Dolev 4press - Installation
Unpack
Reminder: Handle all packing
materials with care. These materials will be used again if you should need to transport
the Imagesetter in the future.
Before you begin unpacking the Imagesetter, ensure that the
unpacking site is large enough to allow easy maneuvering of the Imagesetter. For example,
check the following:
- Available radius for lifting and/or turning the Imagesetter
- Doorway clearance
Checking for Damage
Check that the shipping container is undamaged. Do not proceed with
the installation if it is damaged in any way. Notify the shipping agent immediately.
A shock indicator has been attached to the outside of the
Imagesetter shipping container. This instrument is used to indicate whether excessive
shock was encountered during shipment (for example, if the container was dropped). Examine
this instrument. The following figure shows how to read the gravity shock indicator.
Gravity shock indicator

If the shock instrument is missing, or indicates that the
Imagesetter has experienced an excessively large shock, do not proceed with the
installation. Notify the shipping agent immediately.
Precautions
Observe the following precautions before unpacking:
- Do not unpack the Imagesetter in extreme heat or cold (above 30°C or
below 0°C).
- If there are any signs of ice on the machine, do not touch any of the
mechanical parts. Wait 24 hours (preferably 48 hours) for the Imagesetter to gradually
reach room temperature.
- Do not unpack the Imagesetter in a non air-conditioned room during
very humid weather.
The following parts are shipped along with the Imagesetter:
- Packet containing configuration documents
- Film Loading Cassette
- Film Unloading Cassette
- Four (4) Imagesetter Floor Skirts
- Accessory Pouch containing film trimmer, two (2) interlock keys,
extra fuses
- Power Cord
Do not proceed with the installation unless all of the above parts
are present.
REMOVING THE IMAGESETTER
 A minimum
of three technicians is required to lower the Imagesetter from its
pallet.
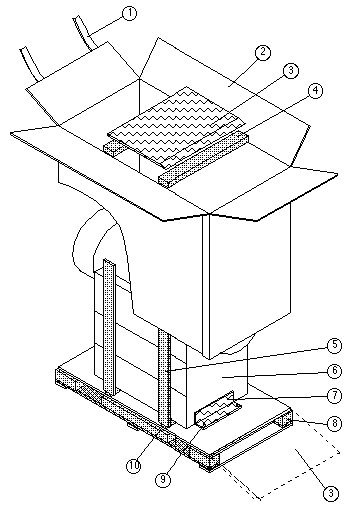
The figure below (Unpacking the imagesetter) depicts the unpacking
process. Refer to this figure to identify the numbers appearing inside brackets in the
text.
Unpacking
the Imagesetter
 Click
to see the full size
- Cut the two plastic bands [1] surrounding the shipment.
- Open the container cover flaps [2].
- Remove the ramp [3] from the top of the opened package.
- Remove the staples that secure the outer container [2] to the wooden
shipping pallet [8] and the wooden shipping bars [5].
- Remove the entire container carton.
- Remove all wooden shipping bars [4] and [5] from the package top and
sides.
- Remove the Imagesetter books and cables.
- The Imagesetter [6] is secured to the shipping pallet by two brackets
[7]. Remove the four (4) bolts and washers [9] from these brackets.
- Lift the Imagesetter off the shipping pallet planks [10], located
under the machine. Three technicians are required to perform this and the following steps.
- Place the ramp [3] at one of the short ends of the shipping pallet,
as shown in the following figure.
- Two technicians should stand at the side closest to the ramp. One
technician should stand at the opposite side of the Imagesetter.
- The single technician should gently push the Imagesetter down off the
shipping pallet via the ramp while the two remaining technicians control its descent. At
all times, grasp the Imagesetter at its middle or at its base.
 Do not
attempt to push or lift the Imagesetter by the cylinder-shaped upper
part of its access doors.
- Carefully roll the Imagesetter into its final location at the site.
Handle all packing materials with care. (These materials will be used again should you
need to transport the Imagesetter in the future.)
|

