Dolev 4press - Installation
Peform Loading/Unloading of Film
This section explains how to remove the Loading Cassette, load film
into it, place it back in the Imagesetter, and trim the film.
The following section explains how to place the
Unloading/Accumulating Cassette in the Imagesetter, and update the Media Info table.
The next section describes the exposure process, and the actions
that may be taken during it.
The last part of the section explains how to remove the
Unlaoding/Accumulating Cassette, and process the film.
Before starting, make sure the following conditions are met:
- The Imagesetter is powered-on.
- Both the Film Loading and Film Unloading drawers are open.
 Both drawers
open automatically If the Loading Cassette contains no film, or
if you requested Change Media on the Control Panel. If one of the
drawers is closed, use Open Load Drawer or Open Unload Drawer on
the Control Panel (see Control Panel Functionality further on).
- The NOT READY message appears on the Control Panel
(refer to Introduction to the Imagesetter).
The Film Path selector determines whether the exposed film is output
to the Film Unloading cassette or to the inline processor.
BEFORE STARTING TO EXPOSE, PROCEED AS FOLLOWS:
- Open the left service door.
The Film Path selector is located below the cutter.
Film Path selector
(set for Accumulating Cassette)
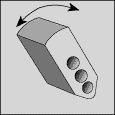
- To direct the exposed film to the Unloading/Accumulating Cassette,
turn the selector to the left (i.e., counter-clockwise).
- To direct the exposed film to the inline processor, turn the selector
to the right (i.e., clockwise).
Since the selector is arrow-shaped, it points to the selected output
device (i.e., to the Film Unloading cassette or to the inline processor)
Overview
When the Loading Cassette runs out of film, the Control Panel
prompts End of Film, and the Loading drawer opens.
The loading film procedure consists of the following stages:
- Removing the Loading Cassette out of its Drawer.
- Loading a Roll of Film into the Loading Cassette.
- Placing the Loaded Cassette in its Drawer.
- Trimming the Film.
Removing the Loading Cassette out of its Drawer
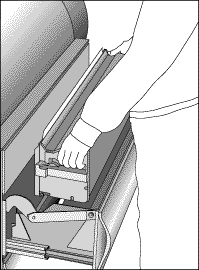
- Pull the Film Loading drawer to open it to its full extent.
- Grasp the Loading Cassette by the inset handles on both its sides.
To avoid
hurting your knuckles, keep your fingers straight.
- Lift the cassette, and remove it out of the drawer.
Removing the Loading
Cassette out of its drawer
Loading a Roll of Film into the Loading Cassette
Overview
Be sure to load film under the appropriate lighting conditions
(i.e., depending on the type of film).
Load only emulsion-out films.
- Clear sufficient space on a dry tabletop in the darkroom.
- Place the Loading Cassette on the table with its two (2)
spring-loaded tabs (A) facing upward.
Position the cassette so that the tabs are closest to you.
The Loading Cassette
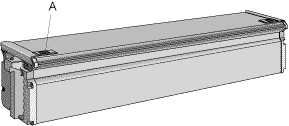
- Push the tabs toward the center and lift the cover.
- Lift the film spool to remove it from the cassette, and place it on
the table.
A flange is attached to each side of the film spool, namely, the
left flange and the right flange.
A different flange is attached to each side of the film spool,
namely, the left flange and the right flange (see Handling the Left Flange and Handling
the Right Flange below).
Handling the Left Flange
- Situate the left flange at one of the following positions:
- Nearer to the middle of the spool if side punches are
not installed (by default, the flange is set to this position) (A).
- Nearer the end of the spool if side punches
are installed.
- To adjust the flange, press on its inner part, and move it
to the appropriate position (B).
- When the flange is at the desired position, release its
inner part to lock it into position. Attempt to move the flange slightly to ensure that it
is locked in position.
Handling the Right Flange
- Press on the inner part of the right flange (B) and move it until it
is detached from the spool.
- Insert the spool into the film roll so that the roll rests on the
inner part of the left flange.
- Attach the right flange to the opposite side of the spool.
- Press on the inner part of the right flange and move it to the Film
Width groove nearest to the edge of the film roll.
The position of the right flange affects the representation of the cassettes on the
Control Panel.
Attaching the right flange
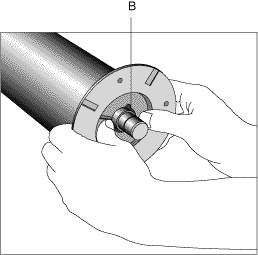
- When the flange is at the desired position, release its inner part to
lock it into position.
- Attempt to move the flange slightly to ensure that it is locked in
position.
- Insert the loaded film spool into the Loading Cassette, film emulsion
facing upward (A).
Inserting the film spool
into the Loading Cassette
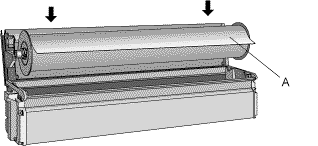
- Rest the film spool ends in the V-shaped channels on both sides of
the cassette.
- Pull at least 50 mm (2 inches) of film so it extends beyond the edge
of the cassette.
- Close the cover of the cassette until it locks soundly with a click.
To make sure
that the cover is closed, push the tabs toward the sides of the
cassette.
- Turn the cassette to grasp it by the inset handles on both its sides.
- Exit the darkroom.
Placing the Loaded Cassette in its Drawer
- Pull the Film Loading drawer to open it to its full extent.
- Grasp the Loading Cassette by the inset handles on both its sides.
To avoid
hurting your knuckles, keep your fingers straight.
- Place the loaded cassette in the Film Loading drawer so that its tabs
face the Imagesetter, and the film exits from the top of the cassette.
Placing the Loading
Cassette in its drawer
- Rest the cassette should against the rear side of the Film Loading
drawer (the side furthest from you).
Trimming the Film
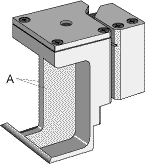
The special film trimmer is included in the Accessories kit. Note:
Apart from the trimmer, the kit includes two (2) interlocks and four (4) fuses.
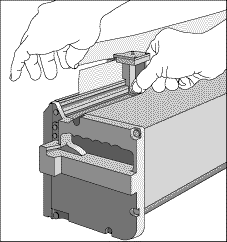
- Grasp the edge of the film with one hand.
- Hold the trimmer (A) with two (2) fingers (of your other hand).
Film trimmer
- Place the trimmer on the left side of the film, and slide it to the
right along the width of the film.
To make sure
that trimming is straight, hold the trimmer steadily, and push it
downward.
Trimming the film
- Close the Film Loading drawer. Push firmly until it clicks shut.
Overview
If the Unloading/Accumulating Cassette is already in its drawer,
check whether it contains film. If it does, skip to the Unloading Film section; if not,
close the Film Unloading drawer and push it firmly until it clicks shut; then skip to the
Updating the Media Info Table section.
This section includes the following topics:
- Placing the Unloading/Accumulating Cassette in its Drawer.
- Updating the Media Info Table.
- Reading Settings from the Imagesetter.
Placing the Unloading/Accumulating Cassette in its Drawer
- Hold the Unloading/Accumulating Cassette by the inset handle at its
top center.
- Place the cassette in the Film Unloading drawer.
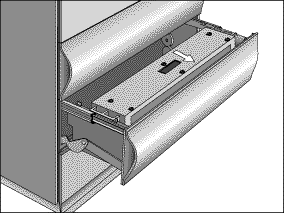
Placing the Unloading/Accumulating
Cassette in its drawer
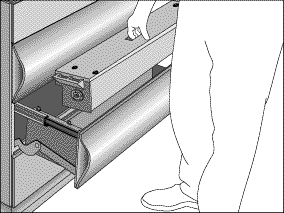
- Rest the cassette against the front side of the drawer (i.e., the
side closest to you).
Unloading/Accumulating Cassette
resting against the front side of the drawer
- Close the Film Unloading drawer. Push firmly until it clicks shut.
Updating the Media Info Table
This feature is sometimes referred to as the Touch Memory Table.
After you close the Film Loading drawer (while the Film Unloading
drawer is already closed), the Media Info window is displayed on the Control Panel’s
LCD screen.
Alternatively, select Film: Media Info on the Control Panel (refer
to Control Panel Functionality below).
Media Info window
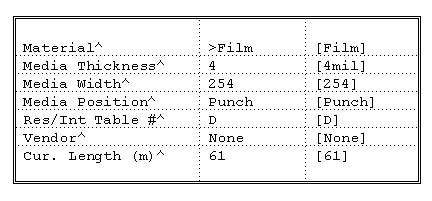
The Media Info window shows the parameters of the Media Info table
of the currently loaded film.
The system uses this data to inform you of the status of the
cassettes during exposure. Therefore, each time you load film, you need to check the
values in the table, and modify them to suit the film you loaded.
- To update a parameter, press the soft button below Toggle. This
switches between available options.
- When you wish to confirm the values and exit, press the soft button
below Done.
A First Feed is performed and the new film is loaded into the
Imagesetter drum. When the Imagesetter completes the first load, a Standby message is
displayed on the Control Panel.
MEDIA INFO WINDOW FIELDS
Material
[toggle field; default is Film] |
Toggle this field to Film (the
default), Plate, or Paper, according to the media you loaded. |
Media
Thickness
[toggle field; default is 4 (mil)] |
Toggle this field to 4 mil (the
default) or 7 mil, according to the media you loaded. |
Media
Width
[toggle field; default is 254 (mm)] |
Toggle this field to the width of
the media you loaded. |
| Media
Position |
Toggle this field to No, Cnt
Punch [toggle field;default is Punch] (center), or (side) Punch (the default), to match
the way you positioned the media inside the Loading Cassette (i.e.,unrelated to the
existence or the absence of a punch). For details, see Handling the Left Flange above. For example: If you have positioned the
media in order to accommodate built-in side punches, toggle the field to Punch.
The position of the left flange affects the representation
of the cassettes on the Control Panel. |
Res/Int
Table #
[toggle field; default is D] |
Toggle this field to D (the
default) to automatically select a Res/Int table to suit the vendor (i.e., if such is
indicated in the Vendor field). If the loaded film
is not of the same type as the one previously loaded, toggle this field to the appropriate
Res/Intensity table number. |
Vendor
[toggle field; default is None] |
Toggle this field to None (the
default) in order to use the table specified in the Res/Int Table field. Toggle this field to the name of the vendor of the loaded media to
use the Res/Int table that is specified in the Res/Int Table # field.
Note: If the Res/Int Table specifies D, the system automatically selects
a Res/Int table to suit the specified vendor. |
Cur.
Length (m)
[default is 61] |
The default (61 m) specifies that
the loaded film is a full roll. If you did not load a full roll of film, toggle this field
to its current length (in meters).
Note: If the required value falls between suggested options, select a higher
value.This is the only field that updates during
exposure. |
Reading Settings from the Imagesetter
The first time you load film into the cassette, and each time you
change any of the parameters in the Media Info table, you need to read the Plotter Setting
directly from the Imagesetter.
Proceed as follows on the PS/2* Host:
- Select Set Up from the Utility strip.
- Select I/O Devices from the Set-Up menu.
- Select Plotter Setting from the I/O Devices submenu.
The PS/2* Host connects with the Imagesetter. When connection has been established, the
Plotter Setting menu appears.
- Select Machine and then 4) Get Params from Plotter. This sends the
current Imagesetter settings to the PS/2* Host.
- Type E and press <Enter> until you exit the Plotter Settings
menu.
Overview
After you press the Done soft button on the Media Info window, FIRST
LOAD and ATTACH are performed (see Control Panel Functionality, Other below). Standby
appears on the Control Panel.
- Now is the time to send the file you wish to expose from the Host on
the Imagesetter.
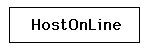
- After communication between the Imagesetter and the Host has been
established, the Control Panel prompts:
- The Imagesetter starts to expose, and the following icon appears on
the Control Panel:

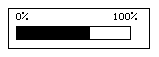
- The Progress indicator on the Control Panel shows how much exposing
has been completed.
- During exposure, you may view the system messages or the exposure
parameters (refer to Control Panel Functionality, Params below).
- When the exposure has been completed, the carriage returns to the
HOME position (i.e., the left side), the Imagesetter performs ADVANCE (according to the
size of the file), and Standby appears on the Control Panel.
- At this stage, you may perform various functions (e.g., Cut &
Collect or Change Media). For details, refer to Control Panel Functionality, Film below.
Control Panel Functionality
Params
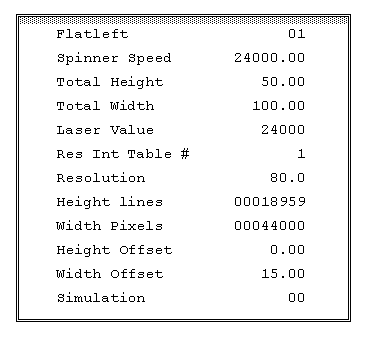
Press the soft button below Params to view the parameters of the
last/current exposure that the Host sent to the Imagesetter.
The Params screen appears.
Params screen
- To return to the previous screen, press the soft button below Params
again.
or
- To activate Status or Film, press the related soft button.
Params screen FIELDS
All the fields are read-only fields (i.e., you cannot enter values
into them).
All the parameters refer to the last/current exposure.
| Flatleft |
This field indicates how may files, related
to the flat
batch, still have to be exposed. |
| Spinner speed |
This field indicates the speed of the spinner
in rpm. |
| Total Height |
This field indicates the height of the
exposed file. |
| Total Width |
This field indicates the width of the exposed
file. |
| Laser Value |
This field indicates the laser intensity
value of the exposure. |
| Res Int Table # |
This field indicates the number of the Res
Intensity table. |
| Resolution |
This field indicates the resolution of the
exposed file. |
| Height lines |
This field indicates the height (in lines) of
the exposed file. |
| Width Pixels |
This field indicates the width (in print
dots) of the exposed file. |
| Height Offset |
This field indicates the height offset (in
mm) of the exposed
file as measured from the origin of the film. |
| Width Offset |
This field indicates the width offset (in mm)
of the exposed
file as measured from the origin of the film. |
Simulation
[for service
engineers only] |
This field indicates 00 for no simulation, 01
for communication
simulation, 02 for ready simulation, or 03 for ELOP SIM simulation. |
Util
Overview
Press the soft button below Util to perform various functions
related to the exposure media, and to get information on the media and the detectors. The
Util menu and the Util soft Functions appear.
Util menu
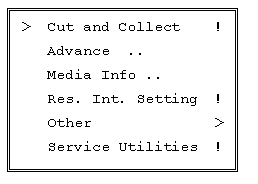
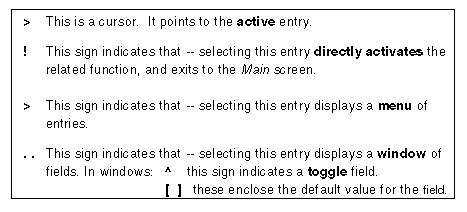
Do one of the following:
- Press the soft button below Done to select the entry to which the
cursor points.
- Press the soft button below Scroll to move the cursor to the entry
below the active entry.
- Press the soft button below Cancel to exit to the previous screen.
Selecting Service Utilities activates Service Utilities mode.
Util Soft Functions

| Cancel |
Press the soft button below Cancel to return
to the previous screen. |
| Toggle |
Press the soft button below Toggle to switch
between the values available for the toggle field in which the cursor is located (e.g.,
the Vendor field in the Media Info window). Note: While a menu is displayed, this soft
button is identical to Scroll. |
| Scroll |
Press the soft button below Scroll to move
the cursor to one (1) menu entry (or window field) below the active one. Note: Since no
button moves the cursor upward, the scrolling is cyclic (i.e., pressing the Scroll button
when the last entry/field is active moves the cursor to the first entry/field). |
| Done |
Press the soft button below Done to select
the active entry when a menu is displayed (and display the related menu/window), or to
confirm the current values when a window is displayed (and exit to the previous window). |
Util Menu Entries
| Cut and
Collect ! |
Select this entry to cut the film, and
perform a regular film unloading cycle (after which the Film Unloading drawer opens).
Note: This is identical to toggling the Unload After Job field in the
Plot Defaults form to Yes. |
| Advance
. . |
Select this entry to move the film forward
(e.g., to create a gap between the margin of the exposure and the edge of the film).
- If you are using an inline processor, select this entry to
send the film to be processed.
The Advance window appears.
- Toggle the Film Length field to 100 mm, 200 mm, 300 mm,
400 mm,500 mm, or 600 mm. Note: If you are using an inlineprocessor, toggle this field to
300 mm, 400 mm, or 500 mm.
|
| Media
Info . . |
Select this entry to update the parameters of
the media after loading a new roll of film. For details, refer to Updating the Media Info
Table above. |
| Res.
Int. Setting ! |
Select this entry to calibrate the intensity
for each plotting resolution. |
Other >
Select this entry to replace the media before it reaches its end and
to perform actions that are normally performed automatically (some of which you need when
clearing stuck media)
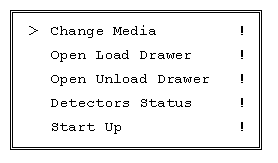
| Change
Media ! |
Select this entry to replace the
media before it reaches its end. In case the
Unloading/Accumulating Cassette contains media,Cut and Collect is performed automatically.
The Imagesetter thenpulls the media (that is in the drum) back into the Loading
Cassette(i.e., Empty Drum), and opens the Film Loading and Film Unloadingdrawers.
- Pull the film beyond the edge of the cassette until you feel
resistance, and trim it (refer to Trimming the Film above).
|
| Open
Load Drawer ! |
Select this entry to manually
open the Film Loading drawer.
The system prompts:

- Press the soft button below Done to open the drawer, or
the one below Cancel to abort the request.
- When relevant (e.g., during Expose), the system prompts:
Process is not available.
|
| Open
Unload Drawer ! |
Select this entry to manually
open the Film Unloading drawer.
The system prompts:
- Press the soft button below Done to open the drawer, or
the one below Cancel to abort the request.
- When relevant (e.g., during Expose), the system prompts:
Process is not available.
|
| Detectors
Status . . |
Select this entry to display a
window that lists the names of the
detectors, and indicates which are active (i.e., Yes) and which are
inactive (i.e., No).
The Detectors Status window appears. |
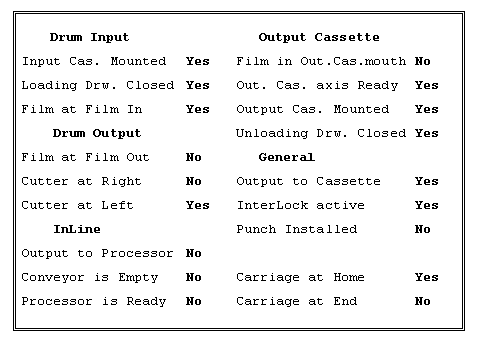
- To exit to the previous screen, press the soft button that is first
on the left.
| Start
Up ! |
Select this entry to load the
Imagesetter’s software, starting from StartUp stage #7 (i.e., the hardware boards are
not reloaded). |
Overview
When the Accumulating Cassette collects approx. 21 m of film, the
Control Panel prompts: C: [W] Acc. Cas full (# m). Note: The # stands for the length of
film that may be exposed before the Imagesetter performs CUT. When the Accumulating
Cassette is full (i.e., it accumulated 23 m of film), the film is cut, and the Unloading
drawer opens automatically.
To cut the film and open the drawer following the end of a specific
exposure, select Cut & Collect on the Control Panel (see above) or Cut & Unload on
the Plot Defaults form.
Selecting Change Media or Open Unload Drawer on the Control Panel
(see above) also opens the Unloading drawer.
Removing the Accumulating Cassette out of its Drawer
- Pull the Film Unloading drawer to open it to its full extent.
- Hold the Unloading/Accumulating Cassette by the inset handle at its
top center.
- Lift the Unloading/Accumulating Cassette out of its drawer.
Lifting the Unloading/Accumulating
Cassette out of its drawer
Processing the Film
- Take the Unloading/Accumulating Cassette to the darkroom
film processor.
- Check that a flap of film is sticking out (B) of the
cassette (if it does not, refer to Media-related Troubleshooting).
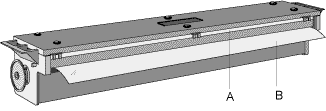
- Flip the cassette around so that the film flap sticks out of
the bottom of the cassette and away from you.
- Rest the cassette on the film processor entry bed.
- To release the film, press on both sides of the Film Gate
(A) until it catches with a click.
- Use your fingers to slowly advance the film toward the
processor take-up roller, until the processor begins feeding the film automatically.
|

