Dolev 4press - Installation
Create Excurve & Home Formats
This section explains how to create and use Excurves on the Dolev PS
workstation.
An EXposure CURVE is a Look-Up table that ensures that color data
exposed on film is as accurate as possible in relation to images processed or created on
the system.
An Excurve (EXposure CURVE) is a Look-Up table (LUT).
It ensures that color data exposed on film is as accurate as
possible in relation to images processed or created via the system.
The purpose of the Excurve is to optimize exposure results.
It eliminates inconsistencies between the desired exposure results
and the results you are seeing on film.
The table accounts for the type of film, amount of light and the
particular film development chemistry used. The curve guarantees you a resolution, dot
shape, mesh and developing process identical to those used when exposing actual production
files.
Overview
This section describes the procedure for creating and testing an
Excurve on a Dolev PS workstation.
To optimize results, you expose a sample file using a chosen Plotter
Format and measure the results. The sample file is a strip of 21 gray levels arranged from
0% to 100%. You correct the problems on a form and repeat the process.
The Excurve is the table you build from the results of your sample
file. It compares the measured results on film with the value you set.
Whenever changes occur in the development process, you need to check
if your Excurve is still accurate.
Perform the following steps to create and test an Excurve:
- Convert and expose the grayscale file provided in the Job/Page
PUBLIC/TABLE under real exposure conditions.
Use a new/existing Plotter Format that does not have a defined Excurve.
- Measure the received values with a densitometer.
- Create the Excurve and add the measured values.
- Associate the Excurve with a Plotter Format; expose the CT/LW
concerted from the grayscale again, and measure the values with a densitometer.
The following procedure describes how to build a positive Excurve.
Refer to Negative Excurves for Instructions for creating a negative Excurve.
Convert and Expose the Grayscale File
A grayscale is a strip made up of 21 areas. The top left area has a
value of 0%; the bottom right area has a value of 100%. The areas change by increments of
5%.
A grayscale (PS type) file is provided in the Job/Page PUBLIC/TABLE.
Scitex
Grayscale File
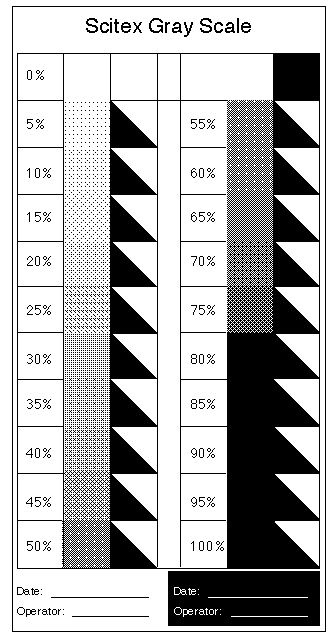 Click to see the full size
For high-definition printing and FULLtone screen,
you may need to create a file with more areas. Refer to the CreoScitex
PS RIP User Guide for details on how to create a vertical strips file,
or create such a file on the Macintosh and transfer it to the Host
PS/2* to be converted.
EXPOSING THE GRAYSCALE FILE
- Select the Job: PUBLIC and Page: TABLE from the Library list.
- Select Start Work from the Library menu. Select the PS file called
grayscale.
- Select Convert from the PS Options menu which appears.
- On the PS Defaults & Configuration form which appears:
Toggle the Destination field to Plotter.
Toggle the Set Size field to Bounding Box.
To calibrate the Excurve by CT values, set the LW Res field to 0 and the CT Res field to
12; to calibrate by LW values, set the LW Res field according to your requirements, and
use the default CT resolution value.
Press <F2> (Dest. Params).
- Enter the following on the Plot Defaults form which appears:
ä In
the Format Name field, enter the name of the Plotter Format to be used to expose the
grayscale file.
ä In
the Separations field, enter C (Cyan), since this is the only separation you need to
expose.
ä Press
<F1> (Submit to Q).
- After the system prompts that the grayscale file has been
successfully converted and exposed, develop the exposed film.
Measure the Values with a Densitometer
Basic knowledge of using a densitometer is assumed. Before
beginning, make sure that your densitometer reads 0 when positioned on a transparent area
of your film. If it does not, you need to reset it. Since a difference of up to 2% is
considered noise, reset the densitometer on a 2% area before starting to measure.
- Use the densitometer to measure the density of the darkest area on
your exposed film.
If the density reading falls in the Dmax range recommended by the
film manufacturer, you may proceed. If not, the laser intensity of your Imagesetter needs
to be adjusted and the grayscale file re-exposed.
- Measure the dot percentage values of all 21 areas on the Cyan
separation. Write the measurements directly on film using a felt-tipped pen.
Create the Excurve and Add the Measured Values
Overview
- On the Library screen, select Set Up from the Utility strip.
- Select I/O Devices from the Set Up menu. The I/O Devices submenu
appears.
- Select Correction Tables from the I/O Devices submenu.
The LUT Tables Main Menu appears.
The form lists the names of all the existing Excurves and
Reproduction curves.
LUT Tables Main Menu SOFT KEYS
| Exit <F1> |
Press this key to exit to the Library screen. |
| Delete <F3> |
Press this key to delete a LUT.
The LUT TABLES (Delete) form which appears lists the existing LUTs.
Enter the name/number of the LUT you wish to delete, and press <Enter>. Select Yes
on the message which appears to confirm the delete action, or No to cancel the request.
Press <F2> (Modify/Create) to return to the LUT Tables Main Menu. |
| Rename <F4> |
Press this key to rename a LUT.
The LUT TABLES (Rename) form which appears lists the existing LUTs.
In the Old Table Name field, enter the original name/number of the LUT you wish to rename,
and press <Enter>.
In the New Table Name field, enter the destination name/number for the LUT you wish to
rename, and press <Enter>.
Press <F2> (Modify/Create) to return to the LUT Tables Main Menu. |
| Copy <F5> |
Press this key to copy an existing LUT.
This option is generally used to build a new LUT so that the duplicated LUT is used as a
basis for the new LUT.
The LUT Tables (Copy) form which appears lists the existing LUTs.
In the Old Table Name field, enter the name/number of the LUT you wish to copy, and press
<Enter>.
In the New Table Name field, enter the destination name/number for the LUT you wish to
copy, and press <Enter>.
Press <F2> (Modify/Create) to return to the LUT Tables Main Menu. |
| Next <F6> Prev <F7> |
Up to 40 LUTs can be listed on each screen.
Press <F6> (Next) to display the next screen of LUTs. Press <F7> (Prev), which
then appears, to display the previous screen of LUTs. |
CREATING THE EXCURVE
- Enter a new name in the Enter Table Name or Number field (e.g.,
JJOHNS) and press <Enter>.
Since, at this stage, you cannot differentiate between Excurves,
Film Reproduction curves and Manual Tone Reproduction curves, it is recommended to add to
the name you enter a prefix (for example, EX) that indicates the type of file.
The Table Name form appears.
- Toggle the Table Type field to Excurve.
- Toggle the Curve Type field to Smooth (for more accurate results).
- If desired, enter a comment in the Comment field (e.g., the type of
film used).
- Press <F3> (List/Modify).
The Excurve - List of Points form is displayed.
Although the form is empty of values, the system automatically
assigns Measured Values 0% and 100% to File Values 0% and 100% respectively (for all
separations).
Adding New Points
- For each dot percentage area on the film of the exposed grayscale,
enter the value of the file on the left column in the form (i.e., File Value) and the
value actually measured with the densitometer on the right column(s) (i.e., Measured
Values). Note: Start with 5% and continue up to 95%.
To enter the same value for all separations, press <Enter> after entering one (1)
value; separate different values with a comma (,) or a space.
- Enter up to 15 file values.
The system automatically arranges the lines so that their values are in ascending or
descending order, and corrects the values slightly.
- After you have filled 15 lines, press <F7> (Next) to continue
to the next screen. Note: For your convenience, the first line on the next screen
indicates the values of the last line on the previous screen.
- To view the new file values, press <F2> (Examine).
The Examine form appears.
- Toggle the Examine field to Final Curve.
- Enter the start value in the From field and the number of steps in
the Step field. Note: The end value is always 100.
The arrangement on this screen is for display purposes only (i.e., it does not affect the
Excurve itself).
- If the table includes more than 17 lines, press <F7> (Next) to
view the next screen.
- Press <F5> (Params) to return to the Table Name form.
At this stage, the Table Type field is informational only (i.e., may not be changed).
or
Press <F3> (List/Modify) to return to the Excurve - List of Points form.
- Press <F1> (Save & Exit) to save the Excurve values, and
return to the LUT Tables Main Menu. The name of the new Excurve and its number is
indicated.
- Press <F1> (Exit) to exit to the Library screen.
Since the names of Excurves do not appear in the TABLES list of
files, to view the list of existing LUTs, enter Correction Tables, as explained above.
Associate the Excurve with the Plotter Format,
Expose the Grayscale File Again, and Measure the Values
In steps 1 through 3 you created an Excurve Table. Now, you can
enter the Excurve name into a Plotter Format. You can then expose a file using the Plotter
Format that uses the specified Excurve.
- Select Set Up from the Utility strip and then I/O Devices. Select
Plotter Formats from the I/O Devices submenu. The Plotter Formats Main Menu is displayed
(for further details, see Plotter Formats below).
- In the Enter Format Name field, enter the name of the Plotter Format
that you used for the first exposure, and press <Enter>.
The Format Name form which appears indicates the parameters of the
specified Plotter Format.
- In the Excurve Positive field, enter the name of the positive Excurve
you created (e.g., JJOHNS), and press <Enter>.
- Press <F1> (Save) and then <F1> (Exit) to return to the
Library screen.
- Expose the CT or LW previously converted from the grayscale file
(i.e., select Start Work with the LW/CT file, and Expose (Plotter) from the relevant
Options menu).
Make sure that the Format field in the Expose form indicates the name of the Plotter
Format that uses the Excurve that you defined.
- Develop the film and measure the values as you did earlier.
The values you measure using the densitometer should match the file
values (tolerate a difference of ±1), because you are using your new Excurve. If this is
not the case, start over again. Unless you have extensive experience with Excurves,
starting over is better than modifying.
Negative Excurves
Negative Excurves must be used to expose negative images.
Do not expose a negative image with a positive Excurve.
It is better to expose a negative image without an Excurve than with
a positive Excurve.
To prepare a negative Excurve perform the following:
- In the Plot Defaults form used to expose the grayscale file, toggle
the Negative field to Yes.
- Convert and expose the grayscale file.
- Set your densitometer to measure negative values. Measure each of the
21 gray areas.
If your densitometer does not measure in negative, you can measure in positive and enter
the (100-value) into the Excurve - List of Points form (e.g., if you measure a 5% area on
a negative gray scale with a positive densitometer, the value reads 95%; enter 5% into the
form).
- Enter these measured values in the Excurve - List of Points form as
described for the positive Excurve.
- Enter the name of this Excurve in the Excurve Negative field in the
Format Name form, and expose files using this Plotter Format.
|

