FCO 510F25994 - replacing DDB-1 with DDB-1-N and updating S/W to 1.00.08
Yaron Soffer
11-Jan-00
Abstract:
The procedure includes the following steps:
Replace the DDB with the DDB-1-N
Update the Lotem Application for new S/W 1.00.08
Change the application setup for VLSI mode
Prior to the procedure
Check that the DDB-1-N has a C.L - L
Backup the Registry & Data Base files on a formatted diskette before
loading this version the new S/W.
Go to the Registry / HKEY_Local_Machine /Software / Scitex /Projects /Lotem
400 and export the registry to the floppy.
Save the Data Base on a floppy diskette as well.
Write down the IP address of the PC controller
Procedure
H/W Replacing the DDB with DDB-1-N
Open the Back door and than the left door
Exit from the Lotem Application and shut down the P.C.
Power off the Lotem by the Main Switch.
From the left door open the L-Box to service mode and open it's back door.
Replace DDB-1 503D2L153S with DDB1-1-N " - Serial number 503D2L695S
like normal replacement.
Updating S/W for new Version 1.00.08
Insert the Application S/W 1.00.08 CD-ROM into the CD drive and turn on
the power for the machine.
Wait for the Lotem setup screen and follow the instructions. (Leave the
Application C.D. in the drive).
Updating to VLSI mode:
Exit from the Lotem application and with the Windows Explorer open the
folder Ddbinst in the Lotem Application C.D.
Double click on the file Instvlsi.bat this will copy the *.hex
and *.rbf files to the hard drive.
Close all doors and open the Lotem 400 application.
Loading the rbf files to the DDB-1-N flash memory:
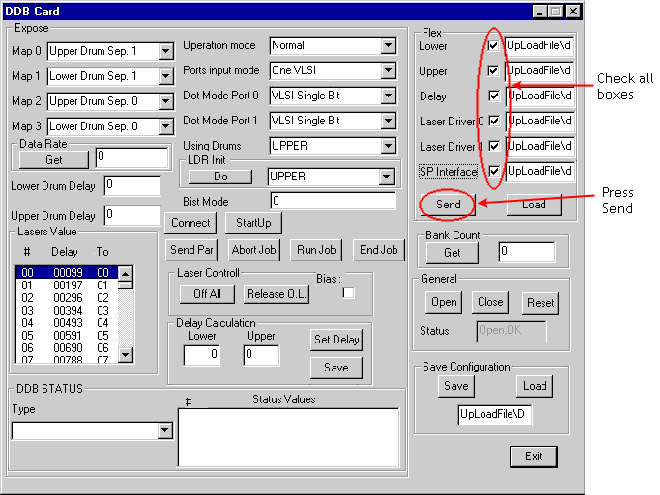
Open the Hardware ® Boards and
double click on the DDB.
The DDB window will appear.
Press and check all rbf files boxes (see figure below).
Press "Send" button and wait until the sand clock is released
(about 3 minuets).
Shutdown the machine and turn off the main power.
Switch on the machine again and start the Lotem application.
The start up will take about 4 minutes for updating the Altera dips
in the DDB-1-N board according to the new files.
Open the Hardware window.
Open the Laser System and click on theLaser Group.
The Laser Group window will appear.
Perform laser calibration to 200 mw and check that all diodes have passed.