

Home | Contact Us | Submit Troubleshooting Info | Search | Help
Output | Software Solutions | Proofing | Color, Screening and Calibration | Scanning | Digital Photography | Consumables | POS
Home | Contact Us | Submit Troubleshooting Info | Search | Help
Output | Software Solutions | Proofing | Color, Screening and Calibration | Scanning | Digital Photography | Consumables | POS

Adding a fifth solenoid to switch on/off the vacuum generator
|
Prepared By: Yaron Soffer |
FCO Kit No.: 510F27039 |
|
Comp. Level: N/A |
Machine S/N: All Lotem 400 w/ MCU Auto Loader |
|
Catalog No. 510V1N168C |
S/W Affected: 1.30.04 and up |
|
Type of Change: Mandatory |
Total Number of Pages:5 |
|
Product Mgr: Yehuda Solomon |
Approval Date: |
|
Product Support: Yaron Soffer |
Approval Date: |
|
Customer Support Mgr: Kuty. Paperny |
Approval Date: |
CSE can order 10 kits
CSA can order 5 kits
CSN can order 0 kits
CSMA can order 0 kits
CSAP can order 0 kits
Please return the old air supply manifold to CSI.
Abstract:
Note: the new manifold works with software version 1.30.04 and up.
This FCO is to shut down the vacuum generator whenever no vacuum in needed.
This FCO will reduce the air supply that the machine needs together with saving the lifetime of the air supply generator.
Additional to the above you will find two fittings for orange tube. You can use them to relocate the Air Filter for the Optic Lens (FUFU) in the inlet of the manifold of the automatic loader (pay attention to connect it to the air supply manifold and not for the vacuum manifold)
The kit should includes the following:
|
Cat Number |
Quantity |
Part name |
|---|---|---|
|
203A10030 |
10 |
MINI CABLE TIE 140MM |
|
344B25800 |
1 |
STR.FIT 8 TO 8 MM |
|
344F10133 |
2. |
HOSE ORANGE OD=8 ID=5mm |
|
507B3D766 |
1 |
MANIFOLD ASSY X 5 |
|
344F10131 |
0.4 m |
HOSE BLUE OD=6 |
|
344B80000 |
1 |
FITTING STRAIGHT 1/8NPT-6MM |
|
344B23105 |
1 |
FITT. FEM 1/4 TO 8MM TUBE |
|
344B81015 |
1 |
FITTING, STRAIGHT 1/4NPT M. 8mm |
|
510V1N168C |
1 |
CD version 1.30.04 |
No special tools are needed
Procedure
Shut down the Lotem 400 w/ MCU .
Close the air supply to the Auto Loader.
Open the bottom panel below the auto loader - two Allen screws on each side.
Undo and remove the Local 3 board by releasing the two screws and pulling upwards the Local 3 box.
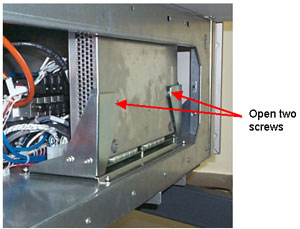
Disconnect the four solenoids plugs (write down on a piece of paper the place of each connector).
Disconnect the air pipes from the manifold and write on each pipe its place.
Undo and remove the two screws connecting the manifold bracket to the frame (you will need to send it back).
Place the new manifold near the vacuum generator (not in the place of the old manifold – see bellow picture) and secure it with the two screws.
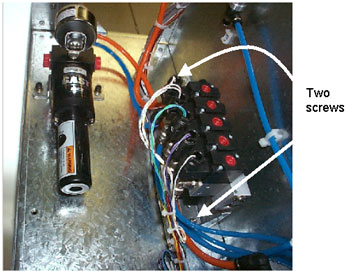
Connect the main air pressure to the new manifold (marked C in the figure
below)
(You can relocate the FUFU air filter in series to this pipe. Pay attension to
the inlet and outlet of the filter)
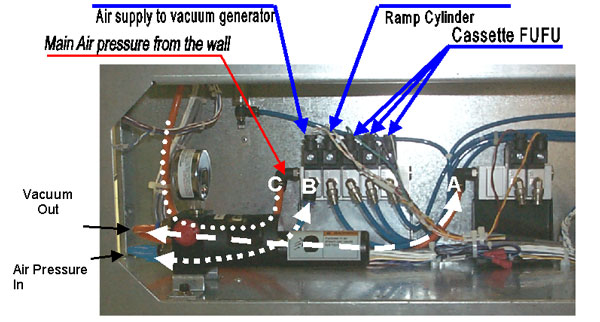
Connect a blue pipe from the vacuum generator inlet to the solenoid (marked as B).
Leave the outlet of the vacuum generator pipe connected - marked A. (it goes to the vacuum manifold shown on the right side of the figure below).
Reconnect the blue air pipes to the manifold with the same order.
Reconnect the manifold plugs for the corresponding pipes.
The additional plug to operate the vacuum generator is placed near all the rest of the plugs. Identify it and connect it to the new solenoid on the manifold.
Install back the Local 3 board and secure it with two screws.
Turn on the air supply and check for linking air (The vacuum generator should not make any noise).
Press on the left red push batten in the new manifold and verify that the vacuum generator get air supply and make noise (small constant air leakage.)
Press on the second left push batten and verify that the Ramp cylinder are operating.
Press on the three right red push button and verify air pressure existing on each cassette.
Start the application.
Select the Hardware, Loading System, Loading Plate To Drum, Valve, and select XY Vacuum Pump.
Select the Start button and verify that the vacuum generator works (a you should hear a small linkage coming from the vacuum generator). Do not close it.
Select the XY Suction Valve, press on the Start and check to have vacuum in the extreme suction cups.
Select the Small Plate Suction Valve press on the Start and check to have vacuum in the inner suction cups.
Select on the Close the XY Vacuum Pump.
Open the Lower Drawer FuFu Valve and switch on the valve. Check to have air pressure in the lower cassette and close the FuFu.
Do the same for the other Middle and Upper drawers.