

Home | Contact Us | Submit Troubleshooting Info | Search | Help
Output | Software Solutions | Proofing | Color, Screening and Calibration | Scanning | Digital Photography | Consumables | POS
Home | Contact Us | Submit Troubleshooting Info | Search | Help
Output | Software Solutions | Proofing | Color, Screening and Calibration | Scanning | Digital Photography | Consumables | POS

|
Prepared By: Yaron Soffer |
FCO Kit No.: 510F27157 |
|
Comp. Level: N/A |
Machine S/N: All Lotem 400 w/ MCU Auto Loader |
|
Catalog No. 510V1N168C |
S/W Affected: 1.30.04 and up |
|
Type of Change: Mandatory |
Total Number of Pages: 6 |
|
Product Mgr: Yehuda Solomon |
Approval Date: |
|
Product Support: Yaron Soffer |
Approval Date: |
|
Customer Support Mgr: Kuty Paperny |
Approval Date: |
CSE can order 10 kits
CSA can order 5 kits
CSN can order 0 kits
CSMA can order 0 kits
CSAP can order 0 kits
Please return the old XY Bar to CSI.
Abstract:
Note: the new XY Bar works with software version 1.30.04 and up.
This FCO is to upgrade the loading system to overcome hardware and software problems:
New XY Bar to solve the scrubbing of the Bar Flag with the paper bin rubber rollers.
New relocated Paper Metal detector with a tilted position.
New Twizer actuator that holds the chain better and save loading time.
|
Cat Number |
Quantity |
Part Name |
Remarks |
|---|---|---|---|
|
203A10030 |
10 |
MINI CABLE TIE 140MM |
For routing the XY harness |
|
507E2D963 |
1 |
VACUUM SYSTEM ASSY |
New XY Bar |
|
298A2P934A |
1 |
VACUUM BAR COVER |
Cover of the XY Bar |
|
290B2T512 |
1 |
CHAIN GUIDE |
New Twizer actuator |
|
380406083 |
3 |
Screw 10/32*5/8 |
|
|
382D13000 |
3 |
Spring #10 |
|
|
203A10010 |
1 |
TIE 370MM |
|
|
381A06002 |
3 |
Nut #10 |
|
No special tools are needed
Move the XY system to a position of X=600, Y=50.
Open the upper door.
Shut down the application and the Lotem machine.
Undo and remove three screws of the XY Vacuum System cover.
Mark the blue pipe that goes to the nearest suction cup. Disconnect two bleu pipes (remove two elbow adaptors).
Remove two screws holding the Chain Belt.
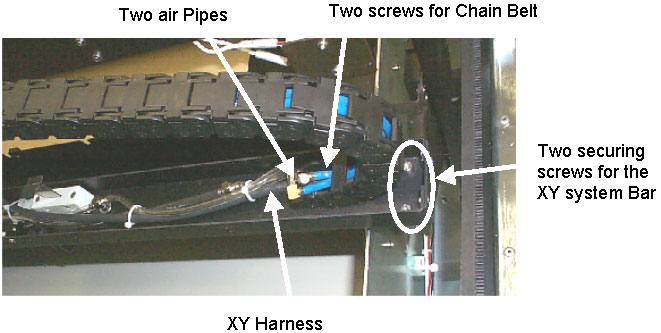
Disconnect the XY harness from the Paper/Metal detector and Bar Flag detector.
Undo and remove two screws on each side of the XY System Bar.
Assemble the new XY Bar and tight it with two screws on each side of the Bar.
Assemble the Chain Bar with two screws.
Connect the two blue pipes (pay attention to connect the marked pipe to the nearest suction cup).
Connect the XY harness to the Bar Flag detector and to the Paper/Metal detector.
Secure the harness with ties to the pipes while verifying that the Bar Flag can move freely and the suction cups can be tilted.
Before closing the XY bar cover, you should adjust the Paper Metal detector according to the procedure bellow.
Close the XY Bar cover and follow the test procedure.
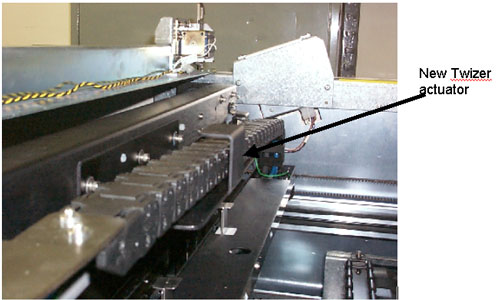
Assemble the new Twizer Actuator using 10/32 “ screws in the new location as shown in the figure bellow (no need to remove the old Twizer Actuator).
Adjust the height of the Twizer Actuator to mach with the XY support Bar
Use a Tie to connect the Chain Belt to the Twizer Actuator.
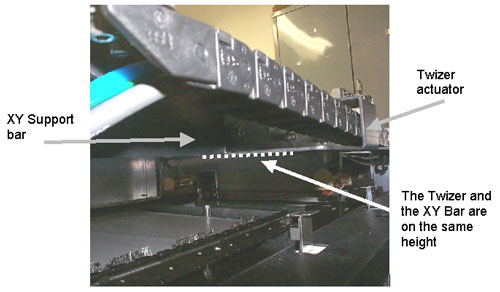
The software version 1.30.02 and up supports only a tilted detector. The detector should be tilted to the tray side and not to the drum side. When detecting a plate the detector status (in the GUI) should be ON, and when detecting paper it should be in OFF state.
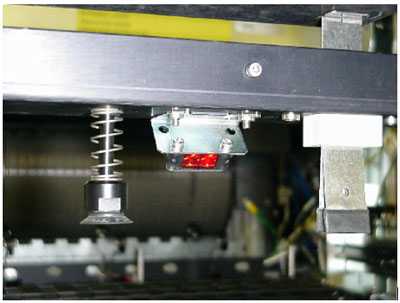
There are two screws on the sensor:
MODE – Dark mode (D) and Light mode (L). In the tilted situation, the detector
mode should be working in L mode.
SENS – Sensitivity adjustment trimmer. Turning the trimmer clockwise increases
the sensitivity.
The detector in the GUI should be in OFF state when facing a paper even when the XY bar is very close to the paper. In the following procedure the sensor is adjusted, to detect the amount of light reflected from the plate. If the detector is in ON status than you should rotate the SENS screw gently until the status changes to OFF and the green light should be blinking. This adjustment will ensure paper detection even when the paper is not flat.
Run the Lotem 400 application version 1.30.02 and up.
Verify that the detector is in the L (Light On) mode.
Under the Loading System/Loading Plate to Drum/Detector, open the Paper/Metal Optic Detector window.
Move the XY Bar manually down until the suction cups touches the plate and the spring starts to shrink.
Adjusting the sensor for Plate (detector state – ON):
The red led should be ON. Rotate the SENS screw until the green led will blink and the detector state will be in ON state.
Move the XY bar upward and check that the detector status stays ON all the way up.
Place a paper in the tray and verify that the detector status is OFF when the XY bar is all the way down. Move the XY bar upward and verify it stay OFF almost all the way up.
Open the Hardware, Loading System
Start the application.
Select the Hardware, Loading System, Loading Plate To Drum Valve and select XY Vacuum Pump.
Select the XY Suction Valve, press on the Start and check to have vacuum in the extreme suction cups.
Select the Small Plate Suction Valve press on the Start and check to have vacuum in the inner suction cups.
Select on the Close the XY Vacuum Pump.
Perform several Loading plates and paper removing to ensure good operation of the machine.