Applies to |
|
Lotem™ 800/400 family (not Quantum) |
Priority = Next visit
Release date = 01 Sep 2002
Type of change = Conditional
|
Component |
|
Light detector
|
Problem |
|
When high-ablation plates are regularly used, plate ablation accumulates on
the optic head lens protector and on the light detector lens. This
accumulation causes a decline in image quality, puts a strain on the laser
diodes, and can cause diode failure. |
Solution |
|
This FCO adds a small lens cleaning brush to the light detector hood.
Each time the carriage moves to and from home position, the optic lens protector
passes over the brush and any ablation (or other debris) that has settled on
the lens protector is brushed off. This prevents the buildup of debris on
the lens protector, and the resultant decline in image quality and diode
function. |
Time needed to
implement |
|
1 hour |
Parts needed |
|
Part Name |
Qty |
P/N |
Light Detector Hood+Brush
Assy |
1 |
507B4E293 |
FCO Document |
1 |
!FCO-DOC |
|
Procedure |
|
This procedure includes the following
sections:
- Checking the lens type
- Removing the light detector hood (cover)
- Installing the light detector hood and brush assembly
- Testing functionality
Checking the lens type
Check the type of lens.
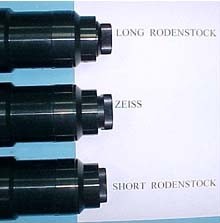
- Long Rodenstock—install short brush
- Zeiss—install short brush
- Short Rodenstock—install long brush
Note: The kit contains both types of brushes.
Removing the light detector hood (cover)
- From the PC Controller, move the carriage to center position (400
mm), and then open the rear door.
- Shut down the machine.
- Disconnect the main power cable, and then disconnect the air pressure.
- Open the rear cover.
- From the rear of the machine, remove the four Phillips®
screws from the light detector hood (cover), and then remove the hood.
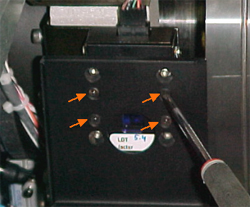
Note: Save two of the Philips screws for later use.
- Verify that the two Allen screws on the spacer on the left side of
the light detector are tightly closed.
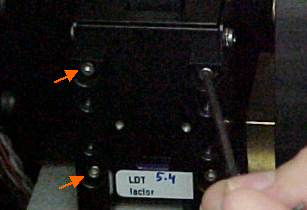
- Remove the two Allen screws from the spacer on the right side of
the light detector, and then remove the spacer.
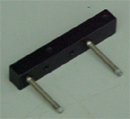
Note: The updated light detector hood and brush assembly
(P/N 507B4E293) includes a spacer as part of the assembly, so you need
to save only the two Allen screws, and not the spacer that you removed.
- Clean the light detector lens using one of the following, dampened
with alcohol:
- Rice paper
- Special lens-cleaning paper
- Q-tips® swab
- Repeat step 8, using acetone instead of alcohol.
Installing the light detector hood and brush assembly
- Install the brush:
- Thread the brush (according to the type of lens) through the slot.
Note: The base of the brush should be on the back
side of the lens.
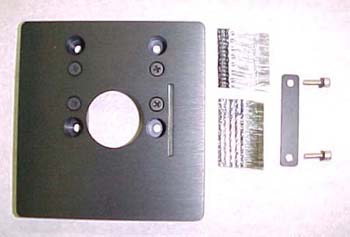
- Remove the sticker from the base of the brush and press the base
of the brush to the back side of the lens.
- Secure the brush to the lens by securing the metal brush holder
(shown above) to the spacer with the two screws, as shown below.
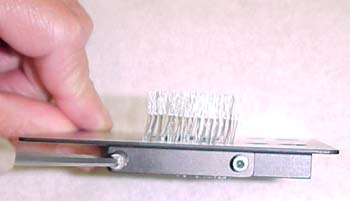
- Put Loctite 242 on two of the Allen screws and insert them into the
light detector hood and brush assembly (PN 507B4E293).
- Attach the light detector hood and brush assembly to the light detector,
and then tighten the Allen screws.
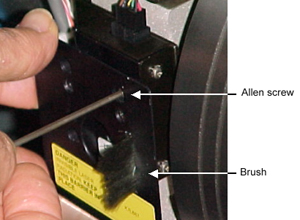
- Secure the left side of the light detector hood and brush assembly
with two of the Philips screws that you removed in step 5 of the previous
section.
- Clean the optic head lens protector using one of the following, dampened
with alcohol:
- Rice paper
- Special lens-cleaning paper
- Q-tip
- Repeat step 4, using acetone instead of alcohol.
Testing functionality
- With the rear door open, turn on the machine.
- Insert cheaters.
- From the PC Controller, move the carriage to home position.
- Watch the optic head lens protector as it passes the light detector,
and verify the following:
- The brush brushes the lens protector.
- The optic head lens protector and the light detector hood do not
touch.
- Remove the cheaters.
- Close the rear cover.
- Turn on the air pressure, and then connect the main power cable.
- Close the rear door, and then turn on the machine.
- Perform laser group calibration.
|
Logistics |
|
Approved quantities:
DU |
Qty |
CAM: |
20 |
CEU: |
20 |
CAP: |
8 |
CJP: |
5 |
CMA: |
5 |
Other: |
|
No Limit: |
|
|
Material Disposition |
|
Dispose of the light detector hood and the spacer that you removed. |
|
Technical
contact |
|
Mario
Amir Product Support Manager: Haim Vaknin
Approval Date: |
Date submitted |
|
01 Sep 2002 |

