Background |
|
The height start image area determines the minimum location on
the drum at which the optic head starts to look for the plate when we
use edge detection. You may need to adjust the height start image area
in the following circumstances:
- When calculating the carriage home position
- After replacing or reinstalling the carriage
- After replacing the thermal head
- When experiencing registration problems
The edge detection system uses the height start image area parameter
to determine the minimum range in which the carriage looks for the edge
of the plate. When the edge of the plate is found, the image exposure
starting point is calculated according to the following formula:
Found Media edge+[Media size - (height)expose parameters]/2.
When you disable the edge detection system, the height start image area
is calculated differently, and determines the default location of the
image offset. The image exposure starting point is calculated from height
start image area +
[Media size - (height)expose parameters]/2.
When you use very wide plates, the carriage may not find the edge of
the plate within the range. The procedure below describes how to set a
wider range to resolve this.
The width start image area determines the distance between
the image and the leading edge of the plate. You may need to adjust the
width start image area in the following circumstances:
- When replacing the thermal head
- When replacing the drum encoder
- When adjusting spoilers and/or registration pins
|
Procedure |
|
Before you begin:
- Expose several files and examine the files to make sure that the image
location is consistent (see step 1).
Note: If the image location is intermittent, it indicates edge
detection problems.
- Disable the edge detection system.
To adjust the height start image area:
- Measure the distance from the left side of the plate to the image
(a) and from the right side of the plate to the image (b) as shown.
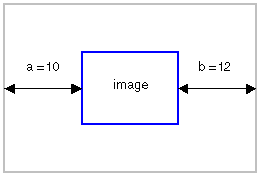
If the two measurements are not equal, adjust the height start image
area.
- To move the image, make the required change in Regedit, in HKEY_LOCAL_MACHINE\SOFTWARE\Scitex\Projects\
Lotem400V\Machine:
- Away from start (0,0)—add half of the difference in the measurements
in step 1 to the value of the Height Start Image Area (mm)
parameter.
- Closer to start (0,0)—subtract half of the difference in the
measurements in step 1 to the value of the Height Start Image Area
(mm) parameter.
In the example, you need to move the image away from start, so you add
1 to the current Height Start Image Area (mm) parameter value:
[current value + 1/2 x (b-a)].
- Restart the Lotem Controller application.
- In Brisque, in the Output Devices Handling dialog box, select the
Lotem platesetter configuration and click Reconfigure.
Brisque reads the data from the device and confirms the connection.
A confirmation message appears and the device data is stored in the
Brisque database. If the connection with the device fails, a failure
message appears.
Important: There is currently no warning mechanism if the device
is disconnected or a component failed.
Note: To find the edge of a very wide plate, in the registry,
select IO Objects\plate edge detection system\wide range search
and change the parameter value from 0 (default) to 1. The carriage
returns to home position (HP) and begins to look for the edge from HP
and on.
To adjust the width start image area:
The width start image area is calculated to start 10 mm from the leading
edge of the plate.
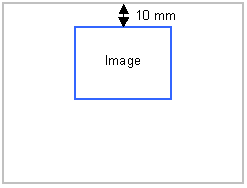
- Measure the distance from the leading edge of the plate to the image.
The correct measurement is 10 mm. If the measurment is not 10 mm, adjust
the Width Start Image Area parameter value.
- To move the image, make the required change in Regedit, in HKEY_LOCAL_MACHINE\SOFTWARE\Scitex\Projects
\Lotem400V\Machine:
- Away from the leading edge—add the difference between 10 mm
and the value you measured in step 1 to the Width Start Image Area
(mm) parameter value.
- Closer to the leading edge—subtract the difference betwen 10
mm and the value you measured in step 1 to the Width Start Image
Area (mm) parameter value.
For example, if you measured a distance of 8 mm in step one, add 2 (10-8)
to the Width Start Image Area (mm) parameter value.
- Restart the Lotem Controller application.
- In Brisque, in the Output Devices Handling dialog box, select the
Lotem platesetter configuration and click Reconfigure.
Brisque reads the data from the device and confirms the connection.
A confirmation message appears and the device data is stored in the
Brisque database. If the connection with the device fails, a failure
message appears.
Important: There is currently no warning mechanism if the device
is disconnected or if a component failed.
|

