Solution
|
|
| Symptom or error message |
Procedure |
|
Vacuum does not grab plate
(MCU)
|
- Verify that air compressor supply is at least 6 bar.
- Check plate position:
- Plate edge is under the side brackets—reposition the
plate inside the cassette.
- Plate is partially out of the cassette—verify that all
suction cups are intact. If any suction cups are damaged, contact
your service representative.
- Plate is half way into the punch—check the leading edge
of the plate for bends or dents. If there are bends or dents,
remove the plate and rotate it in the cassette 180°.
|
Illegal plate size
(MCU) |
- Check whether there is emulsion, residue or dents on the plate
edges. If there is, load new, clean, undamaged plates.
- Verify that the plates are centered properly in the loading
cassette, and adjust if required.
- Measure the plates using a ruler or tape measure, and note the
measurements.
- In the Lotem Controller application, select Settings
> Plate Definitions, and then double-click Media
Definitions. Verify that the plate size is properly defined.
- If the size is properly defined,
contact your service representative.
- If the size is not properly
defined, redefine the media definitions, as described in your
user manual.
For a more in-depth procedure,
see Illegal plate size.
|
Double loading
(MCU) |
Determine where the plates are.
- Cassette to punch area:
- If possible, push the plate back toward the cassette.
- If the plate is stuck, follow the procedure for removing
stuck plates.
- Half onto the drum—follow the procedure for removing
stuck plates.
|
Plate does not reach punch position
(MCU) |
- Check if the plate is centered in the
cassette. Both side brackets should touch the plate sides, and
the rear bracket should be about 1 mm from the plate edge.
- Check plate edges for bends, cuts, or traces of glue. These
can prevent proper function of centering pins. Rotate the plate
180° in the cassette to check whether the plate edge is causing
the problem.
- Look through the cassette entrance toward the punch block unit.
If you see a punch pin the middle of the punch slot, contact your
service representative.
|
| All Lotem 400 |
| Punch is stuck |
- Follow the procedure for removing stuck plates.
If you cannot remove the plate, the punch pin may be in its low
position on the plate.
To release the punch:
- Close the doors of the platesetter.
- In the Hardware tree, select Punch System > Punch Motor
> Punch Motor xx (xx=punch number) > Punch System
Detector > Punch Motor #Home Pos.Det.
Note: The punches are numbered from left to right.
- To determine which punch to release, in the hardware tree, select
Punch System and then double-click Punch System.
- In the Punch System dialog box, select the relevant punch system
and then click the Do Punch button. Try to identify which
punch does not work.
- If you can identify the problematic punch, in the Hardware tree,
select Punch System > Punch Motor, and then double-click
the relevant punch.
- In the Punch Motor #xx dialog box, select EP Det (Cent/Pch),
and then click the Start button. If the Home Position
status does not change to ON, that punch is not functioning
properly.
- If you cannot release the punch, contact your service representative.
|
Illegal gripper width |
- Follow the procedure for removing stuck plates.
- Move all tail grippers to the end of their slots, near the head
gripper.
Note: Make sure not to move the tail grippers beyond the
head gripper holes.
- With a dry cloth, clean the two red LED sensors located on both
sides of the drum frame.
- Verify that the plates are centered properly in the loading
cassette, and adjust if required.
- In the Lotem Controller application, select Settings
> Plate Definitions, and then double-click Media
Definitions. Verify that the plate size
is properly defined.
- If the size is properly defined,
contact your service representative.
- If the size is not properly
defined, redefine the media definitions, as described in your
user manual.
|
Drum did not reach position
or
Load gripper is protected by load gripper protector |
- Verify that all covers and panels are closed.
- Verify that no interlock indicator appears on the monitor, and
that the machine status is not Service. If it is, open
and close the relevant door again.
- Verify that the air compressor supply is at least 6 bars.
- In the Hardware tree, select Loading System and double-click
Loading System.
- In the Loading System dialog box, in the Init area, click
Drum, and then click XY.
|
Removing stuck plates
WARNING: Before trying to remove the plate,
you must read and observe the following precautions:
- Remove objects or clothing that could get caught in the revolving
drum, or in other moving parts. Remove ties and jewelry, fold long sleeves
and gather long hair.
- Switch off the Main Drum Power switch on the distribution box.
- Plate edges are sharp, so do not handle the plate with bare hands.
Wear gloves before trying to release the plate.
- Release the entire plate as one piece. Do not cut the plate. Plate
remnants left in the platesetter can cause mechanical and laser radiation
hazards.
- Dispose of released plates. Do not reuse the plate.
To manually release the stuck plate:
- From the Lotem controller application, use one of the following methods
to open the upper door of the platesetter:
- In Machine Online view, click the rear door.
- From the Routine Functions menu, click Open Rear Door.
- With the rear door open, stand at the rear side of the platesetter
and rotate the drum forward, toward the front of the platesetter, until
you can see the detached edge of the plate that is not held by the tail
grippers.
- Hold the detached edge of the plate and gently pull it toward you,
until you can see the edge of the plate that is held by the head grippers.
- To release the plate from the head grippers, hold both sides of the
plate, left and right, and pull the plate abruptly toward you.
- Verify that the tail gripper did not move.
- If the tail gripper did not move, proceed to step 6.
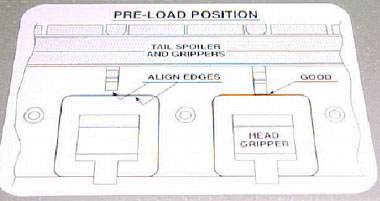
- If the tail gripper moved, return it to Preload position (0), as
follows:
- Drag the tail gripper to the Preload position as shown.
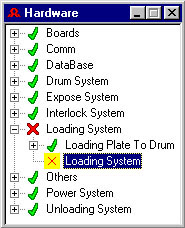
- In the Hardware dialog box, open the Loading System directory,
and then double-click Loading system.
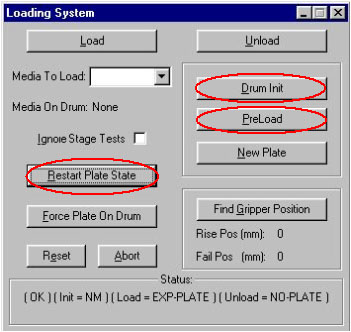
- In the Loading System dialog box, as shown, do the following:
- Click Restart Plate State.
- Click Drum Init.
- Click Pre Load to move the tail gripper to the correct
position according to the defined plate size. The status indicator
shows Ready (blue).
- Close the rear door of the platesetter.
- In the Lotem Controller application, close the Loading System and
Hardware dialog boxes.
- In the Message window, click the Reset button.

- In the Confirm message that appears, click Reset.
Machine status is now Ready, and you can proceed to load the
correct plate size, or continue with the troubleshooting procedure.
|

