Home | Contact Us | Submit Troubleshooting Info | Search | Help


    Output | Software Solutions | Proofing | Color, Screening and Calibration | Scanning | Digital Photography | Consumables | POS


Plate Edges Are Bent, Image Is Skewed with MCU for Lotem 400


Product


MCU for:

  • Lotem® 400
  • Lotem 400 Xpose
  • Lotem 400 Quantum

Symptoms

 
  • Plate edges are bent
  • Image is skewed

Cause

 
  • Plates in the upper two MCU cassettes are not loaded and centered correctly.
  • When reloading, in order not to lose the centering set previously, the operator inserts a stack of plates without opening the centering pins.

Note: A skewed image can occur due to a variety of causes, and not only improper plate loading and centering.


Solution


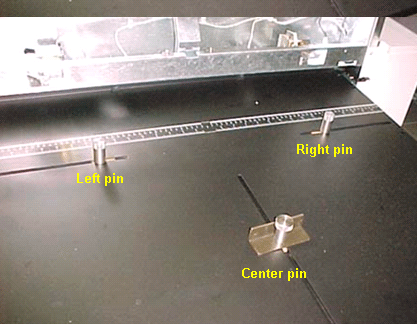
Load, reload, and center plates in the upper two MCU cassettes according the the following procedures:

Loading a new plate size

  1. Before inserting the stack of plates, verify that the left, right, and center pins are positioned far enough away so that they do not touch the stack of plates when you insert it in the cassette.
  2. Insert the stack of plates in the cassette and position it so that it is touching the edge of the cassette.
  3. Center the stack of plates using the ruler.
  4. Move the right pin until it gently touches the plate stack, and then lock the right pin.
    Note: The pins must not exert pressure on the plates.
  5. Move the center pin until it gently touches the plate stack, and then lock the center pin.
  6. Move the left pin until it gently touches the plate stack, and then lock the left pin.

Reloading the same plate size

  1. Unlock and move the left and center pins, but keep the right pin locked.
    Important: This will prevent bent plates and skewed images while allowing you to keep the centering that you set previously.
  2. Insert the stack of plates touching the edge of the cassette and the right pin.
  3. Move the center pin until it gently touches the plate stack, and then lock the center pin.
    Note: The pins must not exert pressure on the plates.
  4. Move the left pin until it gently touches the plate stack, and then lock the left pin.

Technical contact(s)
 

Mario Amir

Submitted by
 

Mario Amir

Date submitted
 

25 May 2005


    Copyright © 2005 Creo Inc. All rights reserved. Confidential. Back to top.