Applies to |
|
Lotem 800 VL
|
Priority: Next
failure
Release date: 14 Nov 03
Type of change: Conditional
|
Problem |
|
The edges of small plates cut the
rollers as they pass through them.
The damaged area on the rollers then scratches the larger plates. |
Solution |
|
By replacing the existing (damaged)
rollers with rollers that have 2 mm less diameter on each side, the pulling
force of the rollers is increased by between 10-30% (depending on the size
of the plate).
|
Time needed to
implement |
|
1 hour |
Parts needed |
|
| Part name |
Quantity |
Part number |
| Roller support II |
2 |
290A5L919B |
| Plart.Bear. ID=¼" L=¼" |
4 |
361C20080
|
| GT3/25 Sprocket for shaft 4.76 |
2 |
290B5L190 |
| Packing label - Wht |
1 |
374A00080 |
| Pres. dowel 1.5 mm x 8 mm H6 Hard.&GR |
2 |
385P70570 |
| Unloading Roller Assy (VL) |
2 |
299G2P250A |
| FLT Washstst#10*.203*7/16*.042 |
2 |
382A13001 |
| Spring L/W STST.#10 |
2 |
382D14000 |
| FCO document |
1 |
719-02637 |
|
Procedure |
|
- In Lotem Controller, open the rear door of the platesetter.
- Disconnect the unloading tray's connectors.
- Remove the 10x32 NC screws, which secure the unloading tray to the
platesetter.
- Remove the tray and place it on a working table.
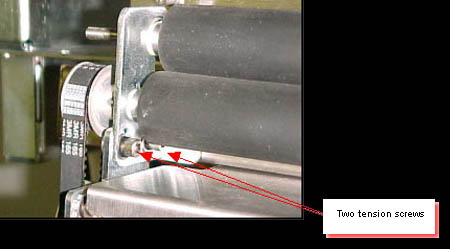
- Release the belt's tension by releasing the two screws on the side,
and then remove the belt:
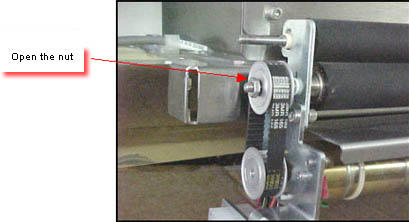
- Use a 3/8" open wrench to release the nut that secures the wheels:
- Remove the sprocket from the old roller shaft.
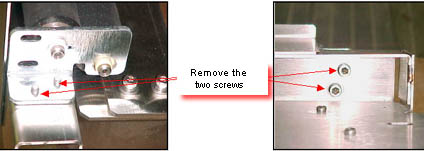
- From the reverse side of the tray, release the two screws connecting
the old roller support bracket and then dispose the bracket:
- Place the white plastic bearing (bushing) on the end of the new roller
axis (p/n 299G2P250A).
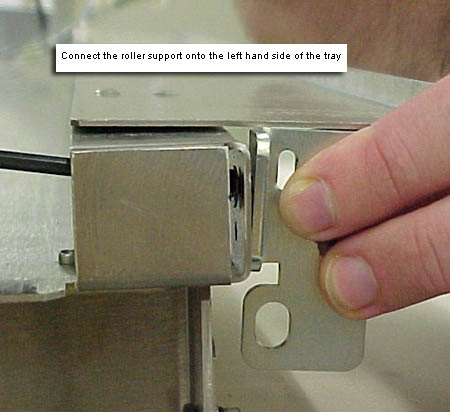
- Connect the new roller support II bracket (p/n 290A5L919B) onto
the left hand side of the tray (not the motor side).
- Place the two new rollers on the left panel support. This facilitates
the connecting of the right hand side bracket (the side with the motor).
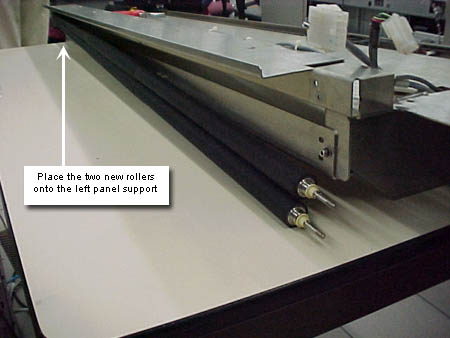
- Assemble the the right hand side roller support II bracket onto the
two rollers, and then connect the tray. Spread Loctite 242 onto the
threads and slightly close (but do not tighten), the screws.
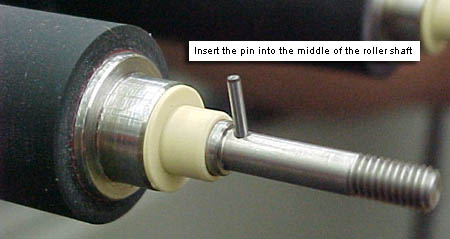
- Put some Loctite 638 onto the pin and insert the pin into the middle
of the roller shaft:
- Place the belt sprocket onto the lower roller.
- Attach the sprocket to the pin located on the roller shaft. Put Loctite
242 onto the roller threads.
- Insert a spring L/W and flat washer and then close the sprocket with
a nut.
- Push the roller bracket towards the center of the tray. This will
reduce the sideways movement of the rollers.
- Tighten the screws.
- Place the E-ring back onto the roller.
- Put the tension belt back onto the sprocket and then tighten the belt
by pushing the motor bracket.
Note: Make sure the motor
is straight before tightening the two screws.
|
When done |
|
- Move the rollers with your hands to make sure all the rollers rotate
freely.
- Reinstall the unload tray onto the platesetter. Close all the screws
with Loctite 242.
- Reconnect the connector to the unload tray.
- Place a cheater on the rear door interlock.
- In Lotem Controller, open the unload motor.
- Activate the motor. Check that the motors rotate easily and quietly.
- Stop the motor.
- Load some plates with differing sizes and thickness.
- Make sure that all the plates easily unload.
- Remove the cheater.
- Close the rear door.
|
Logistics |
|
Approved quantities:
| CSC |
Quantity |
| CAM: |
|
| CEU: |
|
| CAP: |
|
| CJP: |
|
| CMA: |
|
| Other: |
|
| No Limit: |
|
Schedule supplies for first lots:
Inventory:
Lead time: |
Material disposition |
|
Damaged roller support brackets. |
|
Document number |
|
719-02637 Rev B |
Technical
contact(s) |
|
Yaron
Shifman
Product Support Manager: Yaron Soffer
Approval Date: 14 Nov 03 |
Date submitted |
|
14 Nov 2003 |

