Home | Contact Us | Submit Troubleshooting Info | Search | Help
Output | Software Solutions | Proofing | Color, Screening and Calibration | Scanning | Digital Photography | Consumables | POS
Home | Contact Us | Submit Troubleshooting Info | Search | Help
Output | Software Solutions | Proofing | Color, Screening and Calibration | Scanning | Digital Photography | Consumables | POS
Description
Description Improving machine reliability and avoiding roller pressure marks.
|
Prepared By: Itai Peperovich |
FCO Kit No: 510F27651 |
|
Comp. Level: |
Machine S/N: |
|
Catalog No: 502F3D616 |
S/W Affected: |
|
Type of Change: Conditional |
Total Number of Pages: 5 |
|
Product Mgr: Nir Halup |
Approval Date: 03-05-2001 |
|
Product Support: Itai Peperovich |
Approval Date: 20-05-2001 |
|
Customer Support Mgr: Kuty Paperny |
Approval Date: |
1. Reason For Change
1. To add the ability to adjust the unloading rollers air pressure, and to avoid pressure marks.
2. Installing all pressure and vacuum units on one bracket.
3. To add an air pressure valve for future use.
2. Description of Change
1. To replace the existing bracket on which the two vacuum detectors are installed with a new assembly.
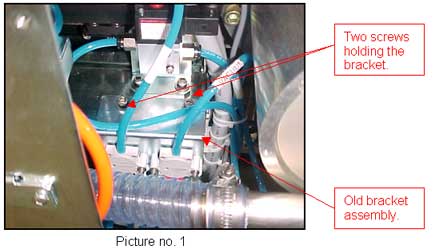
2. The kit includes the following items (see picture no. 1):
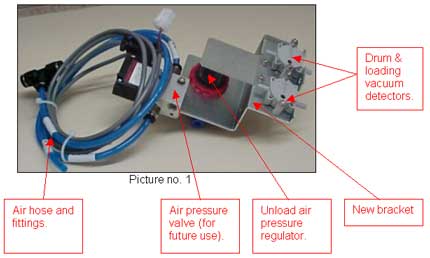
3. To adjust the unload roller's air pressure to 1.5 bar for plates up to 0.3 mm thickness and 2.5 bar for 0.4 mm plates thickness.
3. Change Procedure
1. From the GUI, open the front and right doors.
2. Remove the laser cover.
3. Close the application and shutdown the machine.
4. Disconnect the air pressure supply to the machine.
5. Disconnect the wiring and the two air hoses from the old vacuum detectors.Note: Make sure that the wiring and the two air hoses are labelled, for easy reinstallation to the correct detector.
6. Open the two screws to remove the old bracket (see picture no. 1).
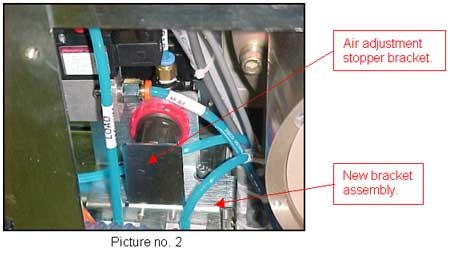
7. Install the new bracket. Use the same screws with loctite 242 (see picture no. 2).
8. Re-connect the drum, loading system wiring and hoses according to the labels on the hoses.
Note: The drum and loading system vacuum detectors are pre-adjusted in the production line.
9. Tie all cables and hoses together. Verify that they are not tightened against sharp edges.
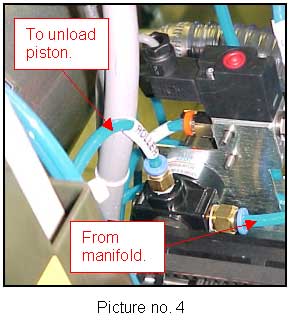
10. Disconnect the air hose which is connected to the upper unload roller piston. Cut the extra hose and reconnect it to the air pressure regulator
(see picture no. 4).
11. Connect one side of the hose you have just cut to the air regulator and connect the other side to the pressure gauge (see picture no. 4).Unload roller air pressure adjustment procedure
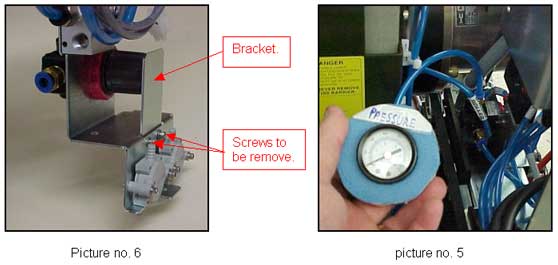
1. Connect the hose from the air regulator to the pressure gauge P/N: 347N22236 (see picture no. 5).
2. Open and remove the two screws holding the bracket. This prevents accessibility to the air regulator adjustment (see picture no. 6).
3. Pull the air regulator knob for adjustment.
4. Reconnect the air pressure to the machine. Verify that the machine pressure regulator on the wall is adjusted to 6 bars.
5. Power up the machine and restart the application.
6. Open the unload roller dialog and operate the valve.
7. Adjust the air pressure to 1.5 bar (if 0.4 mm plates are used adjust to 2.5 bar) by rotating the knob.
8. Push the regulator knob back in place.
9. From the GUI, close the unload roller valve.
10. Disconnect the hose from the pressure gauge. Reconnect it to the upper unload roller piston.
11. Reinstall the regulator bracket with the two screws; use loctite 242.
4. Test Procedure
1. If required, adjust the two vacuum detectors.
2. Load plates of different size and thickness'. Make sure the plates unload properly.
3. Verify that the drum pressure valve works and the air come out of the vacuum holes in the drum.
4. Reinstall the right laser cover.
5. Close the right and front door.
Go back to working status
5. Parts List
|
PART |
QTY |
DESCRIPTION |
|
344B80000 |
1 |
STRAIGHT FITTING |
|
344D58010 |
1 |
"T" FITTING |
|
344F10131 |
1.5 |
BLUE HOSE |
|
391A3L789 |
1 |
RSC BOX 230X185X95 SINGLE WALL. |
|
507A3E885 |
1 |
PRESSURE/VACUUM UNIT ASSY |
|
7!FCO-DOC |
1 |
FCO DOCUMENTS |
6. Attached Documentation
None.
7. Material Disposition
8. Logistics
Approved quantities:
|
CSA |
: |
10 |
|
CSE |
: |
10 |
|
CSAP |
: |
2 |
|
CSN |
: |
2 |
|
CSMA |
: |
2 |
|
Other |
: |
|
| No Limit
|
Schedule supplies for first lots
|
D.U |
Month |
QTY |
Month |
QTY |
Month |
QTY |
|
|
CSA |
: |
|
10 |
|
|
||
|
CSE |
: |
|
10 |
|
|
||
|
CSAP |
: |
|
2 |
||||
|
CSN |
: |
|
2 |
||||
|
CSMA |
: |
|
2 |
||||
|
Other |
: |