

Home | Contact Us | Submit Troubleshooting Info | Search | Help
Output | Software Solutions | Proofing | Color, Screening and Calibration | Scanning | Digital Photography | Consumables | POS
Home | Contact Us | Submit Troubleshooting Info | Search | Help
Output | Software Solutions | Proofing | Color, Screening and Calibration | Scanning | Digital Photography | Consumables | POS
Improve reliability and prevent denting on the plate
Replace existing detector with new one
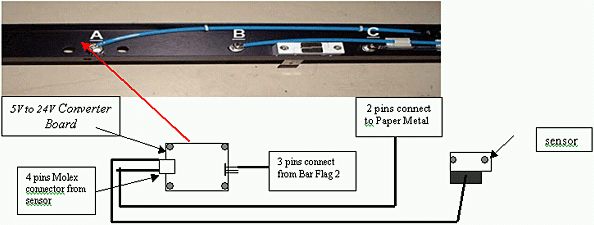
Note: Avoid direct light on the plate or paper during the adjustment
There are two LED’s on the sensor, green and red, to indicate the reading of the sensor.
The “Sens” screw is for sensitivity adjustments.
The “Mode” should be in L position ( “Light On” ).
Open the top cover of the cassette. The front door should be open as well.
Open “Paper/Metal detector” dialog box in the GUI.
- Optic sensor status should be “ON” when it detects a plate. The red led and the green led should lighten up.
- Optic sensor status should be “OFF” when it detects a paper .The green led should be ON and the red led should be OFF. Repeat step 3 with paper to check this.
Note: If you find that the reading is “OFF” for a plate and “ON” for a paper, flip the “Sens” screw 180 degrees. Ensure that there is no interference in the beam way from detector to plate.
Ensure that the sensor indications are correct when the suction cups are 20-30 mm above a plate or a paper.
The optic sensor status depends on the amount of light reflected. It should detect a paper (“OFF”) even when the distance from the sensor to the paper is shorter. Place a peace of folded paper about 10 mm high beneath the sensor when the suction cups are pressed down. If the reading is “ON”, gently rotate the “Sens” screw until the status changes to “OFF”. (This fine adjustment will ensure paper detection when the paper is not flat on the plate).
|
507A3D256 |
OPTIC DETECTOR BOARD ASSY 1 |
|
507A3D257 |
OPTIC DETECTOR ASSY 1 |
|
203A10030 |
MINI CABLE TIE 140MM 8 |
|
380A03041 |
SOC HD CAP STST 6-32*3/8" 2 |
|
382A07001 |
FLAT WASHER STST #6S 2 |
|
382D08000 |
SPRING L/W ST ST #6 2 |
|
FCO DOCUMENT |
1 |
N/A
You can dispose off the old detector.
DU’s should order the following quantities
STA – 60, STE – 60, STAP – 10, STN – 10, STMA - 10