Procedure |
|
- Open the conveyor cover, and remove the DC motor and bracket by
drilling out the four rivets that secure the motor bracket to the
conveyor floor.
Note: Leave the DC motor belt on
the conveyor.
- Remove the unload conveyor detector from the conveyor, and unplug the
detector connector.
- From the area
where the DC motor was installed, pull the detector cable and remove
it from the conveyor.
- Thread the new unload conveyor detector cable (part number
504L2D883A) through the opening between the floor of the conveyor and
the plate directly underneath, and pull the detector connector up
through the detector cable hole (shown in step
6). Thread the other end of
the cable down through the cable
hole where the DC motor was installed.
- Plug the detector connector into the unload conveyor detector, and
reinstall the detector.
Note: Apply
Loctite® 242 to each screw.
- Drill holes in the plate underneath the conveyor:
- From the inside of the conveyor, drill a 4mm hole through the
two smaller DC motor brackets that are securing the holes closest to the end of the conveyor
(circled in the picture below), and continue drilling downward into the plate
directly underneath (shown in the next picture) to mark it.
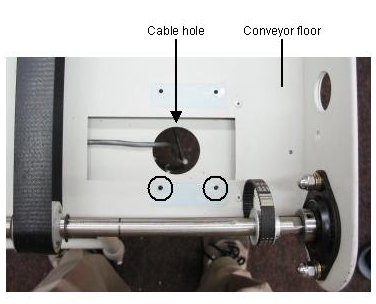
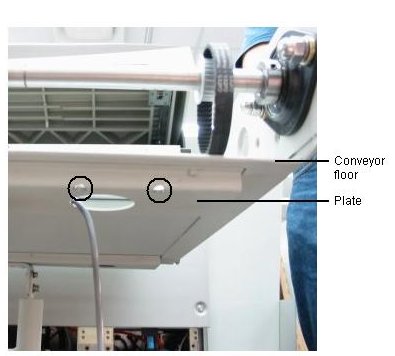
- From underneath the conveyor, use the drill with a 7mm bit to
enlarge the 4mm
holes you previously drilled in the plate (circled in the picture below).
Do not drill through the conveyor floor with the 7mm bit.
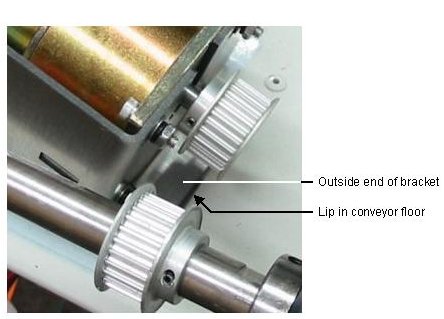
- Position the DC motor assembly in place. Notice that the outside end
of the bracket fits under the lip in the conveyor floor, as shown
below.
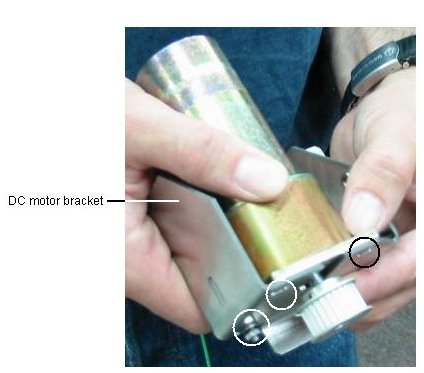
- From underneath the conveyor, secure the DC motor assembly in place,
using the four small screws supplied with the kit and the lock
washers (three are circled in the picture below). Insert two of the screws through the 7mm holes you
previously drilled in the plate.
Note: Apply Loctite 242 to each
screw.
- Press the motor toward the end of the conveyor, and slip the belt
over the motor sprocket.
- Press the motor toward the Lotem until the belt is under tension. Hold the motor in place, and tighten the
four
DC motor bracket securing screws.
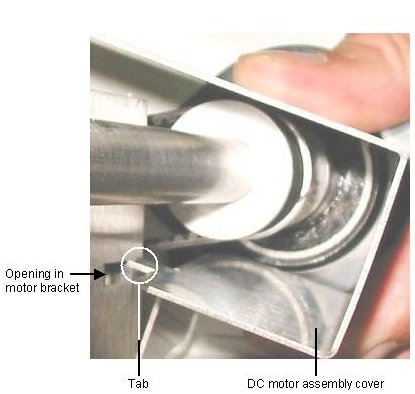
- Place the DC motor assembly cover on the motor assembly. Notice
that the cover has a tab on the inside that must be inserted into the
motor bracket, as shown below.
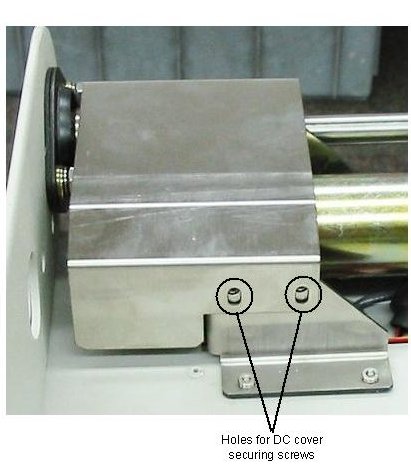
- Secure the cover to the bracket using the two supplied screws with washers, and lock
the washers in the holes circled below.
- Manually rotate the conveyor bar, and visually inspect the DC motor
sprocket and belt to verify that they do not come into contact with the
cover. If they do:
- Loosen the two screws that secure the cover in place, and adjust
the height of the cover.
- Repeat this step until the sprocket and belt do not come into
contact with the cover.
- Plug the cable connector into the DC motor with encoder.
- Plug the D14 connector on the new cable into the conveyor connector
(labeled conv).
Tip: The conveyor
connector can be accessed from the rear of the machine by removing the
rear, lower panel, or from the right side of the machine.
- If the supplied Service Pack Floppy disk is not available, you will
need to download the service pack (UnloadConveyorWithEncoder-Quantum-3.51.02.exe)
and
save it to a floppy disk. If you have the floppy, skip this step and go
to step 17.
When the download is complete, verify that the
following files have been saved to the floppy disk:
- INSTALL.BAT
- servicePack1.REG
- ConfigLoadingSystem.Script
- UnloadPlateFromTray.Script
- VersionInfo.txt
- Install the service pack on the machine:
- Insert the floppy disk in the floppy drive in the E-box.
- In the PC controller, open Windows Explorer and browse to the
floppy drive.
- Double-click INSTALL.BAT to install the pack. When the pack is
installed, a message appears indicating that information in
servicePack1.REG has been successfully entered into the registry.
- Close the DOS window and verify that the pack was successfully
installed by clicking Utilities >Machine Info.
The PC controller version is displayed along with the service pack
version. If the service pack version is:
- 1, it was successfully installed.
- 0, it was not successfully installed. Repeat steps
16 through 18.
- Close the conveyor cover. Load
and unload several plates to verify that the conveyor speed matches the
speed of the plate while exiting the Lotem. After the plate has
cleared the Lotem, adjust the values for the following parameters:
- To change the speed at which the plates are transported from the
Lotem, adjust the value for the (default=5).
- To change the speed at which the plates are fed to the pre-heater
or processor,
adjust the value for the (default=.5—the value was changed
to 2 when the service pack was installed).
- Repeat step
19.
|


 To access the Conveyor Motor Speed
parameters: