Procedure |
|
This procedure includes the following steps:
Preparation
- From the PC Controller, open the front door of the Lotem.
- Manually open the right door.
- Shut down the PC Controller.
- Shut down the Lotem.
Disconnecting the flat cables and configuring
the new hard drive
- From the E-box, remove the hard drive tray.
- Disconnect the two flat cables, and the power cable from the Motherboard.
Note: There are two flat cables in the E-box: the Floppy
Disk cable and the CD-ROM/Hard Drive cable. This procedure replaces
the old, longer CD-ROM/Hard Disk cable with the new, shorter one.
- Remove the four screws that connect the hard drive to the tray.
- Change the new hard drive's configuration from Slave to Master,
as shown below.
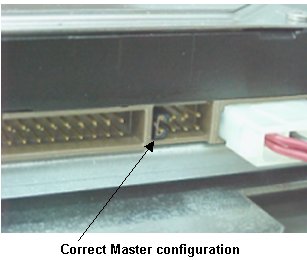
Figure 1
Note: By default, the hard
drive is factory-configured as Slave.
- Install the new hard drive on the hard drive tray.
Installing the new CD-ROM/Hard Drive cable
- Connect the shorter end of the new cable to the hard drive.
Note: Make sure the side of the cable with the red
line is facing the hard drive power connection, as shown in Figure 2.
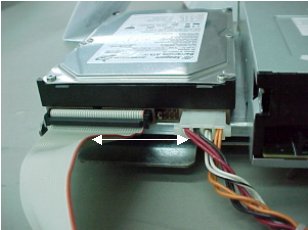
Figure 2
- Connect the middle connector to the CD-ROM, again making sure the
side of the cable with the red line is facing the CD-ROM power connection,
as shown in Figure 3.
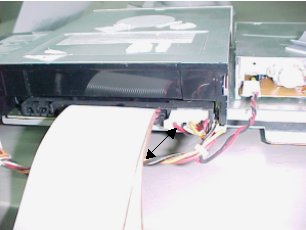
Figure 3
- Reconnect the Floppy Disk flat cable. Make sure the side
of the cable with the red line is facing the power connection, as shown
in Figure 4.
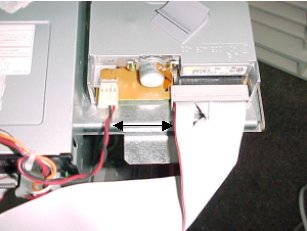
Figure 4
- Insert the Hard Drive tray into the E-box, but not all the
way.
- Reconnect the power cable to the Motherboard.
- Route the new CD-ROM/Hard Drive cable underneath the tray; then pull
the cable forward in front of the boards and connect it to the CPU,
as shown in Figure 5.
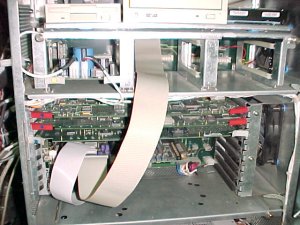
Figure 5
- Push the tray all the way in, and secure it with the two
screws.
Installing the software and restoring BIOS settings
- Make sure there is no floppy disk in the drive, then power on the
machine (if not already on).
- Before Windows starts, press the Delete key continuously,
until the BIOS Setup window appears on the monitor.
- From Bios/setup/inside utilities/secure cmos, change the secure
cmos status from Activated to Disable.
- Ensure the right boot driver sequence: Floppy, CD-Drive and Hard Disk.
- From Standard/Date/Time, update the date and time, if necessary.
- Save your changes and exit the BIOS Setup window.
- Insert the BIOS diskette (version 1.1 or 1.2) into the floppy disk
drive and power on the machine.
- Press Alt+Ctrl+Del to reboot, and run the bios
diskette. The Bios settings are automatically updated.
- Remove the Bios diskette, then reboot.
- Before Windows starts, press the Delete key continuously,
until the BIOS Setup window appears on the monitor.
- Check the following:
- From Bios/setup/inside utilities/secure cmos, make sure the secure
cmos status has changed back to Activated.
- From the Utilities dialog box, double-click the Detect
IDE button; then do the following:
- Click the PIO field.
- Change the speed of the speed of the hard disk to 0.
Note: Even though the hard drive is 20/40 GB,
the CPU recognizes only 8 GB.
- From Standard/Date/Time, update the date and time, if necessary
- Press Esc twice.
- Save your changes and exit the BIOS Setup window. The E-box reboots
automatically and the default configurations are restored.
Restoring the hard drive with Windows 95 (Image
Disk)
- Insert the Startup (EZ Restore) diskette in the floppy
disk drive, and the Windows Image CD in the CD-ROM
drive.
Note: Make sure you are installing the correct BIOS
and Image versions: BIOS version 1.1 with Image version 1, or BIOS version
1.2 with Image version 2.
- Press Alt+Ctrl+Del to reboot. After a few moments
(or longer), the Windows 95 desktop appears on the monitor.
- Remove both the floppy (Startup) and Image CD from their respective
drives.
- Insert the Lotem PC Controller disk and reload the software.
- Restore the machine's registry and database files.
- Reconfigure the Brisque connection.
Note: For more detailed information regarding hard
drive restoration, see the Restore Hard Drive
procedure.
|

