When you replace a TMCE board, you must save all the relevant parameters of
the platesetter and load the new board with the right firmware version. The
following procedure describes how to replace a TMCE board.
Procedure
The Replacing the TMCE Board procedure includes the following steps:
Saving NVS parameters
Replacing the TMCE board
Loading the firmware
Restoring NVS parameters to the TMCE board
Saving NVS parameters
Before you replace the TMCE board, you must save theNVS
parameters from the current TMCE board to the disk.
Note: The files must be saved under the same directory of
the bload program.
Open Splot Quantum>>fw dir and write down all the
firmware versions that are listed.
Check the file name you need to enter by accessing c:/ th2 /tools to see
the latest file that was saved.
Quit the terminal (Splot) to free the serial port.
Open a Dos prompt on the PC controller and type the following commands:
Save the Ram from the Turbo TMCE to the Disk
C:\Th2\tools\ bload f=File name_ram.bin p=8 d=ram i=nvs upload
For ex: QuantumRam.bin
Verify that it is saved successfully.
Save the Flash from the Turbo TMCE to the Disk
C:\Th2\tools\ bload f=File name_flash.bin p=8 d=flash i=nvs upload
For ex: QuantumFlash.bin
Verify that it is saved successfully.
Notes:
Naming the files - You can give any name to the NVS files (both Ram &
Flash), as long as it has the extension .bin. Record the file name
in order to restore it to the new board. It is recommended to give a <date>.bin
name so that you will have a reference.
f = represents the file that you load. The name may be changed by another
service engineer.
If the save operation fails, delete the file that was created and repeat
the save procedure.
If the save operation fails, check spelling. If it fails continuously, reduce
the baudrate as follows:
At the Splot prompt, type Quantum>>mce Baud 9600then go to: Term/PortSetting and enter the following parameters:
Baudrate: 9600
Parity: none
Data bits: 8
Stop bits: 1
Repeat step 2 to save. Then go to term/Port Setting and return the baudrate
to 57600.
Replacing the TMCE Board
Open the top front door.
Open the left side door.
Disassemble the Distribution Box Mech panel.
Remove the two screws on the electronic tray to provide easy access, and
slide the tray half way out.
Disconnect the cables one by one.
Remove the four Philips screws that connect the TMCE board to the tray,
and remove the TMCE board.
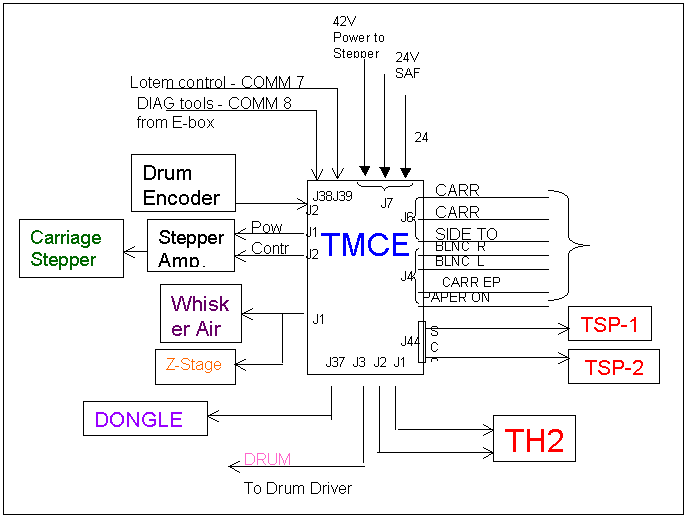
Assemble the new TMCE board. Be sure to connect all the cables correctly.
Use drawing 1 as a reference.
Drawing 1: TMCE Connection
Note: The TSP connector on the TMCE board has the same size
and shape as the connector for the scsi cable. Do not confuse them.
Turn on the platesetter, and start the Lotem application and the Splot.
Type Quantum>>fw dir
A list of all the firmware loaded on the board appears.
Check that the files are compatible to step 2 in the Saving NVS Parameters
section. If they are not compatible, continue loading firmware.
Loading the Firmware
Type Quantum>> Reset boot
A Boot>> prompt appears.
Quit the terminal (Splot) to free the serial port.
Open a Dos prompt and find the file name for the correct Xilinx firmware.
Then load it by typing the following:
C:\Th2\tools\ bload f=File name.bin p=8 i=Lca
For ex: mcelca0101.bin
Wait until it finishes loading successfully.
Find the file name for the correct TMCE firmware and load it by typing the
following:
C:\Th2\tools\ bload f=File name.bin p=8 i=main
For ex: QuantumFmwRelease106.bin
Wait till it finishes loading successfully.
Start Splot.
Type Quantum>> reset
Type Quantum>> scan eh_&Logicpower bon
Type Quantum>> reset
Restoring the Parameters to the TMCE Board
It is very important to reload the parameters that were saved in step 4.
Quit the terminal (Splot) to free the serial port.
Open a Dos prompt:
C:\WINDOWS >cd\
C:\>cd th2\tools
C:\Th2\tools\ bload f=file name_ram.bin p=8 d=ram i=nvs
C:\Th2\tools\ bload f=file name_flash.bin p=8 d=flash i=nvs
Type Quantum>>reset Note: The file must be created with the version of firmware
that is being loaded.
Close all machine panels and covers.
Expose and check that the image is clear of artefacts.