Brisque version 4.85.5, expose 4.0.85 with two patch:
Upd brisque 4_Beta2_1.partAObj
Upd brisque 4_Beta2_1.partB.Obj
Software Related & Solved Bugs
Important Notes
Very important, please read! The method of detecting the position
and alignment of the tail grippers was changed, to overcome a bug that
prevented correct identification of gripper misalignment under certain circumstances.
As a result, the values for Side2Side Calib Fall Pos mm
and Side2Side Calib Rise Pos mm parameters were changed, and therefore
if you are upgrading the software from any version lower
then 3.50.03 (e.g., Beta 5) you must perform the side to side calibration
procedure again to adjust these two values for your specific machine. But
before commencing with this calibration procedure, you must also set
these two values (found under …\IO OBJECTS\Loading System\Loading
System Setup) to their new default values by copying the values found under
the Default column to the Value column. Now you can perform the
side to side calibration procedure which will enable you to fine tune these
two values to match your specific machine.
Very important, please read! The problem of the drum entering an
error state and being unable either to initialize or reach a specific position
when it is unbalanced was solved. This requires you to manually change (only
once) a specific parameter in the MCE: In the SPlot application under the
QUANTUM prompt, type the following command: set drum maxacc 8.
If this version is installed as an upgrade from Beta 5, the shift and scaling
parameters the MCE uses may need re-calibration; After installing the
version verify the image offsets and dimensions on the plate, and calibrate
them if needed using the relevant parameters under the set gc command
via SPlot.
When using the head and tail margins in the Press Format tab in the Brisque
for changing the image offsets, note that the minimum values for
these two parameters are derived from parameters in the controller; The minimum
head margin is taken from the Plate Width Top Mech Margin
(mm) registry parameter (currently 6 mm), and the tail margin is taken from
the Plate Width Bottom Mech Margin (mm) registry parameter
(currently 6 mm). If you change one of these registry parameters, you must
restart the Lotem application and then perform the reconfigure
operation at the Brisque in order for the change to take effect.
Solved Bugs
Improved synchronization between the controller, MCE, Brisque and TSP modules
during the start of expose process eliminates problems related to
expose freezing, Brisque 5230 errors and the expose process being aborted
without any imaging.
Fixed TH2 error messages display that used to show incorrect text in the
form of %1 %2 strings.
More robust, fast and reliable carriage behaviour.
More reliable drum behaviour, even when severely unbalanced.
More reliable unloading procedure, intended to prevent the "Media is
stuck on drum and did not reach the unload tray - the unload tray detector
is at OFF state" error message which occasionally appeared during unloading.
Don’t need to supply the correct computer name as a registry entry,
which formed a problem whenever the name was changed or when toggling
between network and direct connection between the DFE and the Lotem machine.
More robust and reliable procedures for stroke calibration, focus learn
and edge detection reduces the number of TH2 related errors during the
expose preparation phase.
Solved imaging problems related to data shifts and image scaling on the
plate.
Added extra 2 mm covering at plate edge when exposing positive plates.
Software Related
New features
Removed redundant image parameters from “media” values in the
MCE:
Old
New
media X reflectivity
hdm Y sr
media X drumspeed
hdm Y ds
media X depth
hdm Y sd
X is not necessarily equal to Y.
Added support for operating the new debris removal pump.
Improved version of SPlot (3.34).
Improved calibration tests with better fault recovery. Also added support
for Surface Depth and Drum Speed tests.
Increased speed of performing the grippers detection and drum balance procedures.
Added support for disabling the drum vacuum only during the expose process
itself.
Improved warning and error messages for paper disposal bin capacity.
A more efficient prepare expose stage now allows a faster time to start
the next expose job, leading to a higher overall machine throughput.
Automatic support for the GTO unload valve. The operating solenoid is now
named “GTO unload arm”, and its home position detector is named
“GTO Unload Arm HP Detector”.
The Width Pos (mm) parameter in every punch motor was changed from 45 to
50.
Added controller support for the different data unit types: for example,
single TSP, two TSPs and SCSI connection.
Added support for Prinergy DFE connectivity.
Changed look and feel of the Log dialog. It now also supports saving only
a selection of text.
Improved handling, detection and display of carriage errors.
Added the ability to stop the carriage from the carriage motor dialog.
Changed the name of the carriage home position detector from “Carriage
Coarse Detector” to “Carriage Home Pos Detector”.
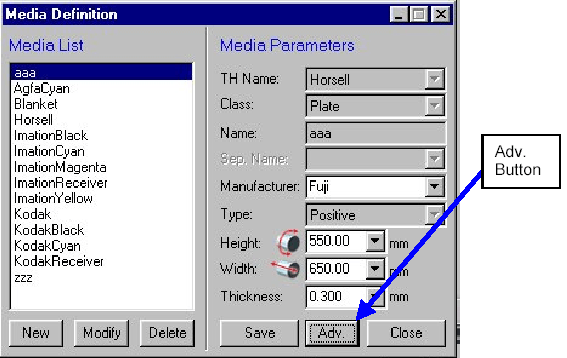
Some changes in the media definition dialog: (1) added a “Modify”
button that enables to modify attributes of an existing media. (2) The “New”
button will now clear all media attributes and force the user to set all attributes
for the new media she is defining. (3) In the Advanced Media
dialog added an attribute of “Fast Load” process: this means that
for every media the user can choose whether to use the regular loading process
or a fast one which greatly contributes to machine throughput. By default
all media in Quantum machines are set to use the fast loading process.
Added the ability to toggle between two display modes for the Expose Info
dialog – compact and normal - where in compact mode only the expose progress
bar is displayed.
Added automatic logging of all operations during the machine startup –
this is saved under the “Log” directory in a file named “Startup.Log”.
The machine now “remembers” the type of measurement units last
used (mm/inch), and will automatically use it on its next start-up.
Added support for the new Omron type laser interlocks.
Grouped together the Drum Power Switch, Drum Vacuum Pump and Drum Vacuum
Disable Valve under a new section in the “Hardware”
dialog named “Drum Solenoids”.
Added specific online help for Quantum in a new HTML format. It is accessible
by pressing the F1 key or through the “Help” button in the Error
Messages dialog.
Added support for a lower drum speed when unloading GTO plates, to prevent
plate damage on unload tray due to the regular fast unloading
speed.
Each of the two balance arm solenoids will now check for a change in its
home position detector as verification when it is operated.
New Dialog
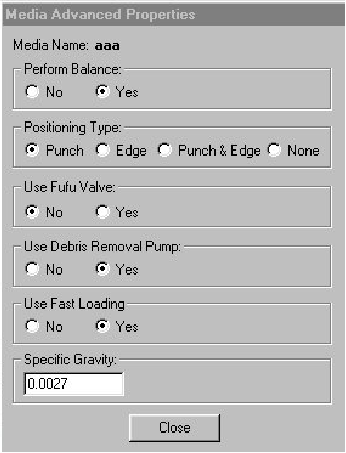
The range of attributes available for media used in Lotem machines was expanded.
As a result, the media data base files have undergone a change
and several advanced media attributes were added to each media file.
In order to view and edit these new attributes:
Change to expert mode.
Open the Media Definition dialog.
Click the Adv. button.
The Media Advance Properties dialog will prompt up:
Description of the new media attributes
Perform Balance
Determines whether the drum needs to be specifically balanced
for the media before loading it. For media types ‘Plate’ and ‘Blanket’
the setting should be Yes; For all other media types the setting should be No.
For example, the drum does not need to be balanced before loading a media of
type receiver or proof because the drum was balanced for it already when we
loaded the carrier (blanket) on to it – the specific gravity of the carrier
is the sum of the 3 media: carrier, receiver and donor.
Positioning Type
Determines the method by which the location of the edge of the
media is found before the exposure process commences. Four settings are available:
Spiral punch, Edge detection, both or none. The correct setting depends on the
media type, machine type and the machine configuration: If
the media type is proof or receiver, the setting should be NoMediaPositioning.
For a ThermoFlex machine the setting should also be NoMediaPositioning. For
a thermal head machine the setting should be Edge.
Use Fufu Valve
Determines whether to operate, during the expose process, an air
valve for diverting media debris from the laser lens. This attribute is relevant
only for fibber head machines, as thermal head machines are not equipped with
such a valve.
Use Debris Removal Pump
Determines whether to operate, during the expose process, a vacuum
pump for collecting media debris from the laser lens area.
Use Fast Loading
Determines which media loading process should be used: the conventional
method suitable for the complete range of media size and thickness, or a fast
method which uses higher motor speeds and a more efficient process leading to
higher throughput but might not be suitable for extreme media sizes. For thermal
head machine the setting should be yes. For fibber head machine the setting
should be No.
Specific Gravity
Represents the specific gravity of the media in grams per cubic
mm. The value is used primarily for the drum balancing process. In most if not
all cases there is no need to change the default value setting.
Note: At the End return the Mode to User Mode.
Known Bugs
Pressing the Download button in the Distribution Card dialog may crash
the application. This functionality is originally intended only for R&D
purposes.
When spinning the drum through the drum motor dialog or by SPlot, the machine
status remains at Ready rather then being at Working.
After start up of the Lotem application when the doors and/or cassette are
open - and although the motor interlocks defeater and/or cassette defeater
are in place and there are no active interlocks - the error messages The operation
Start-Up can't be done because interlock is active followed by The task Start
Up Lotem800V failed may appear. In this case reset the application and ignore
the error message.
If an abort is done during an internal test (for ex. focus test) the value
of the
parameter is reset to zero.
When kit 0.15 is installed punches 9,10 are used for operation, yet they
are
still can be ascribe to a punch system.
Appendix A
Loading firmware process:
To load the MCE firmware and Xilinx:
Open the splot
Quantum>>reset boot
Wait till you get boot>>
Close the splot and open dos prompt type the following:
C:/th2/tools> bload f=Quantumfmwrelease106.bin I=main p=8 b=57600.
Wait till the load will finish successfully
C:/th2/tools> bload f=mcelca0101.bin I=lca p=8 b=57600
Wait till the load will finish successfully
Close the dos prompt and open the splot type the following:
Quantum>>reset
To load the head firmware type the following:
Open the splot
Quantum>>set head type3
Ignore any error massages about unsupported parameters
Quantum>> head program
Wait for the massages data link Exposure head coming online ignore
warning
messages.
Quantum>> head boot
Wait for the message ***state message: EH boot command (3). Complete THE
Command completed successfully.
Close the splot and open dos prompt type the following:
C:/th2/tools> Tehload P=X th2h100c.bin
Wait till the load will finish successfully
Close the dos prompt and open splot type the following:
Quantum>> Reset