Description:
This procedure upgrades the ThermoFlex Mid from a VLSI Screen Processor to the
Turbo Screen Processor - TSP
The TSP upgrade kit includes:
Cat Number
Qnt
Part name
291A3L803
1
PCI/E30 Bracket
291A7L219
1
PCI 43P BRACKET
374A00080
1
Packing Label-Wht
380J01022
2
Phil.Pan Hd.Sst.Sems 4-40x1/4"
380J03024
1
Phil.Pan Hd.Sst.Sems 6-32x1/4"
391S60606
1
Rsc Box 470x380x170
399Z1M292A
1
TSP Installation Guide
501V1M847A
1
TURBO SCREENING WBT CD1/2000
503D03465M
1
T.S.P ASSY
504L1L670
1
Cbl,62 Pin D-Type Plg- L=30
504T2D064
1
Flat 100P in DDB (A+B) to L-Box
510V1M334A
1
BRISQUE 3.0 OPTIONS REVISION-2
Logistics
Please revert the VLSI Data Box and the SFL board.
Prerequisite:
Verify that the distance between the Lotem L-Box and the Brisque does not
exceed 30 meters.
The machine should have a DDB-1-N (503D2L695S) C.L. - L or higher
Verify that the Brisque is Updated to Ver. 1.32 plus UPD 2 (Lotem update
1.35) or higher.
Procedure
Route the cable from the Brisque station to the ThermoFlex.
Update the DDB-1-N connections to TSP.
Install the TSP Board (described in the Brisque installation guide).
Update the Lotem Application for TSP.
Route the cable from the Brisque station to the ThermoFlex
Route the 30-meter cable from the Brisque station to the Lotem (or the other
way around).
Place one end near the Brisque and other end near the L-Box.
H/W update the DDB-1-N connections to the TSP
Open the back door and then the right door
Exit from the Lotem Application and shut down the P.C.
Power off the Lotem by the Main Switch.
From the left door, open the L-Box to the service position and open it's
back door to allow access to the DDB-1N board.
Disconnect the cable from the VLSI to the DDB - 504L1L320A.
Verify that the DDB1-1-N - sn 503D2L695S is installed and the C.L. is L
or higher.
Replace the DDB to the L-Box flat cable:
The old flat cable is- "FLAT 100 REC X 2" - sn 504T1L473
The new flat cable is "FLAT 100 PIN DDB (A+B) TO L-BOX" - sn
504T2D064.
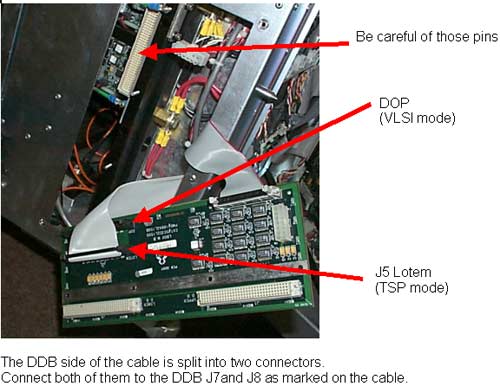
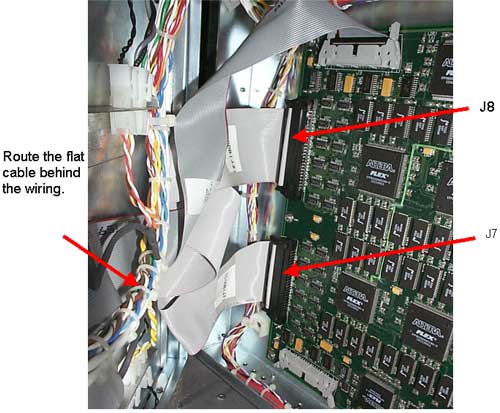
Disconnect the old flat cable from the DDB - J8.
Open the 4 Philips screws on the right-hand side of the L-Box to gain
access to the L-Box motherboard.
Open the 4 nuts securing the L-Box motherboard.(Sometimes the nuts come
off with the screw attached. That is OK)
Remove the motherboard by pulling the board from the edges toward you
being careful not to bend the pins on the large connectors located on the
left-hand side of the board.
Install the new cable (505T2D064) and connect the single end connector
of the cable to the J5 connector (marked as Lotem) for a TSP configuration.
Note: You can leave the disconnected VLSI flat cable in place in
case you need to return to the VLSI mode.
Gently put back the M.B. verifying that no pin was bent.
Close the M.B. cover
Reconnect the cables to DDB J4, J5, and J9.
Close the L-Box.
Reconnect the cable from the E-BOX to J3 on the L_BOX (The lower connector).
Connect the new cable 504L1L670 to the L-Box (The middle connector) and
route it to the Brisque station.
Note: Use caution when opening and closing the L-Box to its service
position. The TSP cable can damage the connector on the DDB-1N board. Ferrite
can also cause damage when moving the L-Box to its service position
Close all the doors.
Install the TSP Board
Follow the TSP board installation guide.
Connect the TSP cable coming from the L-Box.
Update the Lotem Application for TSP
Software Version 1.10.03
Startup the machine but don't run the Lotem application.
On the PC, select Start and then Run from the pop-up menu.
Type regedit in the text box and select OK.
Go to the HKEY_LOCAL_MACHINE\SOFTWARE\Scitex\Projects\LotemFlexo\IO OBJECTS\DDB CARDS\DDB
Card and change the Hex File Name to LotemFlexoo\UpLoadFile\Ddb\TSP\ddb-wcs.hex
Go to the HKEY_LOCAL_MACHINE\SOFTWARE\Scitex\Projects\LotemFlexo\Machine
and change the Screen Processor Type (VLSI=0, TSP=1) to "1".
Load the rbf files to the DDB-1-N flash memory:
Open the Hardware -> Boards and double click on DDB.
The DDB window will appear.
Note: A window will appear after 4 minutes because the Altera dips
in the DDB-1-N board update according to the new files.
Click on Send All.
Shutdown the machine and turn off the main power.
Switch on the machine again and start the Lotem application.
Note: All previous templates must be changed to choose TSP formats
Test
Open the Hardware window.
Open the Laser System and click on Laser Group.
The Laser Group window will appear.
Perform laser calibration to 600 mw and check that all the diodes have
passed.
Troubleshooting
Problem
Solution
No light calibration
Check that all DDB to MB flat cable connections are as marked
on the cable.
Lotem message error:
no. of lines mismatch
(DDB has counted zero lines.)
Check that the screen set is in VLSI mode. If it is, change
it to Turbo Screen.
If not, and if TSP has advanced (Brisque's progress indicator)
then check the DDB-Plotter cable connection.
DDB has counted a mismatched number of lines but not zero.
Check the DDB-TSP cable.
Missing end of expose on plate (or middle of expose is missing)