Home | Contact Us | Submit Troubleshooting Info | Search | Help


    Output | Software Solutions | Proofing | Color, Screening and Calibration | Scanning | Digital Photography | Consumables | POS


Chiller pressure gauge doesn't register properly

Applies to

  • Trendsetter 3244/3230
  • Trendsetter Spectrum
  • VLF Trendsetter
  • VLF Platesetter
  • Thermoflex

Component

Neslab CFT33D chiller

Problem

The pressure gauge reads zero when the chiller is running. It does not change reading when the outlet hose is crimped

Cause

The pressure gauge may be defective or plugged.

Note: Before replacing the pressure gauge, confirm that the pump is working properly and that it is the pressure gauge which is defective.  The best way to do this is as follows:

  1. Turn the chiller off using the main power switch on the front of the chiller.
  2. Remove the reservoir cover and the reservoir cap.
  3. Remove the short drain hose from the hose bundle.
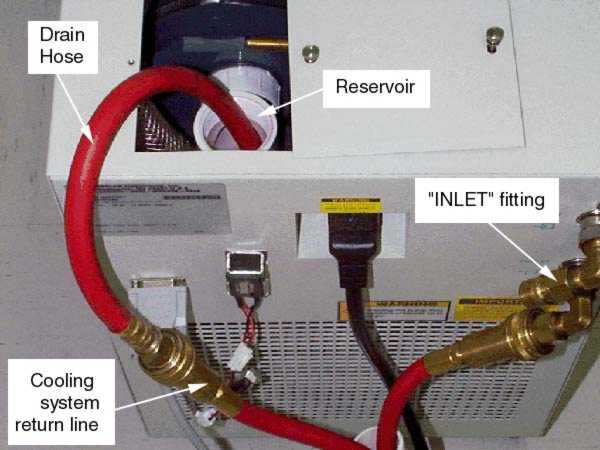
  4. Disconnect the return line (marked INLET) at the back of the chiller (see Figure 1).
  5. Connect the drain hose to the return line and put the open end in the reservoir opening (see Figure 1).
  6. Turn the chiller on. There should be a good flow of coolant.
  7. Turn the chiller off and reconnect the return line.
  8. If all other functions of the chiller are operating, the output device can continue to operate.
  9. Make a note of the chiller’s serial number on the label. Call Neslab at 1-800-258-0830 to request a warranty replacement pressure gauge.


Solution

To replace the chiller pressure gauge:
  1. Turn the chiller off.
  2. Remove the chiller cover. There are 4 screws on each side.
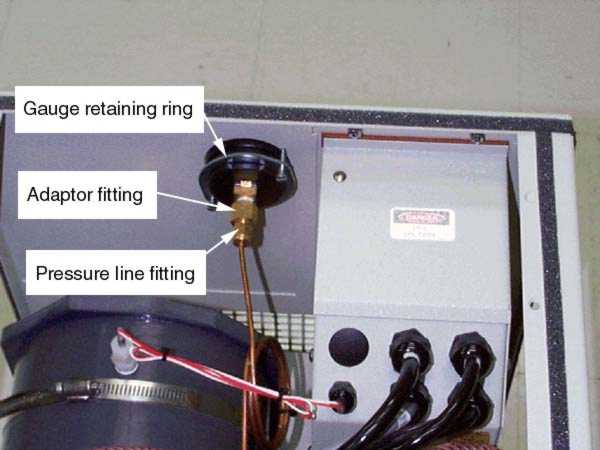
  3. Disconnect the pressure line fitting from the pressure gauge (see Figure 2).
  4. Loosen the two retaining screws and rotate the backing ring to the removal position.
  5. Remove the pressure gauge.
  6. Remove the adapter from the old pressure gauge. Using teflon tape on the threads of the replacement gauge, install the adapter on the replacement gauge.
  7. Place the gauge in position, then rotate the backing ring to the closed position and tighten the retaining screws.
  8. Connect the pressure line fitting to the pressure gauge.
  9. Turn the chiller on and check for correct pressure gauge operation.
  10. Replace the chiller cover and tighten the screws.


See also

Neslab CFT33D Chiller Installation and Operation
Neslab chiller pump makes noise, has low pressure


Technical contact

Rick Baggett (Annacis local 3380)

Date submitted

2 June 1999

Date modified


    Copyright © 2005 Creo Inc. All rights reserved. Confidential. Back to top.