Background
|
|
If the unload table vacuum cups lose suction, or a visual inspection
reveals that they are excessively worn (brittleness, tears, or flatness),
you should replace them.
|
Procedure
|
|
If you have not done so already, check to see what the
vacuum level is before the vacuum cups are replaced. See procedure.
- In Service Shell's Device Monitor command box, enter command:
table up
- With a 3 mm hex key, loosen, but do not remove, the
three screws attaching the three panels in the center of the unload
table to the bottom of the unload table frame.
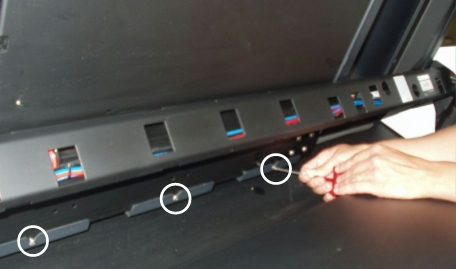
- Enter command:
table down
- Turn off the device air.
- Power off the output device.
- Use a 3 mm hex key to loosen the three screws at the exit side
of the unload table.
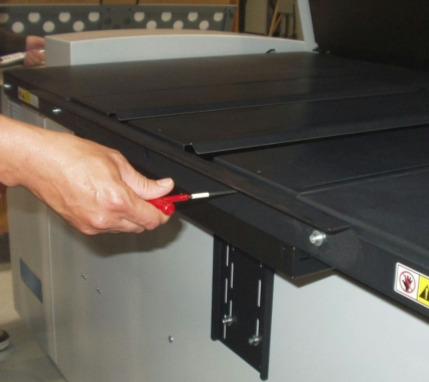
- Move the three panels in the center of the unload table out of the
way:
- Starting with the panel on the away side panel, lift up the end
closest to you, and push the panel away from you (toward the entry
side), so that the slot in the other end is no longer in contact
with the screw you loosened in step 2.
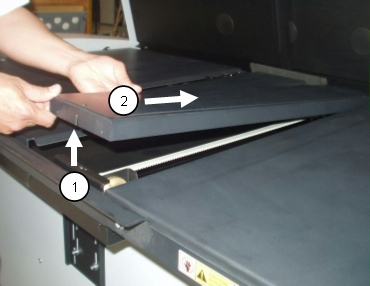
- Slide the away side panel to your right, out of the way of the
traveler and vacuum cups.
- Repeat steps a and b for the remaining two panels, but
slide at least one of them to your left to get it away from the
traveler and vacuum cups.
- Gently pull the traveler to the exit position (towards you).
To replace worn or damaged vacuum cups:
- Place one hand under the vacuum cup and locate the washer between
the bottom of the traveler arm and the nut into which the vacuum cup
is screwed.
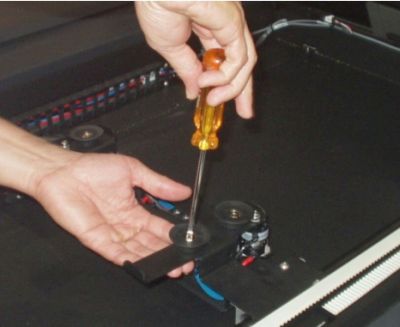
- While holding the washer in place, use a screwdriver to remove the
screw from the vacuum cup assembly.
Important: When you let go of the washer, make sure that it
remains aligned with the nut into which the vacuum cup is screwed.
This will make it easier to screw in the new vacuum cup.
- Remove the screw and washer from the vacuum cup.
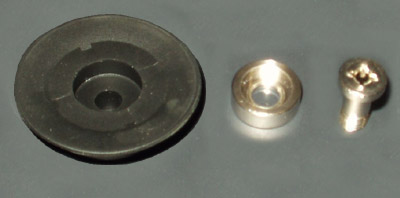
- Discard the old vacuum cup and insert the washer and screw into the
new one.
- Again, locate the washer and nut on the underside of the traveler
arm, and holding them in place with one hand, gently screw in
the new vacuum cup with the other.
Important: Do not overtighten the screw. When the screw is
correctly tightened, the top of the washer should be flush with the
inside edge of the vacuum cup. Overtightening can cause the vacuum cup
to deform and lose suction.
- Repeat steps 1–5 for any remaining vacuum cups that need to be
replaced.
To put back the unload table panels:
- Gently push the traveler back to the entry position.
- Reposition the unload table panels you moved in step 7 of To
access the unload table vacuum cups, above.
- Reach around to the entry side of the unload table and feel the
slotted mounting plates underneath to ensure that the slots are
aligned with, and wrapped around the screws you loosened in
step 2.
- Use a 3 mm hex key to tighten the three screws you loosened on
the exit side of the unload table in step 6.
- Power on the output device.
- Turn on the device air.
- In Service Shell, enter command:
table up
- Tighten the three screws underneath the unload table that you
loosened in step 2.
- Enter command:
table down
- Check the positioning of the panels:
- Place a long straight edge on top of the panels on the unload
table to verify that they are properly aligned to the same height.
- Enter command:
table cups up
- Check to ensure that the vacuum cups are above the height of the
unload table.
- If necessary, adjust the positioning of the panels by repeating
the relevant steps above.
|

