

Home | Contact Us | Submit Troubleshooting Info | Search | Help
Output | Software Solutions | Proofing | Color, Screening and Calibration | Scanning | Digital Photography | Consumables | POS
Home | Contact Us | Submit Troubleshooting Info | Search | Help
Output | Software Solutions | Proofing | Color, Screening and Calibration | Scanning | Digital Photography | Consumables | POS
Use the following information to assign an IP address to the SuperStack 3300 switch which will enable the utilization of the Web based management, to further configure the switch. Also included are instructions to download new software to the switch.
Minimum Prerequisite is Rev 1.07 on this switch. In case you donít have this version go to section "Download new software to SuperStack 3300î at the end of this document".
Connect a serial null modem cable to the console port of the 3300 switch (none, 8, 1).
Login: security <CR>
Password: security <CR> (password will not display while typing)
Menu options: -----------------3Com SuperStack II, Switch
3300------------------
ethernet - Administer Ethernet ports
ip - Administer IP
logout - Logout of the Command Line Interface
system - Administer system-level functions
Type ? for help.
---------------------------------------Switch 3300 (1)--------------------------
Select menu option : ip <CR>
Menu options: -----------------3Com SuperStack II, Switch
3300------------------
interface - Administer IP
ping - Poll remote device
Type q to return to the previous menu or ? for help.
---------------------------------------Switch 3300 (1)--------------------------
Select menu option (ip) : interface <CR>
Menu options: -----------------3Com SuperStack II, Switch
3300------------------
bootp - Enable/Disable BOOTP
define - Set IP interface information
display - Display IP interface information
Type q to return to the previous menu or ? for help.
---------------------------------------Switch 3300 (1)--------------------------
Select menu option (ip/interface) : define <CR>
Enter IP address [1.2.3.4 ]: 192.9.200.30 <CR> (enter desired
IP address)
Enter subnet mask [255.0.0.0 ]: 255.255.255.0 <CR> (enter correct
mask)
Enter default gateway [1.2.3.1 ]: 192.9.200.1 <CR> (enter correct
gateway)
Enter SLIP address [192.168.101.1 ]: <CR>
Enter SLIP subnet mask [255.255.255.0 ]: <CR>
IP address: 192.9.200.30
Subnet mask: 255.255.255.0
Default gateway: 192.9.200.1
SLIP address: 192.168.101.1
SLIP subnet mask: 255.255.255.0
An IP address has been succesfully assigned to the switch.
There Are Two options available to configure switch management (auto-negotiate, 100Mbit full duplex etc.). The first way is via serial cable, the second is utilizes the Web based management on the switch. Both ways will be described in this document to configure port 1 to 100Mbit full duplex.
Connect a serial null modem cable to the console port of the 3300 switch.
Note: this feature is not available prior to 1.07 operational version.
Login: security <CR>
Password: security <CR> (password will not display while typing)
Menu options: -----------------3Com SuperStack II, Switch
3300------------------
ethernet - Administer Ethernet ports
ip - Administer IP
logout - Logout of the Command Line Interface
system - Administer system-level functions
Type ? for help.
---------------------------------------Switch 3300 (1)--------------------------
Select menu option : ethernet <CR>
Menu options: -------------3Com SuperStack II, Switch
3300--------------
autoNegotiation - Enable/Disable auto-negotiation
flowControl - Enable/disable flow control
portMode - Set the port speed and duplex mode
portState - Enable/Disable ports
statistics - Statistics for a port
summary - Display port stats summary
Type "q" to return to the previous menu or ? for help.
-----------------------------------Switch 3300 (1)----------------------
Select menu option (ethernet): autoNegotiation <CR> (autoNegotiate must be disabled in order to force the port to 100Mbit full duplex)
Select Ethernet port (1-24): 1 <CR>
Enter new value (enable,disable) [enable]: disable <CR>
Select menu option (ethernet): <CR>
Menu options: -------------3Com SuperStack II, Switch
3300--------------
autoNegotiation - Enable/Disable auto-negotiation
flowControl - Enable/disable flow control
portMode - Set the port speed and duplex mode
portState - Enable/Disable ports
statistics - Statistics for a port
summary - Display port stats summary
Type "q" to return to the previous menu or ? for help.
-----------------------------------Switch 3300 (1)----------------------
Select menu option (ethernet): portMode <CR>
Select Ethernet port (1-24): 1 <CR>
Enter new value (10half,10full,100half,100full) [100half]: 100full <CR>
The second way to configure port 1 to 100Mbit full duplex is by logging into the SuperStack 3300 via the Web based management feature.
Launch your Web browser and enter the IP address that has just been assigned to the switch in the location field of the browser.

Location: 192.9.200.30 <CR>
Login to the switch:
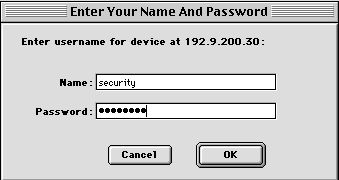
Name: security <CR>
Password: security<CR>
A Graphical front view of the the SuperStack 3300 will now be displayed. By default all switch ports are configured to AutoNegotiate. To configure the switched port to forced 100Mbit Full Duplex perform the following steps:
Click select the desired port to configure with the mouse, (Default configuration will be displayed).
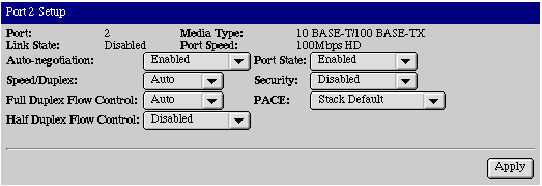
Click select Auto-negotiation to disable and select Apply to apply changes.
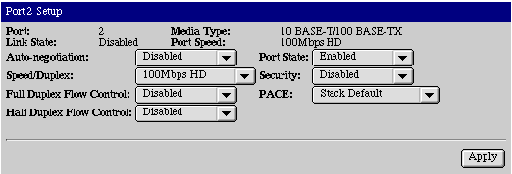
Set Speed/Duplex to 100Mbps FD and select apply to force port to 100Mbps Full Duplex.
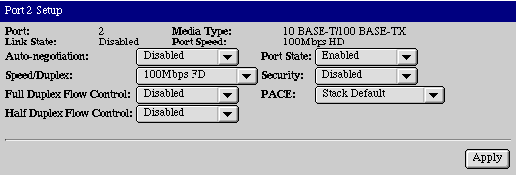
Switch port 2 is now configured to 100 Mbps Full Duplex, continue this procedure with any additional ports that may need to be configured.
Download new software to SuperStack 3300: (NEVER POWER OFF DURING DOWNLOAD)
Downloading new software onto the SuperStack 3300 requires the use of a TFTP server. Install the new software onto the TFTP servers root directory (currently version 1.07 file name S2S01_07.BIN).
Select menu option:
Menu options: -------------3Com SuperStack II, Switch 3300--------------
ethernet - Administer Ethernet ports
ip - Administer IP
logout - Logout of the Command Line Interface
snmp - Administer SNMP
system - Administer system-level functions
Type ? for help.
-----------------------------------Switch 3300 (1)----------------------
Select menu option: system <CR>
Menu options: -------------3Com SuperStack II, Switch
3300--------------
display - Display device information
information - Set the system name, location and contact
initialize - Reset to factory defaults
inventory - Stack information
password - Change system password
remoteAccess - Change Remote Access permissions
reset - Perform system reset
security - Administer system security
softwareUpgrade - Perform agent software upgrade
unit - Input commands to another unit
Type "q" to return to the previous menu or ? for help.
-----------------------------------Switch 3300 (1)----------------------
Select menu option (system): softwareUpgrade <CR>
TFTP Server Address [1.2.3.4]:192.9.200.101 <CR>
File Name [1]:S2S01_07.BIN <CR>
Software Upgrade has begun...
Select menu option (system): “SEE NOTE BELOW!!”
Note: Imediately after pressing enter to upgrade software the “Select menu option (system)” will display, please note that the Power /Selftest will blink while new software is being loaded. The upgrade only takes a few minutes to download. Eventually the “Unit” led’s on the switch will blink in a circular fashion and the switch will reboot with new software.