PC-PCSHARE
Software
Installation and Configuration
Introduction
AppleTalk is the
generic name for a proprietary LAN architecture built
into all Apple Macintosh computers and laser printers. On
an Ethernet network this protocol is known as EtherTalk.
AppleTalk is not compatible with TCP/IP but can coexist
with it and other network protocols on the same network
cable with no mutual interference. Ethernet is a
linear-bus topology network, with all workstations etc.
connected to a single cable which has a beginning and an
end and is not arranged as a T or a ring.
EtherShare
EtherShare is a
software program for AppleTalk networks, it provides
server functions for Apple Macintosh and other computers
(MS-DOS based) connected together in an AppleTalk
network. EtherShare is based on the
multiple-tasking/multiple-user features of the UNIX
operating system and the RS/6000 platform. EtherShare is
closely integrated with some of the more common system
facilities and programs in UNIX.
EtherShare-OPI
OPI (Open Press
Interface) is an interface specification developed by
Aldus Corp. This is an optional add-on for EtherShare
which enables you to increase print spooling speed for
DTP layouts using large high-resolution images.
PCShare
PCShare is a high-end
TCP/IP based file-server, print-server and
terminal-server software for MS-DOS computers which are
attached to UNIX computers through Ethernet etc. PCShare
is compatible with EtherShare allowing MS-DOS and
MS-Windows users to share network printers and files with
Macintosh and UNIX users.
The EtherShare
software can be divided into the following functional
modules:
AppleTalk
Protocol Stack - is responsible for basic
AppleTalk network functions including network
routing for interconnecting physically separate
AppleTalk networks and passing required
information between them transparently.
The
EtherShare File Server -allows access to
documents and applications throughout the whole
network.
The
EtherShare Print Server -is a central spooler
for print jobs destined for PostScript devices.
One or more printers can be connected to
EtherShare simultaneously, either through
EtherTalk, TCP/IP or connected directly to the
RS/6000 host. The Font Server is an integral part
of the Print Server
The
Terminal Server and Ripro Terminal - the
Ripro Terminal program allows workstations within
the AppleTalk network to make one or more
simultaneous connections to one or more UNIX
hosts via a terminal emulation with multiple
session capability. Ripro Terminal communicates
with UNIX through the Terminal server.
The Mail
Server and Ripro Mail - allow workstations in
the AppleTalk network to send electronic mail
messages and files to other Macintosh or UNIX
users on the network. Ripro Mail communicates
with UNIX through the Mail Server.
The
Administration Server and Ripro Admin - Ripro
Admin communicates with EtherShare through the
Administration Server. The Administration Server
runs on the UNIX host while Ripro Admin runs on
the Macintosh. System administrators can use
Ripro Admin to configure EtherShare from a
Macintosh workstation. It can also be used to
set-up regular UNIX users, groups and printers.
Regular users can use Ripro Admin to inspect
current EtherShare configuration, but only
designated personnel can make changes.
Activation
Keys
An integral part of
open platform software is the necessity for site
licensing (to prevent illegal use of the software and to
protect the financial interests of the software
manufacturer) and activation keys to enable the software
to run.
The following
procedures cover the setup of the Ripro Server
Application, inserting the activation key and configuring
the AppleTalk network. These procedures must be executed
for each module of the Application (EtherShare,
EtherShare OPI and PCShare).
Licensing
and Activation Keys Installation
-
The Ripro Server stations are supplied
pre-loaded with the Application software. Refer to Chapter 3, Configuration
and Setup (UNIX), for a description of the installation of the Server
Software. The completion of the software installation is executed
using demo activation keys supplied by CreoScitex in the event that
the base site license is not immediately available.
A demo
activation key is limited for a specified period
of time. This is a generic key shipped with each
system to enable completion of software
installation on-site. Demo keys are also used in
specific cases where a change in a machine will
change its status vis-a-vis the license (e.g.
change in CPU, or purchase of a new software
option).
-
Permanent activation keys must
then be ordered from CreoScitex in accordance with the number of
machines to be licensed and other relevant information such as CPU
ID etc. Formal ordering procedures are set out by ICS. These keys
do not have a time limitation.
The initial
license is known as a base license and covers a
minimum of 20 users for EtherShare and EtherShare
OPI. For PCShare the minimum base license is 3
users. The base license may be expanded as new
users are added to the network. For EtherShare
(and EtherShare OPI) each expansion of the base
license covers an additional 10 users, whereas
for PCShare only five additional user can be
added each time.
For software
upgrades new keys are issued and installed
according to the procedures set out here.
To configure the EtherShare
Networking Products proceed as follows:
- Login as root, type in your
password and press Enter.
- At the command prompt type cd
/usr/local/es and press Enter.
- Type ./install.p and
press Enter.
- The Ripro Server Networking
Products Installer appears.

- To install EtherShare press
Enter to confirm the default selection (1) which
is the EtherShare installation. The following
EtherShare Installation Menu appears:

NOTE: When selecting an option, press
Enter only, if the option numberrequired
appears as the default in the type-in space. In
all othercases type in the option number and
press Enter.
- Type 1 to install
programs and configuration files, or press Enter.
The installer will run for a few seconds and then
return to the above window.
- Type 2 to install and
configure AppleTalk kernel modules, or press
Enter.
- Type 3 to enter an activation key to license
CreoScitex products, or press Enter.
- Press Enter to reach the
EtherShare License Menu
NOTE: The machine
ID is the number of the CPU and therefore a unique number
for each machine.
The EtherShare License Menu enables
you to configure the different aspects of EtherShare as
set out in the menu.
To enter a Base
License
- To enter a Base License, type 1
and press Enter. The following screen appears:
(this screen is an example only, base licenses do
not have an expiration date)

- Type in the license parameters
( software serial number, number of users and
checksum), type 5 and press Enter to
return to the EtherShare Installation Menu. The
license is valid.... message appears before
returning to the installation menu.
To enter an user
expansion license
- To enter a Base License, type 2
and press Enter.
- Type in the license parameters
( software serial number, number of users and
checksum), type 5 and press Enter to
return to the EtherShare Installation Menu. The
license is valid.... message appears before
returning to the installation menu.
To display
licenses
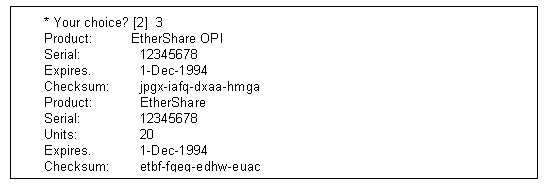
- To display the licenses
(license numbers and checksums), type 3
and press Enter. The following screen appears:
- Type 5 and press Enter
to return to the EtherShare Installation Menu.
To delete a
license
Use this option only when absolutely necessary,
after consulting CreoScitex.
To Add a Demo User
This option is accessed from the
EtherShare Installation Menu:
- To add a demo user, type 4
at the main menu prompt, and press Enter. The
following screen will appear:

- Type y and press Enter
to confirm creation of a demo user named macuser.
- The installer will
automatically return to the main menu.
Configure
AppleTalk network numbers
Type 5
to configure the AppleTalk network, press Enter.
The following system message appears:
The terminal type ($TERM)
is IBM3151
Enter terminal type <Return> for IBM3151.
- Press Enter and the AppleTalk
Network Setup screen now appears.
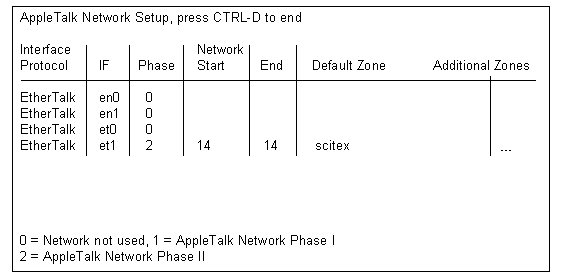
NOTE: For correct configuration
at a customer's site, the Network Start andEnd numbers should be supplied
by the Network Administrator. Refer to CreoScitex Doc No.771-39963B
Ripro Server Admin Guide.
- Enter the network
configuration numbers. After finishing the
AppleTalk configuration, press Ctrl-D twice.
Write current network configuration to...?
<Y> and press Enter.
Press Enter to quit.
- The program returns to the
Networking Products Installer menu.
- Proceed to configure
EtherShare OPI.
- From the Installer Main Menu,
type 2 and press Enter.
The following system message appears:
The OPI installation needs to know where the
EtherShare has been installed on this system.
* Location of EtherShare (q to quit) ?
[/usr/local/es]
- Press Enter to confirm the
location of EtherShare OPI.
When you confirm the location of the EtherShare
files the EtherShare OPI Installation Menu screen
appears:
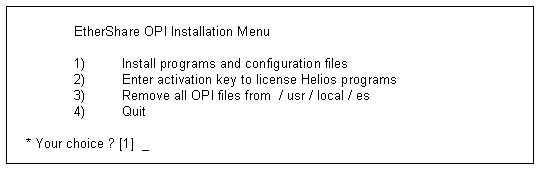
- Type 1 to install the
programs and configuration files or press Enter.
The installer will run for a few seconds and then
the following message will appear.
Enter suffixes for the Cyan color [C], Magenta
color [M], Yellow color [Y], Black [K]. Press
Enter.
- After you press Enter you
return to the EtherShare OPI Installation Menu.
- Type 2 or press Enter
to enter the activation key. The following screen
appears, with the system message regarding the
EtherShare and OPI serial numbers:
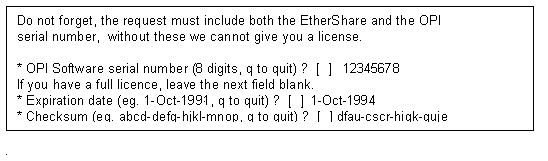
- Enter the serial number received from CreoScitex
and then the checksum series. Press Enter to return to the OPI installation
menu. (The expiration date is only relevant for demo activation keys).
The license is valid.... message appears before returning to the installation
menu.
- Type 4, or press Enter
to return to the Installer menu.
- From the Installer Main Menu,
type 3 or press Enter.
- The PCShare Installation Menu
screen appears:
- Type 1 to install the
programs and configuration files or press Enter.
The installer will run for a few seconds and then
the next screen confirms the installation of an
automatic PCShare start-up script.

- The PCShare Installation Menu
appears.
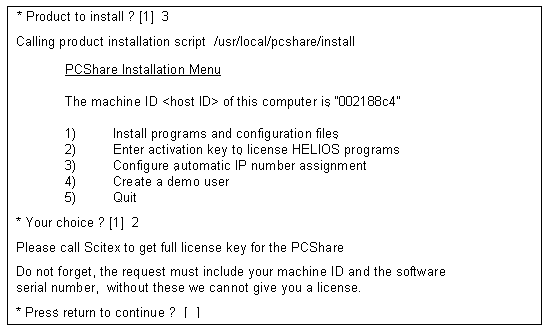
- Type in 2 to Enter the
activation key to license programs, or press
Enter. Ensure that you have the full license key
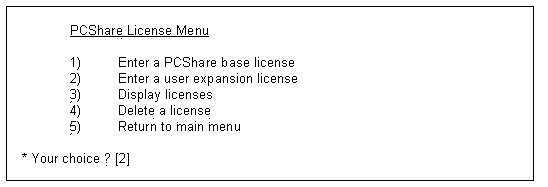
The PCShare License Menu now appears:
- From the PCShare License Menu
select the option you require. Refer to EtherShare License Menu and use the same procedures
described there to enter a base license, to enter
a user expansion license, to display licenses or
to delete a license. Press Enter.
- Type 5 or press Enter
to return to the PCShare Installation Menu.
Configure
automatic IP number Assignment
Identifies your TCP/IP
configuration, and displays which interface adapter will
be used in conjunction with the PCShare software.
- Type 3 or press Enter
to select this option.
The window that appears lists the configuration
for the network interface to which you are
currently connected
- Select OK if you accept this
configuration; to change the interface connection
you will need to change your TCP/IP setup.
You now return to the PCShare Installation Menu.
Create a Demo
User
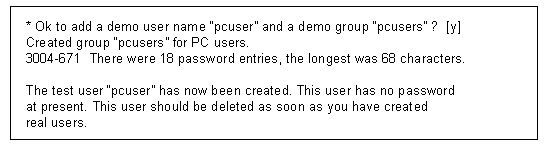
This will enable you to create a
demo PC User until you create actual users.
- Type 4 or press Enter
to activate this option.
- Press Enter in answer to the
question - to add a demo user and demo user
group.
- Type 5 and press Enter
, to quit and return to the Ripro Server
Networking Products Installer.
- Type ./start pcshare
For Servers with Scitex
Ripro Software Ver. 1.2
To upgrade PCShare Client Software
.
- PCShare software can be
installed on top of earlier existing versions
- PCShare Server Ver 2.0 is
backwards compatible, PCShare 2.0 client software
is not backwards compatible. It must be installed
only after upgrading PCShare server software.
NOTE: You must install PCShare from
CreoScitex Ripro Software Version 1.2.
DO NOT use the CD-ROM or diskettes that come with the
PCShare documentation kit.
NOTE: The Setver.exe
command must not be used with PCShare 2.0. If your config
file includesthe following entry it must be deleted:
C:> Setver x:\dir name pcs_odi.exe /d. (x:\dir name is
the full path to the Dos directory).
Stopping the
PCShare Server
- If the PCShare server is
working it must be halted in order to continue to
upgrade and/or install new software.
- At the command prompt type :
/scitex/version/usr/local/pcshare/stop-pcshare
and press Enter.
- To start the server when you
have completed the installation and
configuration, type at the command prompt:
/scitex/version/usr/local/pcshare/start-pcshare
and press Enter.
PCShare and other
Networks
- PCShare can be used
concurrently with other network software on the
same PC, however the sequence of loading drivers
is important.
- Refer to PCShare Version 2.0,
Technical and Installation Manual, Chapter 15,
Coexistence of PCShare and other Networks pages
410-416, if you are already using Novell or other
types of Network.
- PCShare creates a Net.cfg file
on installation, which must be used by all
networks.
- Rename the Net.cfg file (of
the existing network ) Net.Old.
- Ensure that the PCShare
directory is entered into the path of your
autoexec.bat file and that all protocols can
access the same Net.cfg file (have the same
path).
PCShare client installation is
performed using the PCINST installer program. To use
PCINST and install PCShare refer to the documentation
supplied with the software.
PCShare Version 2.0, Technical and Installation Manual,
Chapter 3, Installation.
When you initially install PCShare
the order of operations recommended is as follows:
| Operation |
Aim |
| Create
PCShare Install diskette |
Install
PCShare |
| Install
Ethernet Card |
To
run PC-Share |
| Install
PCShare |
Copies
files to your PC |
| Configure
Network |
Configure
network driver |
| Configure
TCP/IP |
Create
local configuration file for IP address etc |
| Configure
Windows 3 |
To
enable using PCShare with Windows
IMPORTANT:
This option can only be installed after a
complete installation of both PCShare server and
client software has been performed and a
successful login to the server has also been
executed. |
| Configure
Terminal (optional) |
Only
if not using standard PCShare terminal
configuration |
| Configure
PrintSrv (optional) |
Configure
local printers |
Create
PCShare Client Installation Diskette
To make an installation diskette with an image of
PCShare Client Software from the CreoScitex Ripro Server Distribution
Media CD-ROM Ver.1.2.
- Insert any 1.44MB diskette
(formatting not important) into the floppy disk
drive of the Ripro Server.
- At the command prompt type: $SCI_SCRIPTS/makepc
and press Enter.
- On the screen the following
message appears:
Please insert new diskette to floppy drive and
press Enter.
- Press Enter.
- At the end of the
process,which should only take a few minutes, the
following message appears on the screen:
dd:360+0 records in
dd:360+0 records out
PCShare Installation diskette is now ready. You
can use it to install PCShare Client.
Installation
- Verify which Ethernet card you
have installed and what settings are configured
for this card.
- It is assumed that client
hardware (Standard Ethernet board) is
successfully installed. If the board is self
configuring, PCShare will recognize all
relevant parameters.
- For non -self configuring
boards the following information must be
supplied:
- Board type (should be
written on the board)
- Interrupt Request
- I/O Base Address
- DMA Channel
- Base Memory Address
- Refer to documentation
supplied with the specific board.
IMPORTANT: Confirm that PCShare on
the server has been successfully installed and configured
before commencing the following PCShare client
installation.
- Insert PCShare version 2.0
diskette (refer to section 4.2.5 Create PCShare
Client Installation Diskette) into your computer.
Make sure Windows is closed. At the DOS prompt
type: a:\pcinst and press Enter.
NOTE: The diskette contains only a minimum number
of files and programs necessary to install
PCShare and login to the host. The other PC
utilities are made available as soon as the
PCShare server connection is established.
- From the Install PCShare menu
select the different items to be installed, in
the following order:
- Install PCShare (refer to
PCShare Version 2.0, Technical and Installation
Manual, Chapter 3, Installation, page 30).
- Configure Network (refer to
PCShare Version 2.0, Technical and Installation
Manual, Chapter 3, Installation, page 34). This
includes configuring your Ethernet card
parameters and your Ethernet port (whether thin
Ethernet (10Base-2) or thick Ethernet (10Base-T).
- Configure TCP/IP (refer to
PCShare Version 2.0, Technical and Installation
Manual, Chapter 3, Installation, page 39).
- Configure Terminal and
Configure Printers are optional and need not be
executed.
- When these installations are
complete, select Exit from the PCShare Install
Menu.
- At the DOS prompt type cd
c:\pcshare and Enter, then type startnet
and press Enter. This command loads the files
required by the ODI driver system. For a
successful connection you will receive the
following message on the screen: Drive Z: used
for volume Public Disk.
- At the DOS prompt type: a:\pcinst
and press Enter.
- From the Install PCShare menu
select Configure Windows 3. (Refer to PCShare
Version 2.0, Technical and Installation Manual,
Chapter 3, Installation, page 41).
- When this is complete, select
Exit from the PCShare Install Menu.
Configuring
PCShare Client
The PCShare Administration can be
configured from a PC (DOS) or UNIX workstation, using the
PCAdmin application.
To access this application from
the Ripro Server.
- Login as root, type in roots
password and press Enter.
- Type cd /usr/local/pcshare
and press Enter.
- Type ./pcadmin and
press Enter.
To access this application from
the PC
- From the PC, login to the
server as root using PCLogin.
- At the DOS prompt type: PCADMIN
and press Enter. You will be prompted to type in
roots password.
The PCAdmin main menu appears. (Refer to PCShare
Version 2.0, Technical and Installation Manual,
Chapter 7, Administering PCShare).
- Select Configure Users (to
add, change or delete users) and follow the
reference manual to configure the users.
- When you have completed
defining all user parameters, return to the main
menu.
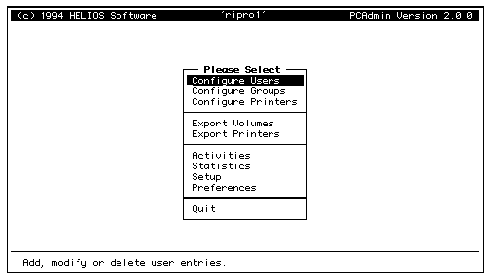
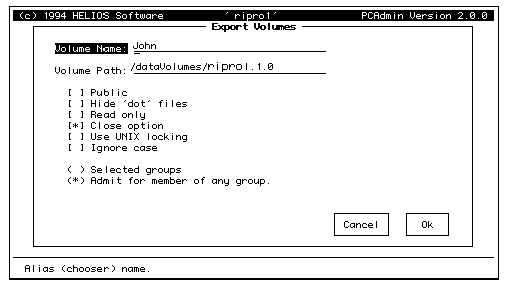
- Select Export Volumes.
Exporting Volumes enables PCShare users to access
dataVolumes (UNIX directories), follow the
reference manual to define volumes for export.
Ensure that you select the Close option for each
volume you select.
- Select Export Printers, select
New Printers and then select the printer from the
network. Refer to PCShare Version 2.0, Technical
and Installation Manual, Chapter 7, Administering
PCShare, for further information on printer
configuration.
- After you have completed the
Export Printers you can now begin working with
PCShare, without configuring other items in the
menu. These can be configured when needed.
- To exit PCAdmin, select Quit
from the main menu.
PCShare Chooser
for Windows
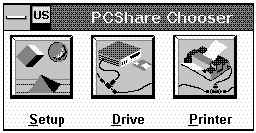
PCShare Chooser is a Windows tool
that allows you to choose and then mount PCShare network
volumes and to make them available to your PC.
You can set up the PCShare program
group PCShare Tools where you will have access to the
PCShare Chooser.
Select PCShare Chooser, which has
shortcut buttons, for executing the main chooser
functions.
Refer to PCShare Version 2.0,
Technical and Installation Manual, Chapter 4, Accessing
Network drives and Printers from Windows, pages 53-64.
Ethershare, Ethershare OPI and
PCShare will start automatically when the server is
rebooted.
- To start the server after
configuration, from the Networking Products
Installer type 4 Start Server and press
Enter.
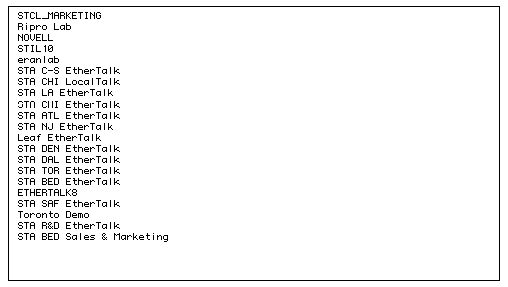
Display Zones
To display the AppleShare zones in
the network.
- From the Ripro Server
Networking Products Installer menu, type 6
press Enter to display the AppleShare zones.
Display Network
To display the AppleShare Network
- From the Ripro Server
Networking Products Installer menu, type 7
or press Enter to display the AppleShare network.
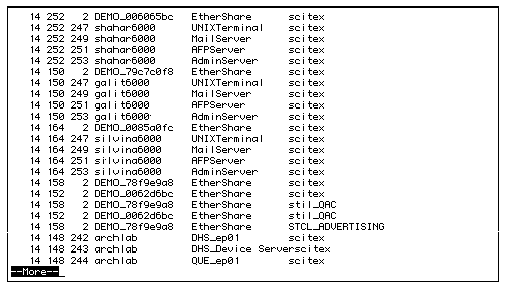
This window displays all
AppleShare devices configured on the network and
their IP addresses.
- At the Ripro Server Networking
Products Installer menu type 9 and press
Enter to quit.
|

