Scinet
LAN FE (MAC)
SciNet LAN FE provides a network
infrastructure for Scitex applications running on Apple
Power Macintosh computers. This document describes the
procedure for installing the LANC PCI expansion card for
PCI Bus and the SciNet LAN FE software.
SciNet LAN FE consists of:
- Scitex Program To Program
Protocol (PTOP)
- Dynamic configuration
- File transfer protocol
- Remote file access protocol
These protocols require a Scitex
LANC PCI expansion card in each computer. Only one card
can be installed at a time. You can only work with either
Ethernet or Fast Ethernet at one time (not with both).
Apple software packages used by
SciNet LAN FE are:
- Apple Shared Library Manager
- Thread Manager
All those items necessary to run
SciNet LAN FE are included in the interface kit.
- The SciNet LAN FE software
interface kit consists of one floppy disk: SciNet
LAN FE.
Hardware
Requirements
- Apple Power Macintosh computer
or higher.
- PCI expansion bus
architecture.
Software
Requirements
System software version 7.5.2 or
later.
Network
Requirements
LANC PCI supports the following
networks:
- Twisted pair Ethernet
(10BaseT) above cat. 3, cat. 4 and cat. 5 cables.
- Twisted pair Fast Ethernet
(100BaseTX) above cat. 5 cables.
Note: The board
connectors are Half Duplex, so if your Link Switch or
other device is Full Duplex you must switch your device
into Half Duplex mode.
Coax cables are not supported.
- Switch off your computer and
all other devices.
- For further safety, unplug the
power cord from your computer.
- Remove the computer lid.
- Choose the PCI expansion slot
you wish to use, and remove the metal shield
protecting the slot opening. You can use any free
PCI slot.
- Push out the plastic cover
with your thumb, or use a blunt object such as
the eraser end of a pencil.
- Remove the card carefully from
its protective antistatic bag.
- Slide the card down into the
slot. Align the connector on the bottom of the
card, and push the card down firmly to make a
good connection.
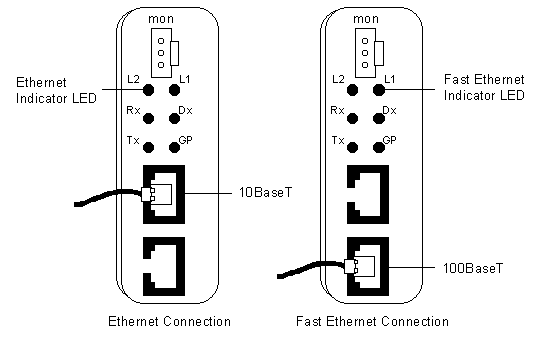
- Attach the cable to one of the
two connectors according to whether you want to
work in Ethernet or Fast Ethernet (see the figure
below).
Note: If you need to change between 10BaseT
and 100BaseT connections after the computer has
been turned on, first modify the physical
connection as required, then restart the
computer. Only one card can be installed at a
time. You can work with either Ethernet or
Fast Ethernet at one time (not with both).
- Close the computer's lid.
- Switch on the computer.
Install the software (see the Software section).
Checking the LEDs
If you wish to check that the
expansion card is inserted and connected correctly, you
can check the LEDs (light emitting diodes) on the card as
described below. However, it is not a compulsory part of
the installation.
When the expansion card is inserted
and connected correctly to either the Fast Ethernet cable
or the Ethernet cable on one side and to the Hub/Switch
or Hub on the other, one of the following will occur,
depending on the connection you have made:
- the Fast Ethernet LED will
light up when you are connected to the Fast
Ethernet network.
- the Ethernet LED will light up
when you are connected to the Ethernet network.
- Switch on your Apple Power
Macintosh computer.
- Verify that the LANC PCI board
is connected to the network, as described in Hardware.
- Insert the SciNet LAN FE
diskette in the floppy disk drive. A disk icon,
as shown below, is displayed on the desktop.
- Double-click on the icon. The
following window is displayed:
SciNet
LAN FE
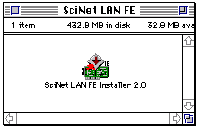
- Double-click on the SciNet LAN
FE Installer icon.
- The installer displays a
welcome message.
SciNet
LAN FE Installer
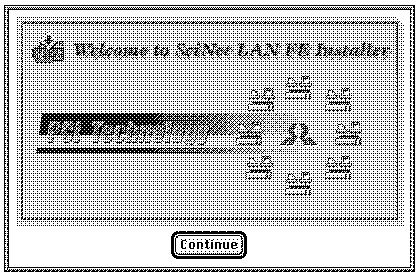
- Click Continue to begin
the installation.
The SciNet FE PCI window is
displayed, as shown below.
SciNet
FE PCI
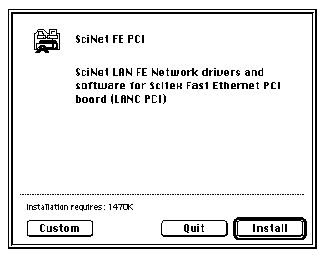
- Click Install to
perform the standard installation.
Note: Should you wish to uninstall, hold down
the Control key to change the window and
click on Uninstall to enable this option.
The Install button will change to Uninstall.
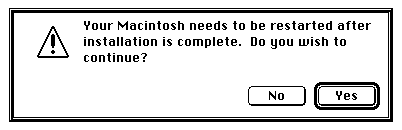
- A warning message is
displayed. Click Yes to continue with the
installation.
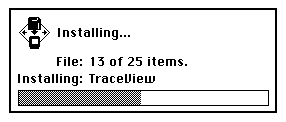
Installation begins. A message box is displayed
showing the progress of the installation.
- When the
installation is complete, the following message
box is displayed:
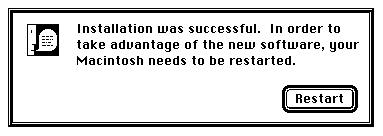
- Click Restart
to complete the installation. When the Apple
Power Macintosh is restarted, the SciNet device
driver icon should appear in the group of device
driver icons which appear at the bottom of the
screen during startup. If it does not appear at
all or appears with a large X, refer to Troubleshooting.
After
the cable and the software is installed, you must restart
the computer to enable communication. Furthermore, each
time you change between an Ethernet and Fast Ethernet
connection you must also restart the computer, since the
computer only detects the connection change upon start
up.
Now you must configure your Apple
Power Macintosh computer as a station on the SciNet.
This section describes how to
configure your Apple Power Macintosh computer as a
station on the SciNet.
To configure your Apple Power
Macintosh computer, perform the following procedure:
- Open the SciNet Configuration
control panel.
It can be found in the Control Panels folder.
If this is the first time you've installed SciNet
LAN FE on this Macintosh, SciNet Configuration
displays its control panel, shown in the
following figure:
SciNet
Configuration
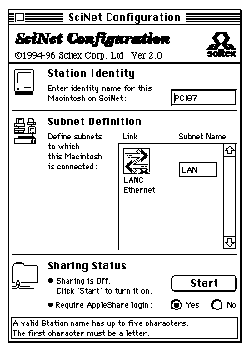
In the Subnet Definition window of
the control panel, you can see what type of connection
has been made, Ethernet or Fast Ethernet.
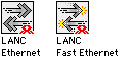
If a large X appears in the window,
no connection has been made.

If a connection can't be found, you
can either select Restart from the Special menu to
restart your computer and begin again, or press Start on
the SciNet Configuration control panel to try to
reconnect. This option will take some six seconds until
SciNet reconnects.
If the Subnet Definition window is
empty, make sure that the LANC board has been properly
installed. See Troubleshooting
for more details.
- Enter a name for this Apple
Power Macintosh.
In the Station Identity text box, type in a name
according to the following criteria:
- The name can consist of up
to five characters.
- The first character must
be a letter and the last character must be a
digit.
- The station name must be
unique on your network.
- Enter the logical name for the
LAN Subnet.
In the Subnet Definition part of the window,
enter your LAN Subnet logical name in the Subnet
Name field. This name should contain between
one and six characters. The first character must
be a letter. The logical name of the subnet is
common to all stations connected to it.
(Macintosh computers and Scitex workstations).
Warning: Make sure you have the same LAN
subnet logical name on all your SciNet stations
(Whisper, PS/2 and Macintosh).
- Choose whether the Apple Power
Macintosh is visible to other computers on the
SciNet network.
If sharing is on, other computers on the SciNet
network can see your Macintosh.
By default, Sharing is Off. You should turn it to
On to enable your Apple Power Macintosh to be
visible to the other stations on the SciNet
network.
- Choose whether users need to
log in to access your Apple Power Macintosh.
SciNet LAN FE supports access rights as defined
by either AppleShare or System 7 File Sharing,
when accessed by another Macintosh through
SciNet.
When Yes is selected in the Require
AppleShare field, users must enter their
usernames and passwords before they can access
your Apple Power Macintosh. To allow access
without requiring the AppleShare login, follow
these steps:
- Verify that the AppleShare
file server is running, or that the File
Sharing option in the Sharing Setup control
panel is On.
- Select No in the Require
AppleShare login field. If you have File
Sharing, the dialog box looks like this:
File
Sharing Dialog
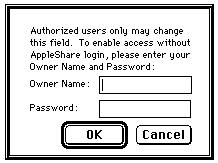
- Enter the requested
information, and click OK. This is the same
Owner Name and Password as defined in
AppleShare's Sharing Setup control panel.
- Close the SciNet Configuration
control panel.
- If you made any changes in the
control panel, restart your Apple Power
Macintosh.
If you changed any of the fields in the control
panel, SciNet Configuration displays the
following message:
Configuration
changes will not take place until the next restart
- Click OK and choose Restart
from the Special menu.
After your Apple Power Macintosh restarts, you
can select SciNet-Look in the Chooser to see all
the stations that are connected to your SciNet
network and that SciNet applications can access.
SciNet
Dynamic/Static Stations
Viewing Dynamic Stations
When your Apple Power Macintosh
starts up, it automatically recognizes all the computers
which are connected to it. These stations are called dynamic
stations.
To view the dynamic SciNet stations
connected to your Apple Power Macintosh:
- From the Apple menu, select
the Chooser option. The Chooser
window is displayed:
Chooser
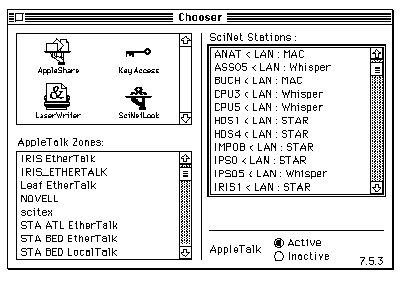
- In the Chooser window,
click on the SciNet-Look icon as shown in
the above figure. The list of dynamic SciNet
stations is displayed in the SciNet Stations
area.
Defining Static Stations
When your Apple Power Macintosh
starts up, it automatically recognizes all the computers
which are connected to it, however, stations which are
not recognized upon startup, can be defined as static
stations using the SciNet Stations control panel.
To define static stations on your
Apple Power Macintosh, perform the following procedure:
- Click on the SciNet Stations icon
 to display the SciNet Stations control panel.
SciNet
Stations Control Panel
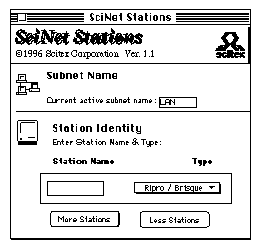
- In the Subnet Name text
box you will see the name of the currently active
subnet. To change this subnet, change the current
Subnet name in the SciNet Configuration Control
panel, as shown on Scinet
Configuration.
- In the Station Identity
part of the window:
- In the Station Name
field, type in the name of the station.
- In the Type field,
select the station type from the drop-down
list. The following types are available: Ripro,
Macintosh, Whisper, PS/2.
When you have entered a station name and
type, fields are displayed in which you can
define additional static stations, as shown
in the figure below:
SciNet
Stations Control Panel
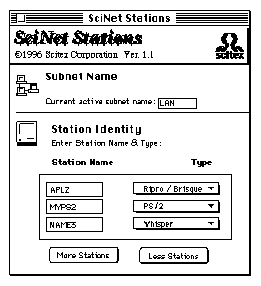
- Repeat Step 3 to define
additional static stations.
- When you have completed defining the static stations, click the
close box
 to close the SciNet Stations control panel.
- Restart your Mac.
Problem:
After restarting my Mac, I see the following message:
"SciNet: Subnet [subnet name]. This subnet cannot be used because no
Ethernet/Fast Ethernet connection was found. Please check
that the board is connected to the network."
Solution:
- Make sure that the LANC board
is properly installed in your Mac.
- Make sure that the
Ethernet/Fast Ethernet cable is properly
connected to the LANC board.
- Make sure that the
Ethernet/Fast Ethernet cable is in good working
condition.
- Check that appropriate
Ethernet/Fast Ethernet LED is lit.
- Run the LANC diagnostic
application to verify that the LANC board is
functioning properly (see Diagnostics).
- Reinstall the SciNet
Installer, as there may be a defective Ethernet
driver in the system.
Problem:
I cannot see any Subnet name in the SciNet applications.
Solution
- Verify that the subnet name is
configured properly in the SciNet Configuration
control panel, as shown in Scinet
Configuration.
- Make sure that the
Ethernet/Fast Ethernet cable is properly
connected to the LANC board.
- Make sure that the
Ethernet/Fast Ethernet cable is in good working
condition.
Problem:
I cannot see any stations in the SciNet applications, and
SciNet-Look.
Solution
- Check that appropriate
Ethernet/Fast Ethernet LED is lit.
- Make sure your Macintosh is
physically connected to the other SciNet stations
(Whisper, PS/2 and other Macintosh computers).
- Make sure the other SciNet
remote stations that you want to see are switched
on and that the proper SciNet application is
running on each station.
- Restart your Macintosh.
- Make sure that the logical
subnet name on all the SciNet stations is the
same.
- Make sure you are not
connected to your other SciNet stations through a
router.
Note: The SciNet
stations can be connected through Hubs/Switches, Hubs,
bridges, repeaters, etc., but not through routers.
Problem:
The following message is displayed:
"SciNet: One or
more of the SciNet files are missing, try to reinstall
the SciNet LAN software."
Solution
- Check that the LANC card has
been properly installed.
- Reinstall the SciNet LAN software.
- Restart, either by selecting
restart from the Special menu, or by clicking
Start on the SciNet Configuration Control Panel.
Problem:
I can see some SciNet stations, but can't see a specific
one.
Solution
- Make sure the other SciNet
remote stations that you want to see are switched
on, connected properly and that the proper SciNet
application is running on each station.
- Check the configuration on the
remote SciNet station.
- Make sure that the Scitex Fast
Ethernet board has been connected correctly to
the Ethernet/Fast Ethernet cable and that this
cable is connected correctly to the Hub/Switch or
Hub.
- Check that the Ethernet/Fast
Ethernet LED is lit up.
- Make sure that your Mac and
the remote SciNet station are not connected
through a router.
- Check the cable which is
connected to the remote SciNet station. Do this
by trying to connect the remote SciNet station to
another SciNet station, preferably one to which
your Mac is connected.
Note: Make sure the
logical subnet name is the same on your Mac and on the
remote SciNet station.
Problem:
I cannot establish a connection from the PS/2, or other
station, to the Macintosh.
Solution
- On the Macintosh, open the
SciNet Configuration control panel, and make sure
that SciNet Sharing is on.
- Make sure your logical subnet
name is the same on the PS/2 and the Macintosh.
- Make sure that the Macintosh
station name that you configured on the PS/2
(through sciutil) is the same name you gave to
that Macintosh through the SciNet Configuration
control panel on the Macintosh.
- Make sure your PS/2 is
physically connected to the Macintosh, and not
through a router.
Problem:
My Macintosh hangs (crashes) when I work with the SciNet
applications.
Solution
- Restart your Macintosh, while
holding the <shift> key. Open the Memory
control panel and make sure that Virtual Memory
is Off and Modern Memory Manager is On.
Problem:
I can see and connect all my SciNet stations, but I'm
getting a very poor data transfer performance.
Solution
- SciNet LAN FE performs best if
you connect your SCSI drive to SCSI bus 0 and use
an Apple Power Mac 9500 130 MHz or higher. Other
configurations may lead to reduced performance.
- Close all open control panels,
as well as any CPU time-consuming application.
- The load of the remote SciNet
station - disk activities and CPU time - may
affect the performance of data transfer.
- If you are using one segment
of an Ethernet line (rather than a Hub/Switch or
Hub configuration), simultaneous data transfer on
the same segment may significantly affect the
performance.
- Defective hardware - bad
cables, faulty hub repeaters, loose cable
connections - even though you may be able to
connect between the stations, can affect the data
transfer rates.
- Disk access speed - use a disk
utility package to check your hard disk access
speed. A slow or very fragmented hard disk may
cause poor file transfer performance.
Note: The SciNet
applications are very friendly; for example, they can run
in the background and can simultaneously copy more than
one file using several SciNet applications. Because of
this, any non-friendly open application may affect data
transfer performance. For instance, any open control
panel may cause the Finder to grasp a considerable amount
of CPU time.
Problem:
SciNet/LAN stops working after loading System 7.5.2.
SciNet Configuration control panel was moved from the
Control Panels folder.
Solution
Overview
This section provides instructions
for running the Diagnostics for PCI Fast Ethernet. The
Diagnostics can run a number of tests (according to your
selections) to check the Fast Ethernet card. The
Diagnostics window enables you to select the tests to be
run and to view the status of failed or passed tests.
This chapter also discusses the menu options that are
available once the Diagnostics has been opened.«
Starting the
PCI Fast Ethernet Diagnostics
Following are instructions for
running the Diagnostics and a description of the
Diagnostics window.
To start the PCI Fast Ethernet
Diagnostics:
- 1. From the System Folder,
select SciNet Files.Diagnostic.
A window opens containing the following:

Note: In addition
to the PCI Fast Ethernet icon, there are two other icons
representing files which are an integral part of the
Diagnostics program.
- Double-click on the PCI Fast
Ethernet icon to open the Diagnostic System. The
PCI Fast Ethernet logo is displayed.
PCI
Fast Ethernet Diagnostics
The PCI Fast Ethernet
Diagnostics window is then opened:
PCI
Fast Ethernet Diagnostic
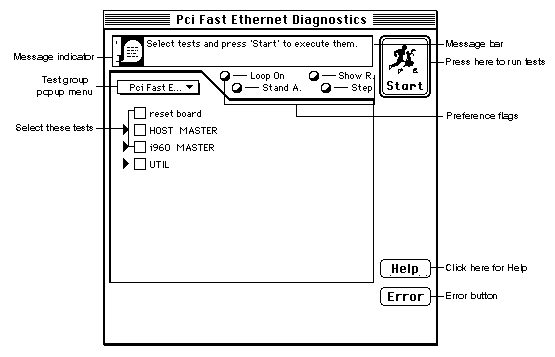
Tests
The Diagnostics window
contains three test groups and one additional option, UTIL,
with checkboxes on their left. The tests are arranged in
a hierarchical tree structure with the test groups shown
on the top level: reset board, HOST MASTER, i960
MASTER, as shown below:
Test
Hierarchy
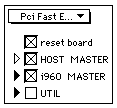
To display the tests contained in a group of tests, click on the (arrow) to the left of a test group. The test hierarchical tree will
expand and the tests in that group will be displayed. The popup menu
above the tests will display the name of the test group you selected.
The following example shows how the HOST MASTER is selected:
Test
Hierarchy
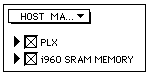
When you select a test group, all
the tests in that group will be selected and an X will
appear in their checkboxes. Tests in a group may contain
sub-tests, which will also be selected. You may leave
these tests selected or deselect them.
- To deselect a group of tests,
click on the test group.
- To deselect a test in a group
of tests, click on that test.
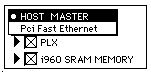
To return to a higher level in the
test hierarchy, click on the popup menu and select the
requested level.
To go to a lower level in the test hierarchy, click on the .
Test
Hierarchy
Indicators
At the top of the Diagnostics
window the following four indicators are displayed:
| Loop On: |
Indicates that the Loop Abort or
Loop Until Fail option is selected in the Preferences
window. |
| Stand A: |
This indicator is not used. |
| Show R: |
This indicator is not used. |
| Step: |
This indicator is not used. |
These indicators
represent the preferences set in the Preferences
window, as described in Running
Looping Tests.
Selecting a
Test
The Diagnostics window contains
three groups of tests and an additional option. It is
suggested that you run the first three tests, reset
board, HOST MASTER and i960 Master. The fourth
option, UTIL, contains additional debugging tests.
- In the Diagnostics
window, click on the test you wish to run. An X
will appear in the checkbox. Selecting a test
group will automatically select all the tests in
that group and they will be checked with an X.
- Click Start to begin
testing.
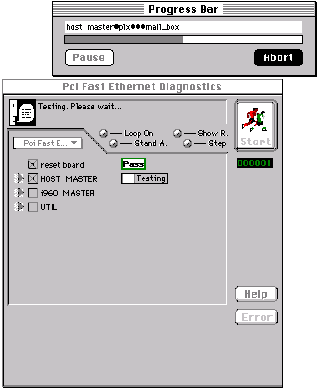
"Testing. Please wait..." is shown in the message box.
The Diagnostics program runs through all the
tests in order.
When Loop mode has been selected, the Diagnostics
window displays a counter of pass and fail tests.
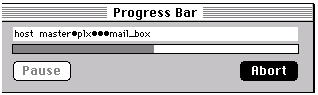
While the tests are running, a progress bar is
displayed, as shown below:
Passed Tests
When the last test has been
successfully run, the following occurs:
- A message is displayed in the
message bar:
"Test completed. No errors detected."
- The message indicator at the
top left corner of the Diagnostics window
turns green:
Green
Pass/Fail Indicator

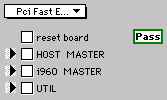
- The word "pass" is
displayed to the right of the test group in a
green frame, as shown below:
Pass
Failed Tests
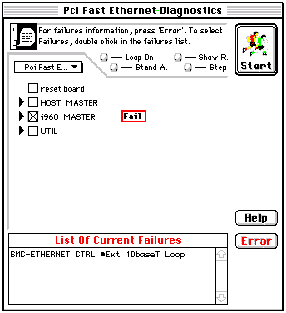
If a fail was detected, the
following occurs:
- A message is displayed in the
message bar:
"For failures information, press "Error".
To select Failures, double-click in the failure
list."
- The message indicator at the
top left of the Diagnostics window turns
red.
- The word "Fail" is
displayed to the right of the test group in a red
frame
- The Error button
becomes active.
- A list of current failures is
shown at the bottom of the Diagnostics
window.
PCI
Fast Ethernet Diagnostics
Aborting a Test
To abort a test while the
Diagnostics is running:
- Click on Abort in the Progress
Bar window, the Diagnostics window
displays the test results. If any test failed,
the Error button will be active to
indicate that an error has occurred.
- Click on the Error
button to view the errors that have occurred.
Progress
Bar
The Preferences option in
the Options menu enables you to specify the
looping mode in which the Diagnostics runs the tests.
- Select Options from the
File menu and select Preferences,
to open the Preferences window, as shown
below:
Preferences
window
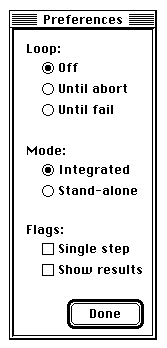
- The following lists the
preference parameters and describes the options
of each one:
| Loop: |
Off |
The Loop option is not
activated. |
| |
Until abort |
The selected tests will run from
start to end, over and over, until you abort. If
this option is selected, the Loop
indicator is yellow when testing begins. |
| |
Until fail |
The tests will start running until
the first test fails. If this option is selected,
the Loop indicator is yellow when testing
begins. |
| Mode: |
|
This option is disabled. |
| Flags:
|
|
This option is disabled. |
| Done: |
|
Click Done to save selections
and close this window. |
Viewing
the Results of a Looping Test
If you have been absent from your
workstation while the Diagnostics has been running the
tests, you will not have a true indication of the tests
that have passed or failed.
A test that may have failed in one
round of testing may pass in another and the results
shown in the Diagnostics window are those of the
current round. So, how are you to know if a test failed
in a previous loop? The answer is that once any test has
failed, the Error button becomes active and you
can press it to see a description of all the tests that
have failed.
When testing has finished, the
failed tests remain selected. You can easily re-run all
failed tests by pressing the Start button, again.

Menu Options
This section discusses each of the
menu options in sequence. The following options are
available once the Diagnostics has been opened.
File Menu
The File menu has one option only:
Quit Diag
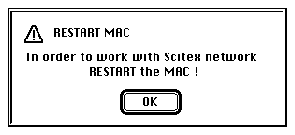
Quits Diagnostics and displays the following window:
Quit
Options Menu
Options
Menu
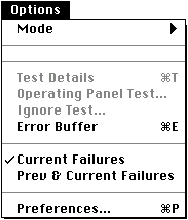
Mode
This option is not implemented. The Diagnostics works in
the Expert mode, and all other modes are disabled.
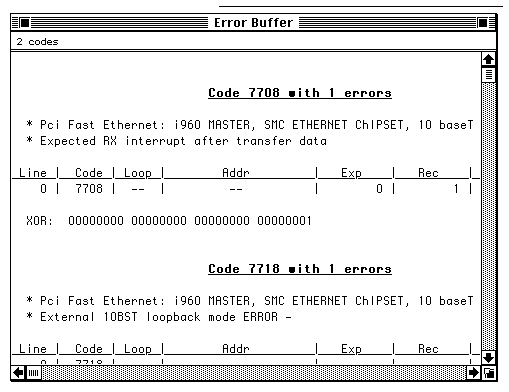
Error Buffer
Displays a list of failed tests.
Error
Buffer
Current Failures
Displays a list of failed tests.
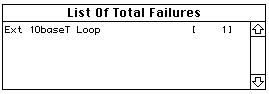
Prev & Current Failures
Displays a list of all the tests that failed in previous
and current test loops and the number of times each test
failed.
List
of Total Failures
Information Menu
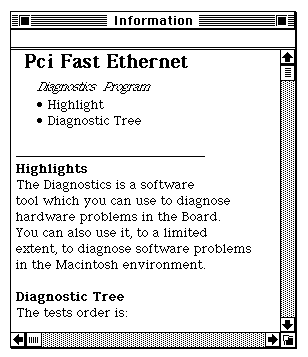
Help
Shows a short description of the Diagnostics and a list
of all the tests.
Information
Messages
Some tests may record information here which may interest
a Scitex engineer. This option is usually not needed.
|

