Home | Contact Us | Submit Troubleshooting Info | Search | Help
Output | Software Solutions | Proofing | Color, Screening and Calibration | Scanning | Digital Photography | Consumables | POS
Home | Contact Us | Submit Troubleshooting Info | Search | Help
Output | Software Solutions | Proofing | Color, Screening and Calibration | Scanning | Digital Photography | Consumables | POS
This section describes how to troubleshoot specific problems,
such as no system power or abnormal LED activity. This section shows you how to:
- Identify and correct system problems
- Perform related diagnostic tasks, such as replacing fuses or cleaning fiber optic cables
By observing system diagnostics, you can identify and correct problems ar system power up.
Power Failures
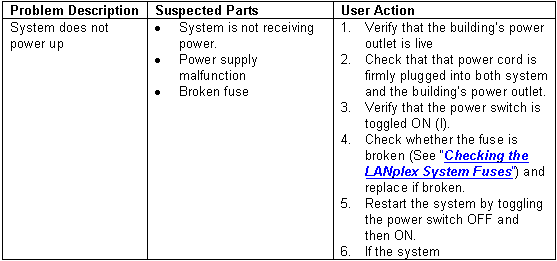
If the system does not respond during power up, See "Troubleshooting Power Failures."
Abnormal LED Activity
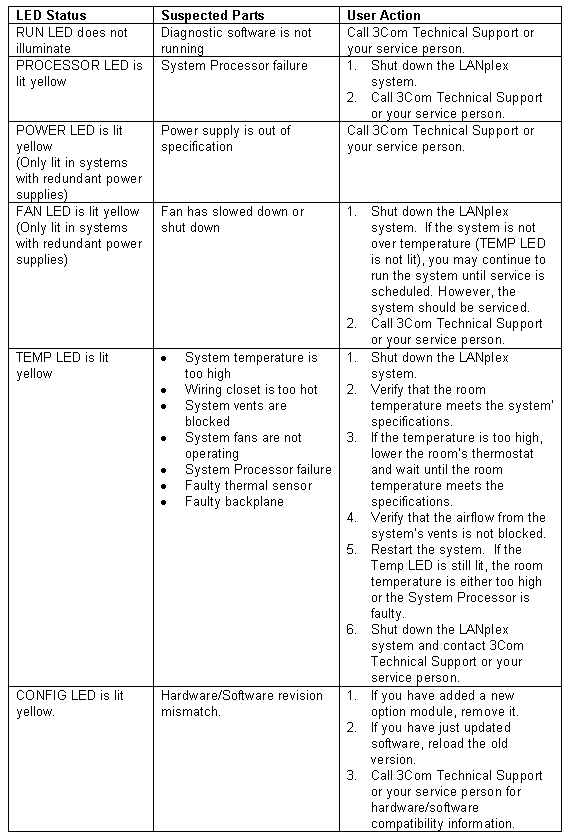
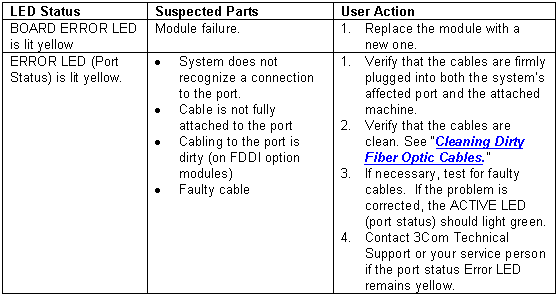
The system procesor contains several status LEDs to indicate system problems. Also each option module has status LEDs that alert you to problems with a module or port. See "Troubleshooting Abnormal System Processor LED Activity" or "Troubleshooting Abnormal Module LED Activity" for troubleshooting suggestions in the event of abnormal LED activity on either the system processor or an option module.
CAUTION: When handling modules, always use a wrist strap that is connected to a proper ground. This prevents the module from being damaged by electrostatic discharge.
During system troubleshooting, you may have to perform minor maintenance procedures to correct the problem. These maintenance procedures are described below. For assistance not described below, contact 3Com Technical Support.
If the LANplex System does not power up, you may want to check the fuses. Two fuses are located inside the AC power switch assembly on the rear of the chassis. The fuses are mounted in removable cartridges.
WARNING: Before beginning this procedure, power down and unplug the system to prevent electric shock and / or sytem damage.
You need a small, flat-blade screwdriver to complete this procedure.
Removing the Fuse:
To remove the fuse, follow the following steps:
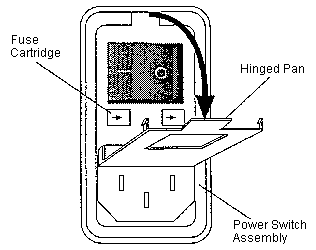
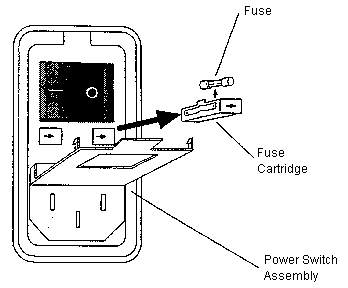
Installing a New Fuse:
To install a new fuse:
Fiber optic transceivers are sensitive optical devices that need to be handled carefully. If dirt collects on the fiber optic lens, you may notice that the LED for an FDDI port either does not light or lights yellow. You may also notice degradation in port performance, indicated by an increase in the Link Error Rate (LER) count for that port.
To prevent dust from collecting on the fiber optic lens, keep dust covers on the ports at all times when not in use. To clean a fiber optic lens, follow the pocedure below: