The Brisque enable you to work with DCS2.0 files created by various applications
(DTP applications, plug-ins etc.). When saving files in the DCS2.0 file format,
you can choose between two options that specify the color channel information:
Single file - generates a single file that holds the master file
together with all the High Res. files in it.
Multiple files - generates one master file and one High Res. file
for each separation. The Brisque enables you to work directly with inserted
DCS2.0 Single or Multiple High Res. Files (inserted via certain DTP applications,
which are described further on). When working with Multi-tone images, we recommend
you save the Multi-tone images as a Single DCS2.0 file. For more information
on creating Single DCS2.0 files containing Spot CTs, please refer to the section
Creating DCS2.0 files in the Duotone Mode.
The Brisque supports the RIPping of DCS2.0 files in the Composite mode. In
most cases, any Composite PostScript file created by an application supporting
the DCS2.0 file format, holds only the master file within it. RIPping such
a PostScript file (i.e. a PostScript file that includes the master DCS2.0
file) requires that the DCS2.0 High Res. file(s) be placed in the High Res.
Paths. There are, however, cases in which the PostScript file embeds the DCS2.0
High Res. files. This does not require you to further define in the High Res.
Path containing the DCS2.0 High Res. files.
DTP Applications Supported by the Brisque RIP The Brisque allows the direct
RIPping of input DCS2.0 files originally created in any of the following applications.
Note that certain DTP applications are limited to saving Single DCS2.0 files
only, while the other applications support both Single and Multiple DCS2.0 files.
Photoshop 5.0 & 6.0 (supports Single & Multiple save option)
FreeHand 8.x & 9.0 (supports only the Single save option)
SmartDOT (supports only the Multiple save option)
Monoscan (supports Single & Multiple save option)
Alternatively, you can use other DTP applications that allow you to insert
DCS2.0 files (originating from applications displayed in the list above), and
then RIP the Composite PostScript files on the Brisque. The following list describes
the DTP applications (Mac platform) that have been tested for this option:
Quark 3.3x & 4.x
Page Maker 6.5
Illustrator 9.0
FreeHand 8.x & 9.0
Useful Tips! SmartDOT/Monoscan Workflow - The SmartDOT can only create a DCS2 file
in the Multiple format (the Single option is currently unavailable for SmartDOT).
On the other hand, Monoscan supports both Single and Multiple formats.
Additional corrections were also made in the RIP application on the Brisque,
which now supports the DCS1 Native format originating from SmartDOT and Monoscan.
Until now, the user could only use the PSImage of DCS1, but not the DCS1 file
itself. Now, Brisque 2.8 makes using DCS1 or DCS2 files much easier, by allowing
you to directly use the Composite PostScript file. Note: DCS1.0 and DCS2.0 files created by SmartDOT and Monoscan are protected
from trapping using FAF.
Known Limitations
This section describes known limitations, pertaining to either the General Workflow
on the Brisque or specifically to the DTP applications used to create files
in the DCS format.
General Workflow Limitations
Nested DCS2.0 files in the Composite PostScript mode are not currently supported.
The OPI and PSImage of the DCS2.0 format are not currently supported.
When creating a DCS2 file, make sure that you do not include an EPS object
whose prefix name is the same as the DCS2 filename.
DCS2.0 APR does not work with a distilled PostScript file. Workaround: Put the PSImage file of the DCS2.0 in Quark application,
create a PS file and then distill / normalize it.
The PS Preview application on the Brisque does not display all the DCS2.0
Spot layers, except for the last Spot layer.
If the DCS2.0 file contains Spot Color separations, it must be RIPped in
either the "All to Spot" or "Specific" mode. The "All
to Process" mode produces poor RIP results.
Merging two Spot color of a DCS2.0 image in the Specific mode will cause
to a
disappearing of one Spot separation. Occurred in both Level 2 and Rip 3.
Does not effect additional Spot separations in the file.
DTP Application Limitations
Working with Quark 3.3x & 4.x
Working with files in Quark 3.3.x & 4.x that contain inserted DCS2.0
files, originally saved via Photoshop 5.0 or 6.0 in the "Multiple DCS
File No composite" mode, is not currently supported. (The "No composite"
mode is a user-defined Preview parameter saved with the file).
The Pre-separated PostScript files created from Quark with DCS2 will include
CMYK equivalence values only when the Spot Color Extension in Quark is active
in the Quark application. If the extension is not installed, any Spots Colors
existing in the file will come out black.
Working with FreeHand 8.0 & 9.0
Before you create a DCS2.0 file in FreeHand 8.0 & 9.0, you must immediately
save your working document after the filename of the DCS2.0 has been defined.
Once you do this, the name of the DCS 2.0 file must not be changed. The filenames
must remain as originally defined, otherwise the DCS2 cannot be located later
on.
FreeHand 8.0 & 9.0 PostScript Issues:
FreeHand 8.0 & 9.0 creates PostScript files causes relevant information
in the PostScript to be missing. The following list describe instances which
later have problems with the subsequent RIPping of the file on the Brisque:
When inserting into a FreeHand 8.0 & 9.0 page, several Multiple master
DCS2.0 files originally created in Photoshop 5.0 & 6.0 using the HexWrench
plug-in. Creating a Composite PostScript file in this instance, lacks an EPS
comment that should appear
at the end of the image line. This subsequently causes the inserted images
(starting
from the second image) to disappear. In addition, poor results also occur
using the
Harlequin RIP.
TIFF/JPEG images placed inside a FreeHand 8.0 & 9.0 page and saved as
DCS2.0 (from the FreeHand 8.0 & 9.0 application) lead to a corrupt CreoScitex
RIP on the Brisque, which produce a CT image with identical process values
for all the separations. This also occurs when 'interfering' manually by keeping
only the Cyan separation. The Harlequin RIP produces the same results that
are described here.
DCS2.0 files created by FreeHand 8.0 & 9.0 and placed inside a Quark
page create a Pre-separated PostScript file, which when CreoScitex RIPped,
also produces a CT image with identical process values in all of the separations.
This also happens with the Harlequin RIP.
Working with Page Maker 6.5
Composite PostScript files containing a Single DCS2.0 Monoscan file created
in PageMaker 6.5, have RIP-related problems on the Brisque. This is due to
essential
information that is missing from the PostScript file created by PageMaker
6.5.
In order for the Brisque to successfully RIP a PageMaker 6.5 Composite PostScript
file with a Multiple Monoscan master file, we recommend you perform the following
steps:
From the File menu, select Place; a Macintosh browser appears
Select the Monoscan Multiple master file and press the <Shift> key
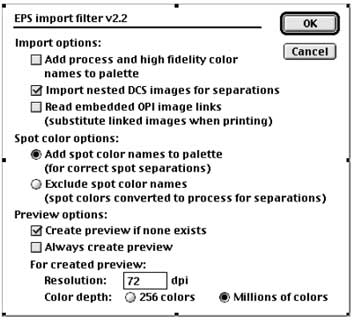
while placing the image into your page; the following dialog appears:
Select the Import nested DCS images for separation checkbox and
deselect the Read embedded OPI image links checkbox (as illustrated
in the figure above).
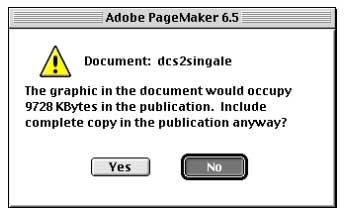
After you have defined the 'EPS import filter' parameters, click OK; the
following message appears.
Click No.
Creating DCS2.0 files in the Duotone Mode
The following workflow may be used instead of the Duotone with PSImage Exporter
workflow, used until now.
From Photoshop, change the image mode to Grayscale; a message appears prompting
you to discard the color information, click OK; the Duotone mode becomes available.
Select the Duotone mode and define the desired Type from the four available
Types. For example, if you select Duotone Type, you must then select the two
Spot Colors you want to work with.
Return to the Mode menu and select Multichannel; the Save As: Photoshop
DCS2.0 file format becomes available.
Save your work as either a Single or Multiple DCS2.0.
Using a DTP application, place the Single DCS2.0 file or the master file
of the
Multiple DCS2.0 in your working document.
Create a Composite PostScript file with the DCS2.0 file inside it. When
RIPping the PostScript Composite file (for both Single and Multiple DCS2.0)
do not forget to
place your DCS2.0 file in the designated High Res. Path (defined in the RIP
application on the Brisque).