Home | Contact Us | Submit Troubleshooting Info | Search | Help


    Output | Software Solutions | Proofing | Color, Screening and Calibration | Scanning | Digital Photography | Consumables | POS


Error Message Guide D-N for Dolev 4press


This document is under construction. It presents the possible causes and solutions for a variety of Dolev 4press error messages. (See also Error Message Guide A-C)

Select the relevant error message from the alphabetized list:

Important! Before replacing any electronic board, use a wrist ground cable, and proceed as follows:

  1. Check board connections, and fix, if required.
  2. Perform shutdown and turn off the machine.
  3. Remove the board.
  4. Clean connectors.
  5. Re-insert the board.
  6. Test. If the error message or problem persists, replace the board.

, -->
Dat Neg 12v Error
Description and possible cause Solution

Error of -12V in the data crate related to 12V power supply. This is checked in HOMC board startup tests with the power on.

Replace the power supply box.

Dat Pos 5v Error
Description and possible cause Solution

Error of +5V in the data crate related to data box power supply. This is checked in HOMC board startup tests with the power on.

  1. Reset the imagesetter
  2. Continue to work with the machine, and replace the data box.
Default Res Intensity
Description and possible cause Solution

Request from host to expose illegal table, due to a missing parameter value.

Back to top of page
  1. Insert the missing parameter value in the table.
  2. Load the grid corrections table from the rescue diskette.
Empty ACC Cassette
Description and possible cause Solution

Film residue remains in the unload cassette.

Open the cassette cover, check if the cassette is empty, and remove film residue if required.
End Plot Error (CRI)
Description and possible cause Solution

Expose job is not completed, and unexpected expose lines appear due to a CRI board misfunction.
Back to top of page

  1. Restart the imagesetter.
  2. Replace the CRI board.
End Plot Error (Host)
Description and possible cause Solution

Expose job is not completed, related to:

  • Data cable connection
  • Host malfunction
  • Communications board
  1. Verify that the data cable is connected securely, and is in good condition, and replace if required.
  2. Replot.
  3. Replace the TSP board.
Error Selector Position
Description and possible cause Solution

there is no online processor in the configuration, but film is transferred toward the online processor, related to:

  • Incorrect selector position
  • Selector detector is not connected

ack to top of page

  1. Use the detector status function to check the selector position, and set the selector to the correct position.
  2. Verify that the selector detector is connected. It is located on the right side of the imagesetter, behind the cutter motor.
Expose Size Exceeded
Description and possible cause Solution

Image exceeds imagesetter limitations due to:

  • Expose parameters (offsets, margins, and so on) exceed limits
  • File size exceeds limits
Back to top of page
  1. Check the expose parameters (offsets, margins, and so on).
  2. Calculate the total image height and width and make sure that the results do not exceed the maximum allowed expose area.
  3. Change the expose parameters if required.
Film at drum exit
Description and possible cause Solution

When using service utilities tools, during first load, the film out detector detects film at the drum exit, due to:

  • Film remains in the drum exit area
  • Film out detector malfunction
  1. Open the upper service door and remove any piece of film remaining in the drum exit area.
  2. Check the film out detector status to see if the film out detector is functioning, and replace the film out detector, if required.
Film crash
Description and possible cause Solution

Film crashes during the advance sequence because the number of LDM pulses exceeds the number of TKM pulses by more than 30 and there is no film at the entry.


Back to top of page
  1. Try to advance about 300 mm and then check if the error message is resolved.
  2. To unload the film from the drum and open the drawers, perform Change Media.
  3. Check all components of the loading system: rockers, rollers, motors, couplings, film guides, dynamic optic bow.
  4. If the in-line processor is connected, make sure that the conveyor is not pulling the film.
  5. Compare the value of the Loose parameter to the default, and reduce if required.
  6. Compare the value of the Velocity parameter for all motors to the default values, and increase if required.
  7. Reload the film and in the service utility, perform a normal advance. Verify that the LDM pulses do not exceed the TKM pulses by more than 20.
Film Detected at Exit
Description and possible cause Solution

In Operation mode, at first advance, film was detected at the exit when it should not be there, due to:

  • A piece of film remaining in the drum exit area
  • Film out detector malfunction
  1. Open the upper service door and remove any piece of film remaining in the drum exit area.
  2. Check the film out detector status to see if the film out detector is functioning, and replace the film out detector, if required.
Film End Detected
Description and possible cause Solution

There is no signal from the film in detector, and no film at entry. The piece of film in the drum automatically rolls back into the loading cassette and the film loading drawer opens, due to:

  • End of film roll
  • Film in detector malfunction
Back to top of page
  1. Remove the film from the loading cassette or from the drum.
  2. If the film roll has ended, load a new roll of film.
  3. Check the film in detector status to see if the film in detector is functioning, and replace the film in detector, if required.
Film Feed Task Fail
Description and possible cause Solution

One of the tasks in the film feed sequence has not completed (advance, attach, load) due to a problem with the loading or unloading components

  1. Try to advance about 100 mm.
  2. Check all components of the loading system: rockers, rollers, motors, couplings, film guides, dynamic optic bow.
  3. Check all components of the unloading system.
  4. Check the interface with the online processor.
Film Is Not Grasped
Description and possible cause Solution

The unloading accumlative cassette is not holding or stretching the film.

  • Film remains inside the cassette
  • Unloading cassette is faulty
  • Unloading motor assembly faulty
  • Incorrect buffer parameter

ack to top of page

  1. Cut and collect the film.
  2. Verify that the unload accumulative cassette is empty, and clean out any remaining film, if required.
  3. Check the Buffer parameter value, and reduce if required.
  4. Replace the unloading cassette.
  5. Replace the motor assembly.
  6. Advance the film 500 mm.
Film Stuck in Guide
Description and possible cause Solution

After the first load, during film advance, the film does not reach the unload cassette detector, related to:

  • Film is not cut straight
  • Skewed film advance
  • A piece of film is stuck in the lower film guides
  • Unload cassette encoder is not adjusted


  1. Advance the film 100 milimeters.
  2. Cut and collect the film.
  3. Open the two side doors, unload the film from the drum, and remove the film from the lower guides.
  4. Verify that the open pass is clear.
  5. Verify that the cutter is cutting a straight edge.
  6. Adjust the unload cassette encoder.
Film Stuck at Proc
Description and possible cause Solution

Film is stuck in the processor and the processor is not ready, due to damaged rollers, gears, and/or guides.


Back to top of page
  1. Release the film that is stuck in the processor.
  2. Inspect the rollers, gears, and guides for damage.
  3. Call the processor manufacturer for service if required.
  4. Continue working with the accumulative cassette if the processor is not ready.
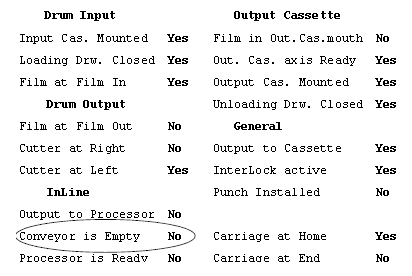
Film Stuck on Conv
Description and possible cause Solution

The film is jammed in the conveyor during unloading, due to:

  • Film from a previous loading is stuck on the conveyor
  • Conveyor component problem

click to enlarge

Check the Conveyor is Empty detector status.

  • Conveyor is Empty status is Yes—call the conveyor/processor service representative.
  • Conveyor is Empty status is No—open the conveyor cover and remove the piece of film manually.
Fine Calib Fault
Description and possible cause Solution

Error in light calibration due to

  • High res intensity
  • Static optic maximum power is below 40,000

ack to top of page

  1. Reduce the laser intensity and try to expose again.
  2. Select Service Utility > Laser and run the ND filler graph.
  3. Verify that the curve exceeds 40,000. If it does not, replace the static optic.
First Load Error
Description and possible cause Solution

The film did not reach the film out detector in the first load sequence due to:

  • Film was not cut straight
  • A loading mechanism component (rollers, rocker, encoder, motor, etc.) is faulty
  1. Perform "Change Media" to move the loaded film back.
  2. Cut the film edge using the lead cutter.
  3. Reload the film.
  4. If the problem persists, check the loading mechanism components and replace as required.
Full Step Motion Stop
Description and possible cause Solution

Carriage stops in mid-process related to:

  • Cables
  • Stepper driver
  • CRI board
  • Power supply
  1. Restart the imagesetter and re-expose.
  2. Check the cables and adjust if required.
  3. Replace the stepper driver.
  4. Replace the CRI board.
  5. Replace the power supply.
HOMC 18 mhz err
Description and possible cause Solution

Error in 18 mhz clock generator

ack to top of page

Replace HMC.
HOMC Load Error
Description and possible cause Solution

During startup, there is a problem loading the hardware table, related to:

  • OMC board
  • CPU board
  • E-box
  1. Check the OMC board, and replace, if required.
  2. Check the CPU board, and replace, if required.
  3. Check the E-box, and replace, if required.
HOMC Spinner Freq Err
Description and possible cause Solution

The spinner does not reach the desired speed, related to:

  • Spinner driver
  • Spinner
  1. Replace the spinner driver.
  2. Replace the spinner.
HOMC Strtup Failed
Description and possible cause Solution

One or more failures in the HOMC board start-up tests with the power on.

ack to top of page

On the panel, press F3 to check for other error messages, and proceed according to the relevant error message.

HOMC WCS Load Error
Description and possible cause Solution

During startup, a problem occured with loading the application. The HOMC WCS is missing.

  • OMC board
  • CPU board
  • E-box
  1. Check the OMC board and replace if required.
  2. Replace the CPU board.
  3. Replace the E-box.
HOMC WCS Missing
Description and possible cause Solution

The HOMC WCS file is missing due to a scrambled microversion.

ack to top of page

  1. Restart the imagesetter.
  2. Reload the latest microversion.
HOMC XIL Missing
Description and possible cause Solution

The HOMC.XIL file is missing from the system diskette due to a scrambled microversion.

  1. Restart the imagesetter.
  2. Reload the latest microversion.
Host Abort Request
Description and possible cause Solution

The Host issued a command to abort the action, accompanied by additional workflow-related error messages
or
Manual abort request from the workstation.

  1. Resolve other error messages in the workflow station and proceed accordingly.
  2. Re-expose.
Host Discon.Request
Description and possible cause Solution

No connection with the host. Disconnect request from the workflow workstation stops the processing of the expose job.

Back to top of page


  1. Check all elements of the communication between the workflow and the device.
  2. Exchange the HOMC ports COM3 and COM4.
  3. Check the TSP cable and replace if required.
  4. Replace the TSP board.
Host Comm. Timeout
Description and possible cause Solution

Host does not respond within the time restraint.

  • Data transfer problem originating from host
  • Data host cable is faulty
  • TSP board is faulty
  1. Reset the imagesetter.
  2. For Brisque, use "screen to go" to verify data.
  3. Re-expose.
  4. Check the data host cable and replace if required.
  5. Replace the TSP board.
HP Calibration Error
Description and possible cause Solution
  • HP detector wiring is faulty
  • Dynamic optic harness position
  • HP value is not within range

ack to top of page

  1. Check for a second error message and proceed accordingly.
  2. Check HP detector wiring and adjust if required.
  3. Check and adjust the dynamic optic harness position to prevent it from getting caught on the detector.
  4. Verify that HP value is within the allowed range, and adjust if required.
HP Calib. Task Fail
Description and possible cause Solution
Home position (HP) detector calibration failure
  1. Resolve other error messages and proceed accordingly.
  2. Recalibrate HP to a value between 200 and 300.
  3. Verify that the calibration remains within the limit when running the dynamic long runs.
More solutions coming soon!  

Back to top of page


    Copyright © 2005 Creo Inc. All rights reserved. Confidential. Back to top.