

Home | Contact Us | Submit Troubleshooting Info | Search | Help
Output | Software Solutions | Proofing | Color, Screening and Calibration | Scanning | Digital Photography | Consumables | POS
Home | Contact Us | Submit Troubleshooting Info | Search | Help
Output | Software Solutions | Proofing | Color, Screening and Calibration | Scanning | Digital Photography | Consumables | POS
Dolev 800/800V/800V² - Brisque Application Issues
Setting up the Configuration
Starting System Configuration
Station Configuration
I/O Devices Configuration
I/O Devices Plotter
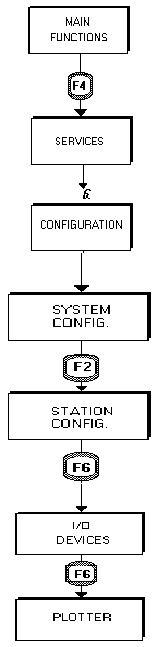
1. Main Functions
2. F4
3. Services
4. configuration
5. System configuration
6. F2
7. Station Configuration
8. F6
9. I/O Devices
10. Plotter
The Dolev 800 must be configured within the CreoScitex Color Workstation before you begin work. Usually, a CreoScitex engineer configures your system during installation.
To move down a list of I/O station menu options, use the Down arrow key. In most configuration screen fields, there are a limited number of options. On I/O stations, press the Space Bar to toggle a field. A field that you can cycle through has the character "" appearing as the first character in the field. All numeric fields are cyclical.
Configuration defines your Dolev 800 imagesetter, the workstation connected to your imagesetter, and how they are connected. The station that you are working on is called the Local Station.
You begin from the I/O station Main Functions menu:
1. From the Main Functions Menu, select 2)
Plot Proof.
2. Select 6) Configuration, from the Services menu.
Form Input Fields
| Workstation Type [toggle field] |
Your workstation is listed on the form. The station is the Whisper/microWhisper unit. Toggle to: I/O, Assembler, etc. |
| Station Name | The station is the Whisper-based unit. The Local station is your workstation: Assign a logical name to your station. |
| Network | Check that your
network connection is registered. Select Station Config <F2>. |
Select Station Config (F2) and the Station Configuration Screen will appear.
Station Configuration displays the I/O Devices softkey (F6) to define Dolev 800 within the system. The Station Configuration form for your station appears. The station name is the name you entered earlier on the System Configuration form. You can also define the fiber optics board and any additional devices.
Select the I/O Devices soft key (F6) on the Station Configuration form.
When you select I/O Devices <F6> on the Station Configuration form you can configure the imagesetter connected to your station.
Select Plotter (F6) on the Configuration form.
Soft Keys (F-KEYS)
Save & Exit (F1)
Save your entries and
Enter (F4)
Saves your entries and returns you to the previous configuration form.
Main Menu <F5>
Returns you to the System Configuration form.
Next <F7>
Displays the next form.
Quit <F6>
Return to the Main Functions Menu without
making any changes.
From the I/O Devices:Plotter form, toggle the plotter field
until you reach the Dolev 800. Select Enter (F4) to choose the Dolev 800 imagesetter.
Press the SPACE BAR until you receive Dolev 800.
The options are: Dolev 800, RAYSTAR, RAY RECEIVE, RAYTRANS, RAYTRANS+, DOLEV, DOLEV-HR,
DOLEV 400, THINK, CHEMCO, STORK and NO.
Size [H,W]
The maximum output size, 812 H x 1117 W appears automatically. You can reduce the size.
Select Save & Exit to save any changes.