Home | Contact Us | Submit Troubleshooting Info | Search | Help


    Output | Software Solutions | Proofing | Color, Screening and Calibration | Scanning | Digital Photography | Consumables | POS


Using diagnostics


Product microversions

  Table of microversions diagnostics versions, and their part numbers

Background


The diagnostics package is used to test the Dolev imagesetter. This procedure describes the following:

After performing the procedure, run a full batch test to verify that the tests run correctly.


Procedure

  Note: Before beginning, check whether the latest diagnostics version is already installed. If not, create a diskette with the latest version.

Loading diagnostics

  1. Insert the diagnostics diskette into Floppy drive.
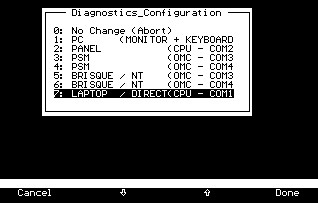
  2. Reboot the Dolev by turning it off and then on. Wait for about two minutes. The diagnostics configuration is automatically loaded to the Dolev (C:\DIAG\Dolev800 directory), and then appears on the panel or the monitor (see Figure 1).

  3.  

    Figure 1: Diagnostics configuration screen

  4. Select the required diagnostics configuration using the arrow keys. (In the example in step 1, Laptop configuration is selected.)
  5. Click Done. The diagnostics program is activated for the configuration you selected.
  6. After running diagnostics, remove the floppy diskette and quit diagnostics. The imagesetter reboots and returns to Standby mode.

Activating diagnostics

  1. In the Dolev application, select one of the following:
    • First use of diagnostics—Util > Tools Operation > Diagnostics > Diagnostics Setup.
    • Note: It is recommended to configure by selecting Diagnostics Setup.

    • Consecutive uses of diagnostics—Util > Tools Operation > Diagnostics > Diagnostics.
  2. Continue according to the mode you selected:
    • Panel Mode—Press Done. After setup is complete, the diagnostics main screen is displayed on the panel. In this mode, error description and the utility program are not available. 
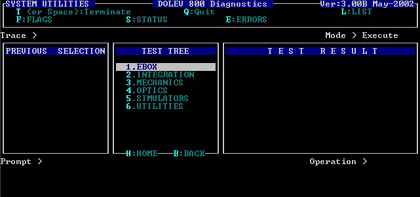
    • Monitor Mode—select PC Monitor and press Done. After setup is complete, the diagnostics main screen is displayed on the monitor (see Figure 2), and is operated via the keyboard.
    • Laptop Mode—Perform the following procedure:
      1. Turn off the Dolev.
      2. Connect the serial cable (part number 504G34023A) from the laptop/PC host to the electronic box COM1 port. 
      3. Note: If the COM1 port is in use, disconnect the device using it and connect the serial cable. 

      4. Turn on the Dolev.
      5. Insert the laptop diskette (part number 501V51944) in drive A of the laptop.
      6. Reboot the Dolev.
      7. On the laptop, run the imagesetter diagnostics under Start > Programs > Scitex diagnostics > Plotters diagnostic.
      8. Verify that the Scroll Lock key on your laptop keyboard is OFF.
      9. Type SF<CR> to refresh the terminal screen. The diagnostics main screen is displayed on the laptop monitor. (See Figure 2.)


Figure 2: Main Screen

Using diagnostics

The following diagnostic commands can be used in a PC or Laptop configuration.

Diagnostic commands

Symbol Action
1-9 The numeric character that activates one of the following:
  • BRANCH - name with all capital letters. When activated, new menu appears.
  • Test - name with small letters. When activated, pass/fail status appears after execution of test.
/ Short Batch operation of a specific sub-menu
Q (Quit) Quit the diagnostic program
B (Back) Move up one level in the test tree structure
H (Home) Move to the top level of the test tree
R (Return) Move to the previous system utilities menu
FL (Flag) For loop operations. 

Note: There are additional flags that can be operated with the Handler.

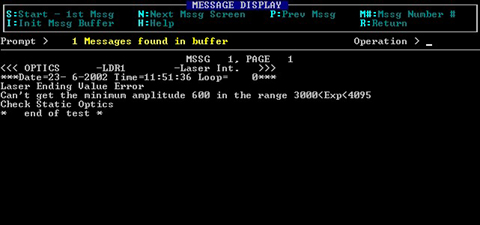
EM (Error Message) To view error messages after test(s) failure. To return to main menu, type R. (See Figure 3.)
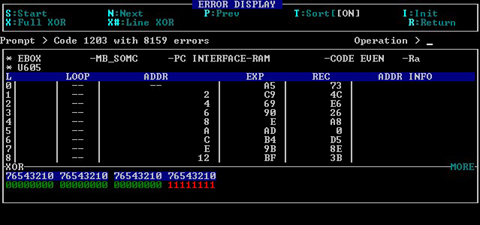
EE (Error Buffer) To view error buffers (Bits) after test(s) failure. To return to main menu, type R. (See Figure 4.)

Note: There can be items in either EM, EE, or both.

Figure 3 - Error Message Screen

Figure 4 - Error Buffer Screen


See also


Full release notes

diagnostics configuration


Technical contact(s)
 

Content owner: Oded Zaccai
See the Escalation page for escalation contacts.

Date submitted
 

16 06 02


Popups / Tool Tips for this Page

   Close this popup...

  1. Format a 1.44Mb diskette to verify that it has no errors.
  2. Download the .exe file from the downloads page (see sidebar).
  3. Activate the .exe file and follow the instructions.
  4. Protect the diskette by activating WRITE PROTECT.
  5. Remove the diskette and label it Dolev <product name> Diagnostics, Ver <x.xx>.
  6. Insert the Diagnostics diskette that you created in the Dolev floppy drive.
  7. Turn off the Dolev and then turn it on, and wait for about two minutes. The diagnostics version is automatically loaded to the Dolev Flash Disk (C:\DIAG\Dolev800 directory).

    Copyright © 2005 Creo Inc. All rights reserved. Confidential. Back to top.