Home | Contact Us | Submit Troubleshooting Info | Search | Help


    Output | Software Solutions | Proofing | Color, Screening and Calibration | Scanning | Digital Photography | Consumables | POS


Adjust 10 micron vertical line


Product

  Dolev 800 V3 only

Platform


Brisque version 4.1


Background

  When exposing, the vertical scan line is not as thick as the scan line.

Procedure

 
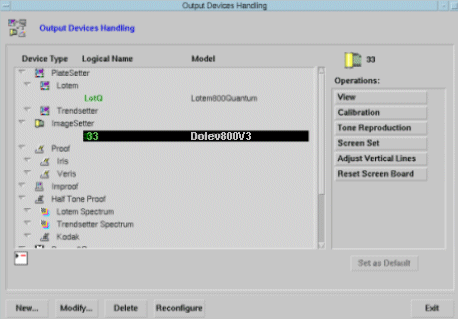
  1. From the Brisque, press the Output Devices Handling button. The Output Devices Handling menu appears on the monitor, as shown below.

  1. Under Device Type, select the Dolev800V3 ImageSetter. The Operations side menu refreshes to display the available options.
    Note: The Adjust Vertical Line option is unique to the Dolev 800V3, and is not available on other machines. 
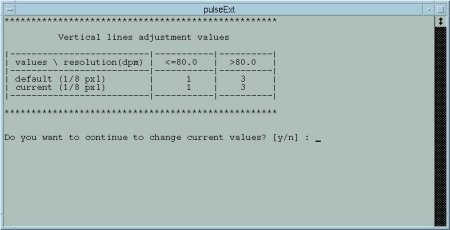
  2. Click Adjust Vertical Lines. The following window with a table showing both the default and current values is displayed (the adjustment is according to units of 1/8 of a pixel):

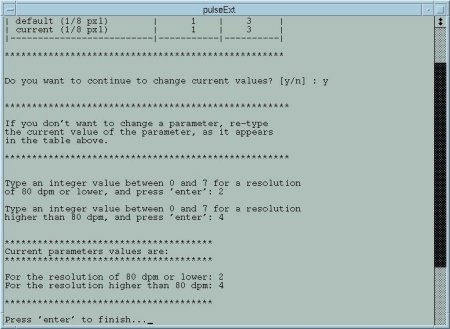
  1. To adjust the current values, type "y". The view refreshes and instructions for adjusting the vertical line values are displayed, as shown below:

  1. If your machine is set to a resolution lower than 80 dpm, enter a new value in the <=80.0 column; if the resolution is more than 80 dpm, enter a new value in the >80.0 column.
    Note: Make sure to re-type the current value of the other (non-relevant) resolution parameter as it appears in the table.
  2. Press Enter to save your changes.

Test


Replot and run a job to check the adjustment.

Repeat the above procedure, adjusting the vertical line values until both the vertical scan line and scan line appear identical in thickness.


Technical contact(s)
 

Oded Zaccai
See the Escalation page for escalation contacts.

Date submitted
 

16 Jan 2003


Popups / Tool Tips for this Page

   Close this popup...

  1. Open the front and side doors.
  2. Remove the front panel of the E box by removing the two screws.


Popups / Tool Tips for this Page

   Close this popup...

  1. Assemble the front panel of the E box and secure it with the two screws.
  2. Close the side and front doors.

    Copyright © 2005 Creo Inc. All rights reserved. Confidential. Back to top.