Home | Contact Us | Submit Troubleshooting Info | Search | Help
Output | Software Solutions | Proofing | Color, Screening and Calibration | Scanning | Digital Photography | Consumables | POS
Home | Contact Us | Submit Troubleshooting Info | Search | Help
Output | Software Solutions | Proofing | Color, Screening and Calibration | Scanning | Digital Photography | Consumables | POS

Data Configuration Setting
TCP/IP Connectivity
 |
Install the platesetter on the PC controller before installing the platesetter on the Brisque. Verify that both Brisque and platesetter are powered off. |
The Lotem 400 to Brisque connectivity consists of a data cable located inside the Brisque, and a TCP/IP link for communication between the platesetter and Brisque (see Setting Up Data Connectivity in the Hardware Installation Guide for Lotem 400).
There are two ways to set up the TCP/IP connection between the Brisque and the platesetter:
Recommended (long term solution)
Connect the Brisque directly to the PC controller using the special network
cross cable (catalog # 199A02132), supplied with the platesetter.
Alternatively (interim solution)
Connect both the Brisque and platesetter to the site network infrastructure.
TCP/IP Connectivity-Direct Link (Recommended)
The direct link solution (the recommended solution) involves connecting the Brisque directly to the PC controller using the special network cross cable (catalog #199A02132) supplied with the platesetter; this cable cannot be used for network connection.
This section describes how to set up the TCP/IP connectivity via a direct link and includes the following procedures:
|
The PC controller and the Brisque must have individual IP addresses. |
To connect the Brisque to PC controller for 43P-150 model (Tiger II):
If the extra Ethernet board is already installed
on the Brisque there is no need to perform steps 1-5 in the
procedure described below.
If you need to install an additional Ethernet
board, please refer to Brisque 43p-140/150 Installation Guide, catalog #
399Z51279
(pdf format).
To define the IP address on the PC controller:
|
The PC controller should already be booted up with the Windows 95 startup screen displayed. |
To define the IP address on the Brisque for model 43P-150:
TCP/IP Setup Connectivity via Network (Alternative)
TCP/IP connectivity via the network involves connecting both the Brisque and the Lotem 400 to the site network infrastructure, and consists of the following procedures:
To connect the Brisque to the PC controller:
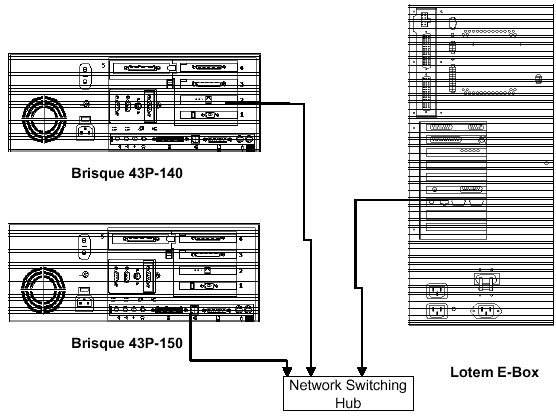
Figure 37. Brisque/Lotem network Connections
To define the IP address on the PC controller:
|
The PC controller should already be booted up with the Windows 95 startup screen displayed. The system administrator should provide the IP address and the subnet mask. |
To define the IP address on the Brisque for model 43-P 150
Refer to Brisque 43p-140/150 Installation Guide (pdf format), Chapter 3, section 3.7 Setting up TCP/IP Communication, page 3-7.
Verifying the TCP/IP Connection
To verify the TCP/IP connection for both Connection methods:
Define IP Address of PC Controller on Brisque SciSMIT
This procedure should be used for both Recommended and Alternative methods of connectivity.
Verifying Connection Between Brisque and Platesetter
To verify the connection between the Brisque and the platesetter:
|
The Lotem 400 application should be up and running. |