Applies to |
|
- Lotem® 800
- Lotem Quantum
- Lotem Quantum Spectrum
|
Priority: Next failure
Release date: 05 Jan 2003
|
Problem |
|
When a plate is improperly loaded or a plate fly-off occurs, both the
drum rollers and the drum roller springs disperse inside of the Lotem.
|
Solution |
|
Replace the drum load rollers and drum roller springs with the new drum
roller spring unit.
The new unit is designed to prevent the rollers and springs from dispersing
inside of the Lotem. (Each roller is now permanently attached to its springs.)
Note: If you only need to replace the rollers after
implementing the FCO, order part number 290A9C299 - drum
roller assembly type II. (The part number refers to one drum roller spring
unit only. Order as many of these part numbers as there are missing units.)
|
Time needed to
implement |
|
1 hour |
Parts needed |
|
Part name |
Qty |
P/N |
Lower Roller Assy |
1 |
507F1L200A |
| Lower Roller Assy Packing |
1 |
391S7L371 |
| Nylon Bag 10x15 W/Closure |
1 |
391I70210 |
| Jig I for Adjust Load Roller |
2 |
290B7B995 |
| Jig II for Adjust Load Roller |
1 |
290B7B994 |
| FCO Document |
1 |
719-00106 |
|
Procedure |
|
- From Lotem Controller, open the Lotem's doors.
- Close Lotem Controller, and shut down the Lotem.
- Disconnect the air pressure supply to the Lotem.
- Remove the outdated load roller assembly from the Lotem, as described
in the Replacing
the Lower Roller Assembly procedure.
- Insert the new load roller assembly into the Lotem.
- Using the jigs supplied with the kit, adjust the location of the
load roller assembly, as follows:
- Connect the air pressure to the platesetter.
- Move the tail gripper until it is as close as possible to the head
gripper.
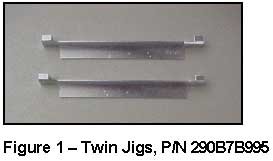
- On both sides of the drum, place a twin jig (P/N 290B7B995) under
the tail gripper, as shown in Figure 1:
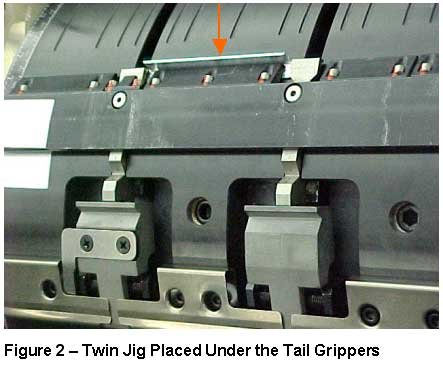
- Drag the tail grippers until they touch the head gripper, as shown
in Figure 2.
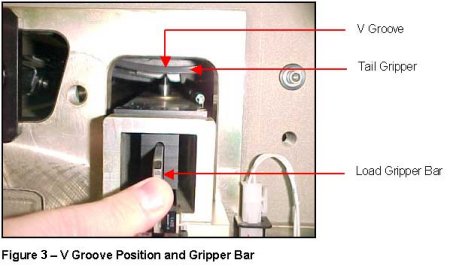
- Turn the drum until the V groove in the tail gripper is directly above
the load gripper actuator pins, as shown in Figure 3, and push the load
gripper bar to lock the drum position.
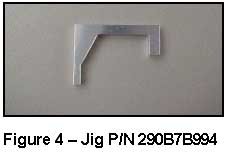
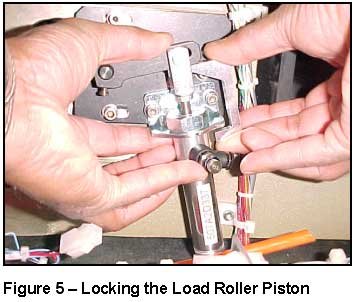
- Since the air pressure is turned off, use the jig (P/N 290B7B994)
as shown in Figure 4, to lock the load roller piston in position so
that the rollers are almost touching the drum, as shown in Figure 5.
- Release the three screws that hold the flange of the load roller
bracket on the left and right sides, as shown in Figure 6.
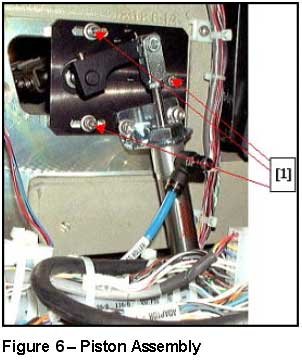
- Push the load roller flange toward the tail gripper until the load
rollers touches the jigs on both sides. First do one side, tighten the
3 screws that you loosened in step g, and then do the other side.
- Remove the piston jig.
- Release the drum by pulling the gripper bar.
- Turn the drum, then remove the two twin jigs.
-
Power up the Lotem.
- Start Lotem Controller.
-
With the doors open, load a variety of plates (different sizes and
thicknesses).
-
Close the doors.
-
Return the Lotem to working status.
|
Logistics |
|
Approved quantities:
DU |
Qty |
CAM: |
30 |
CEU: |
30 |
CAP: |
10 |
CJP: |
10 |
CMA: |
10 |
| CCA: |
|
Other: |
|
No Limit: |
|
Schedule supplies for first lots:
DU |
Month |
Qty |
Month |
Qty |
Month |
Qty |
CAM: |
Feb |
10 |
March |
10 |
April |
10 |
CEU: |
Feb |
10 |
March |
10 |
April |
10 |
CAP: |
Feb |
10 |
|
|
|
|
CJP: |
Feb |
10 |
|
|
|
|
CMA: |
Feb |
10 |
|
|
|
|
| CCA: |
|
|
|
|
|
|
Other: |
|
|
|
|
|
|
Lead Time: 20 days to 1 month |
|
Technical
contact |
|
Itai
Peperovich Product Support Manager: Yaron
Soffer |
Date submitted |
|
05 Jan 2003
719-00106 Rev A
|

