Applies to
- Lotem® 800 Family
- Lotem 400 Family
- Lotem XL
Important: Do not implement this FCO on machines that have the debris removal system installed.
Priority = Next visit
Release date = 04 November 2002
Type of change = Next Visit
Component
Optic head lens protector
Problem
When plate flyoff occurs, the edge of the plate can scratch the glass in the optic head lens protector.
Solution
Install a lens protector ring on the lens protector. This ring prevents
plates from contacting the glass when plate flyoff occurs.
Note: If it ever becomes necessary to remove the lens
protector ring, you will need to replace the lens protector with a new
one.
Time needed to implement
1/2 hour
Parts needed
|
Part Name |
Qty |
P/N |
|
Protector Ring |
1 | 291A9C340 |
| FCO Document | 1 | 719-29821 |
Note: The protector ring will be included in accessory kits that are distributed after November 2002.
Procedure
- Open the rear door and remove the upper rear panel.
- Move the carriage to an accessible position, as required.
Note: If the optic head lens is too close to the light detector, the lens protector will not be accessible. - Remove the lens protector from the optic head lens.
- Clean the outside metal surface of the protector with a lint-free cloth and ethyl alcohol.
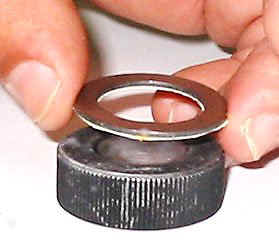
- Peel the paper off of the adhesive backing on the lens protector ring
(part number 291A9C340) and gently place the ring onto the lens protector,
as shown below. Verify that the ring is centered on the protector and
press the ring firmly down to secure it in place.
Important: Do not touch the glass. - Clean the lens protector glass (inside and out) using a lint-free cloth and ethyl alcohol.
- Place the lens protector back onto the optic head lens and tighten
it in place.
Note: Do not over tighten the lens protector. - Calibrate the laser and verify that all laser diodes are functioning properly.
- Run the following tests:
- Focus
- Resolution
If the results are not good, change the values for the focus and resolution parameters, as required.
Logistics
Approved quantities:
|
DU |
Qty |
|
CAM: |
20 |
|
CEU: |
30 |
|
CAP: |
10 |
|
CJP: |
10 |
|
CMA: |
10 |
|
Other: |
|
|
No Limit: |
Schedule supplies for first lots:
|
DU |
Month |
Qty |
Month |
Qty |
Month |
Qty |
|
CAM: |
Nov |
20 | ||||
|
CEU: |
Nov |
30 | ||||
|
CAP: |
Nov |
10 | ||||
|
CJP: |
Nov |
10 | ||||
|
CMA: |
Nov |
10 | ||||
|
Other: |
Lead Time: 1 month (20 days)
Technical contact
Product Support Manager: Yaron Soffer
Approval Date:
Date submitted
719-29821