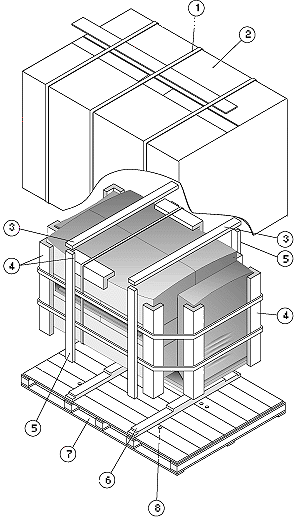
A minimum of two (2) people and a Fork lift are
required to pack-up and place the platesetter on its shipping pallet.
Figure 2-21 shows the packing
process. Refer to this figure to identify the numbers appearing inside brackets in the
following text.
Disconnect all the electrical cables from the platesetter
and remove the skirting boards from the sides, front and rear of the platesetter.
If the Fork lift cannot be moved to the platesetter
location, you need to roll the platesetter to the shipping pallet. To do so, lower the
wheels: close the nut of each leg by turning it counter-clockwise to maximum position.
When the platesetter rests on its wheels, roll it to the shipping pallet.
Place the two (2) lower shipping beams [6] on the shipping
pallet [7] above the main shock absorbing beams. Make sure to place the shipping beams in
the correct orientation; the end of the beam with the shorter extension should face the
front of the pallet (the front bracket securing hole is closer to the edge).
Using the Fork lift, lift the machine and place it on
the shipping beams of the shipping pallet, aligned according to the bracket securing
holes.
Secure the machine to the shipping pallet using the four
brackets, screws and washers [8].
After performing a final check to assure that the
platesetter is positioned and secured properly, cover the platesetter with nylon wrapping.
Pack the skirting boards in bubbled nylon and place behind
the platesetter. Secure with plastic tape [1].
Place six protective rubber angles [4] at each corner of the
platesetter, and tape each angle with two plastic tapes [1].
Place two protective rubber angles [4] on the two upper
doors. Tape the doors to the shipping pallet using two plastic tapes [1].
Staple the side wooden struts [5] to the shipping beams [6].
Staple the top wooden struts [3] to the side wooden struts
[5].
Place an outer carton container [2] on the platesetter on
the shipping pallet [7]. Insert staples to secure the outer carton to the shipping pallet
and side wooden struts.
Close the top flaps of the outer carton.
Close the outer carton with plastic tape and with the two
steel bands.
Figure 2-21: Packing-up the platesetter
Copyright
(c)1998 Scitex Corporation Ltd. All rights reserved. Certain names, logos,
designs, titles, words or phrases on this page may constitute trademarks, servicemarks,
or tradenames of CreoScitex Corporation Ltd. or other entities which may be
registered in certain jurisdictions.