Requirements |
|
There are two types of TSP upgrade kit available, depending upon the
type of Lotem to be upgraded:
- Lotems with serial numbers greater than 992600000 require
a TSP upgrade kit p/n 510K52506A
- Lotems with serial numbers less than 992600000 require
a TSP upgrade kit p/n 510K1M571
The TSP upgrade kit 510K52506A comprises of the following
part numbers:
| Part Number |
Description |
Quantity |
| 291A3L803 |
PCI/E30 BRACKET |
1 |
| 291A7L219 |
PCI 43P BRACKET |
1 |
| 374A00080 |
PACKING LABEL-WHT |
1 |
| 380J01022 |
PHIL.PAN HD.SST.SEMS 4-40X1/4" |
2 |
| 380J03024 |
PHIL.PAN HD.SST.SEMS 6-32X1/4" |
1 |
| 391S60606 |
RSC BOX 470X380X170 |
1 |
| 501V1M847B |
C TURBO SCREENING WBT CD 9/02 |
1 |
| 503D03465M |
T.S.P ASSY |
1 |
| 504L1L670 |
CBL, 62 PIN D-TYPE PLG-PLG L=30 |
1 |
| 504T2D064 |
FLAT 100 PIN DDB (A+B) TO L-BOX |
1 |
The TSP upgrade kit 510K1M571 comprises of the following
part numbers:
| Part Number |
Description |
Quantity |
| 503B2L560S |
LDD2 BRD ASSY |
24 |
| 510K52506A |
TSP TO LOTEM |
1 |
| Brisque |
| Hardware |
TSP board 503D03465M |
| Software |
4.0.97.23 or 4.1.76 |
|
Procedure |
|
Before beginning the procedures, check the following:
- Distance between the Lotem L-box and the Brisque does not exceed 30
meters
- Lotem has part number DDB-1-N (503D2L695S) Comp-Level - L and higher
The procedures include the following steps:
Updating the DDB-1-N connections to TSP
- Open the front door.
- Close the Lotem application and shut down the P.C.
- Power off the Lotem via the main switch.
- From the left hand door, open the L-box to service mode and
then open the L-box's rear door.
- Make sure DDB1-1-N-sn 503D2L695S is installed and
that the C.L. is L or higher.
- Replace the DDB to L-box flat cable "flat 100 Rec X 2"
– S/N 504T1L473 with "Flat 100 pin DDB (A+B) to
L-box" – S/N 504T2D064.
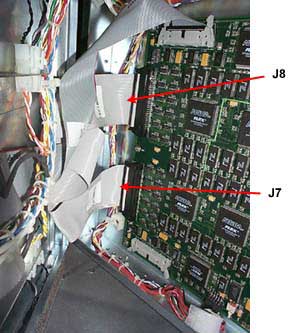
- The DDB end of the cable is split to accommodate two connectors. Connect
the split ends to the DDB J7and J8,
as marked on the cable.
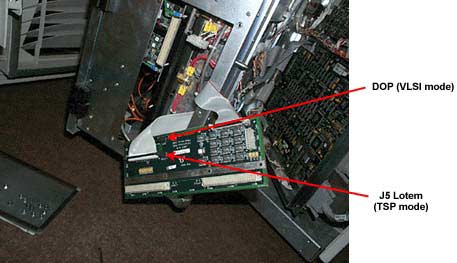
- Connect the other end of the cable to connector J5
(marked as Lotem) on the L-box MB.
Note: Care is needed when connecting this cable, because
the pins inside the MB connector can easily be damaged.
- If the DDB-1-N has been removed, reconnect the cables for the DDB
J4, J5 and J9.
- Close the L-box.
- Reconnect the cable leading from the E-box back to J3
on the DDB (the lower connector).
- Connect the new cable (504L1L670) to the L-box, (the
middle connector) and route it to the Brisque station.
- Close the L-box doors and switch on the L-box power supply.
- Startup the platesetter but do not open the Lotem application.
- Upgrade the registry as described below:
- Navigate to HKEY_LOCAL_MACHINE\SOFTWARE\Scitex\Projects\Lotem800V\Machine\Screen
Processor Type(VLSI=0 , TSP=1) and change the value from 0
to 1.
- Navigate to HKEY_LOCAL_MACHINE\SOFTWARE\Scitex\Projects\Lotem800V\IO
OBJECTS\DDB CARDS\DDB Card\Hex File Name and from the Hex
File Name menu, change the word VLSI to TSP,
where it appears within the text. To confirm the change, click Enter.
- Open the Lotem application.
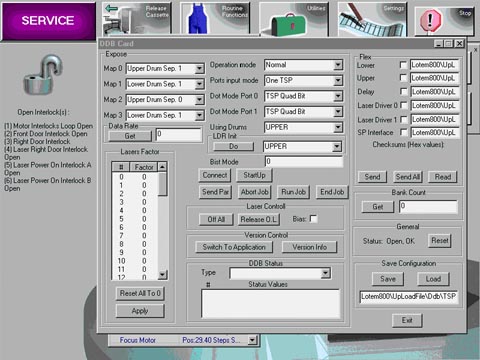
- In the Lotem application, open the H/W menu and double
click on the DDB board.
- Load the ALTERA by clicking Connect
and then Startup.
- Click Send All. The process takes a few minutes to
complete. To verify that the ALTERA has correctly loaded, in Lotem Controller,
do the following:
- Open the Hardware window.
- Open the Laser System and double-click Laser
Group. The Laser Group window opens.
- Perform laser calibration to 200 mw and check
that all diodes have passed.
- To make sure the DDB-1-N connections were updated, do the
following:
Navigate to the Hardware window/Expose System/Laser
System. Double-click on Laser Group. Perform
an Autocal to see if the result is satisfactory.
- Close the Lotem application and shutdown the Lotem via the Main Power
switch and then restart the Lotem.
After the Lotem has been upgraded, the next step is to install the TSP
Board on the Brisque:
Installing the TSP board on the Brisque
- Shutdown both the Brisque and the Lotem.
- Remove the power plug on the Brisque power supply.
- Open the Brisque and install the TSP board in the appropriate PCI
slot.
- Close the Brisque.
- Connect the TSP cable to the TSP board.
- Reconnect the power plug to the Brisque power supply and restart the
Brisque.
- At the login prompt, enter root and password ripro.
- At the UNIX prompt, type # lsdev -Cspci and check
that you can see the TSP board.
Note: If you can not see the board, run the Config
Manager (# cfgmgr) and retype # lsdev -Cspci.
The TSP board should now be recognized by the system.
- Exit from the UNIX prompt and login as cdesci.
- Once in the Desktop environment, navigate to SCISMIT
and PLOT DIAGS. Run a test on the TSP board to verify
that it is working fine.
Once the TSP board has been installed, the next step involves upgrading
the Brisque software.
Upgrading the Brisque software
The Brisque software must be upgraded to 4.0.97.23 or 4.1.76 and higher,
so that it is compatible with the latest PC version; the Lotem family
of products (Lotem 800, 400V, ThermoFlex, XL); and the following new TSP
features:
- New diagnostics (TSP and Rotation boards)
- Support for yellow moire free angles
- Enable laser uniformity
- Enable FM screens
- Rotation button (to de-select the rotation before Plate Expose)
- Larger timeout between plates (for the Lotem XL)
- Unlimited plates sizes
- Updated screen sets
- Mulit-sep in single and external for the Lotem ThermoFlex
- Default to the message Layout too big is Abort
- Reboot the Brisque.
- Login as cdesci and type <enter>.
On Lotem Controller
- Insert the Remote Site Installation CD into the CD-ROM
drive on the Lotem PC. A window opens describing the contents of the
CD-ROM.
- Click Remote Support Site Installation - Full Document, and
follow the instructions.
Note: If the window does not automatically open after inserting
the CD-ROM, double-click My Computer (on your desktop); then
double-click the CD-ROM icon.
Troubleshooting
The table below provides solutions to some of the problems that may occur
during the TSP board installation:
|
Problem
|
Solution
|
| No light calibration |
Check that all the DDB to MB flat cable connections
are as marked on the cable. |
Lotem error message:
No. of lines mismatch |
(DDB has counted zero lines) |
Check if screen set is in VLSI mode. If it is, change
it to Turbo Screen.
If it is not in VLSI mode and if the TSP has advanced (Brisque's progress
indicator), then check DDB Plotter cable connection. |
| DDB has counted mismatch number of lines, but NOT zero. |
Check DDB-TSP cable |
| Missing end of expose on plate (or middle of expose
is missing). |
Check that the C.L of DDB-1-N is L or higher. |
For a complete description of the installation procedure, see Site
Preparation.
|

