Procedure |
|
This procedure includes the following steps:
Preparation
- From the PC Controller, open the front door of the Lotem.
- Manually open the right door.
- Shut down the PC Controller.
- Shut down the Lotem.
Disconnecting the flat cables and configuring
the new hard drive
- From the E-box, remove the hard drive tray.
- Disconnect the two flat cables, and the power cable from the Motherboard.
Note: There are two flat cables in the E-box: the Floppy
Disk cable and the CD-ROM/Hard Drive cable. This procedure replaces
the old, longer CD-ROM/Hard Disk cable with the new, shorter one.
- Remove the four screws that connect the hard drive to the tray.
- Change the new hard drive's configuration from Slave to Master,
as shown below.
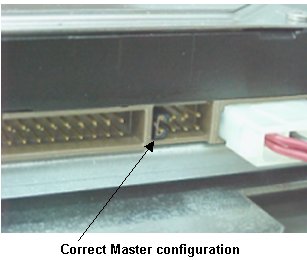
Figure 1
Note: By default, the hard
drive is factory-configured as Slave.
- Install the new hard drive on the hard drive tray.
Installing the new CD-ROM/Hard Drive cable
- Connect the shorter end of the new cable to the hard drive.
Note: Make sure the side of the cable with the red
line is facing the hard drive power connection, as shown in Figure 2.
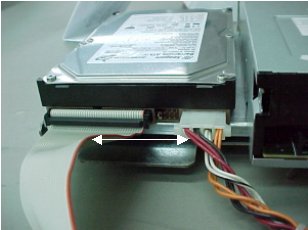
Figure 2
- Connect the middle connector to the CD-ROM, again making sure the
side of the cable with the red line is facing the CD-ROM power connection,
as shown in Figure 3.
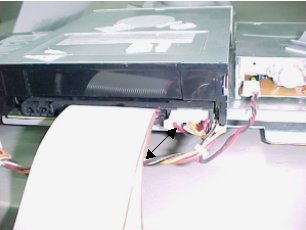
Figure 3
- Reconnect the Floppy Disk flat cable. Make sure the side
of the cable with the red line is facing the power connection, as shown
in Figure 4.
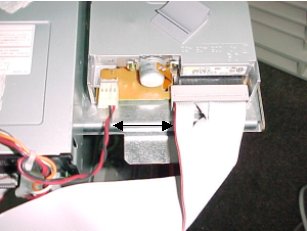
Figure 4
- Insert the Hard Drive tray into the E-box, but not all the
way.
- Reconnect the power cable to the Motherboard.
- Route the new CD-ROM/Hard Drive cable underneath the tray; then pull
the cable forward in front of the boards and connect it to the CPU,
as shown in Figure 5.
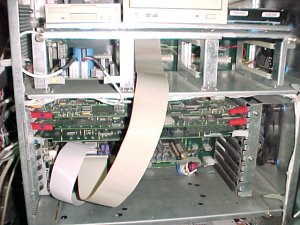
Figure 5
- Push the tray all the way in, and secure it with the two
screws.
- Install Windows 95 or install Windows
2000
Windows 95
Installing the software and restoring BIOS settings
- Make sure there is no floppy disk in the drive, then power on the
machine (if not already on).
- Before Windows starts, press the Delete key continuously,
until the BIOS Setup window appears on the monitor.
- From Bios/setup/inside utilities/secure cmos, change the secure
cmos status from Activated to Disable.
- Ensure the right boot driver sequence: Floppy, CD-Drive and Hard Disk.
- From Standard/Date/Time, update the date and time, if necessary.
- Save your changes and exit the BIOS Setup window.
- Insert the BIOS diskette (version 1.1 or 1.2) into the floppy disk
drive and power on the machine.
- Press Alt+Ctrl+Del to reboot, and run the bios
diskette. The Bios settings are automatically updated.
- Remove the Bios diskette, then reboot.
- Before Windows starts, press the Delete key continuously,
until the BIOS Setup window appears on the monitor.
- Check the following:
- From Bios/setup/inside utilities/secure cmos, make sure the secure
cmos status has changed back to Activated.
- From the Utilities dialog box, double-click the Detect
IDE button; then do the following:
- Click the PIO field.
- Change the speed of the speed of the hard disk to 0.
Note: Even though the hard drive is 20/40 GB,
the CPU recognizes only 8 GB.
- From Standard/Date/Time, update the date and time, if necessary
- Press Esc twice.
- Save your changes and exit the BIOS Setup window. The E-box reboots
automatically and the default configurations are restored.
- Remove the BIOS diskette from the floppy disk drive.
Restoring the hard drive with Windows 95 (Image
Disk)
- Insert the Startup (EZ Restore) diskette in the floppy
disk drive, and the Windows Image CD in the CD-ROM
drive.
Note: Make sure you are installing the correct BIOS
and Image versions: BIOS version 1.1 with Image version 1, or BIOS version
1.2 with Image version 2.
- Press Alt+Ctrl+Del to reboot. After a few moments
(or longer), the Windows 95 desktop appears on the monitor.
- Remove both the floppy (Startup) and Image CD from their respective
drives.
- Insert the Lotem PC Controller disk and reload the software.
- Restore the machine's registry and database files.
- Reconfigure the Brisque connection.
Note: For more detailed information regarding hard
drive restoration, see the Restore
Hard Drive procedure.
Windows 2000
Install BIOS version1.02
- Insert the BIOS
version 1.02 diskette (part number 633-00073C) into the diskette
drive.
- Before Windows starts, press the F2 key continuously,
until the BIOS Setup window appears on the monitor.
- From Bios/setup/inside utilities/secure cmos, change
the secure cmos status from Enabled to Disabled.
- To save your changes, click F10. A prompt message
appears. Click Yes to confirm the changes and exit
the BIOS Setup window.
The BIOS default setting is automatically uploaded.
Note: Wait for the A prompt
to appear on the monitor (this may take a few moments); then remove
the BIOS diskette.
When the PC starts up the following message is displayed on the monitor:
System BIOS shadowed

          System confi data updated - Error

          Check date and time setting

          F1- resume, F2 - setup
If nothing appears when you press any of the keys on the keyboard, check
the mouse/keyboard connection - make sure it is secure and properly
connected. When the BIOS installation has finished, remove the BIOS
diskette from the diskette drive.
Install Windows 2000 Ver 1.03
- Insert Windows 2000 Image CD version 1.03
(633-00078B) into the CD drive.
- Restart the platesetter by pressing Ctrl+Alt+Del
and wait for
F1 to appear on the monitor. Click F1.
Make sure the choice is set to 1, and press Enter.
The image is automatically loaded. After the CD is successfully loaded,
remove it from the CD drive.
- Press Ctrl+Alt+Del on your keyboard to restart the
system. Wait a few moments for Windows 2000 to load. A time and date
error message may appear on the monitor.
- Set the time and date, then restart the platesetter.
Update settings after the Windows 2K Image is installed
- Restore the registry from the diskette.
- Reset the TCP/IP address by doing the following:
- From the Start menu, select Settings.
- Select Control Panel.
- Double-click on Network and Dial-up Connections.
- Double-click on Local Area Connections.
- Click the Properties button.
- Double-click on Internet Protocol (TCP/IP).
Or
Select Internet Protocol (TCP/IP) and click the Properties
button.
- Select the Use the following IP address option
button and enter the desired TCP/IP address.
- Click OK and then click OK again
to exit the window.
Note: For more detailed
information regarding hard drive restoration, see the Restore
Hard Drive procedure.
|

