Cause
|
|
Probable causes include the following:
- Processor problems
- Wall air pressure unit filter needs changing
- Damaged or deformed plates
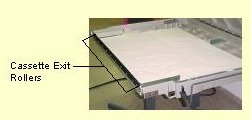
- Cassette and/or cassette exit rollers need cleaning
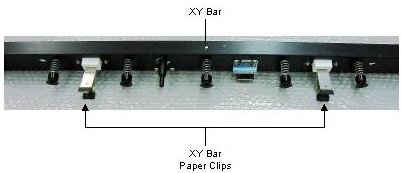
- XY bar paper clip malfunction
- Bar flag malfunction
- Leading rollers need cleaning
- Plate support rollers need cleaning
- Drum and/or drum vacuum holes need cleaning
- Loading rollers need cleaning
- Unload rollers need cleaning
- Unload tray rollers need cleaning
- Small piece of paper was loaded with the plate
|
Solution
|
|
This section includes a detailed
troubleshooting procedure. If at any point you feel that you have
found the source of the problem, you can either process several
plates to verify that the problem has been resolved, or you can
continue to the end of the procedure.
- Keep the damaged plates.
- Review all generic
troubleshooting questions with the customer.
- Check the date on which the
drum was last cleaned. Then, inspect the entire drum for
dirt and/or debris. If found:
- Remove debris, as required.
- Clean the drum using a lint-free cloth dampened with
alcohol.
Note: This
may indicate that preventive maintenance is not being properly
and/or regularly performed. Please explain the proper
preventative maintenance to the customer and emphasize the
importance of performing preventive maintenance regularly.
- vacuum holes and the vacuum channel near
the vacuum holes. Look for signs of:
- Oil
- Grease
- Moisture
- White powdery substance
If you don't find any of the above, proceed to step
5. If you find signs of any of these:
- Verify whether this is a new machine. If it is:
- Thoroughly clean the drum vacuum holes.
- Thoroughly clean the drum vacuum channels.
- Clean the drum using a lint-free cloth
dampened with alcohol.
Note: Use an oilstone
to remove any stubborn substances.
- Check the filter in the
wall air pressure unit and verify that it is clean.
If it is not:
- Further inspect the
drum vacuum holes for dried epoxy that is not flush with the
drum surface.
Note: To facilitate secure plate
attachment, some of the drum vacuum holes may have been
filled in with epoxy. If the dried epoxy is not filed down
to be flush with the drum surface, it may cause hot spots.
If found, answer all generic
troubleshooting questions and then, contact your service
representative.file
down the dried epoxy until it is smooth and flush with the
surrounding area.
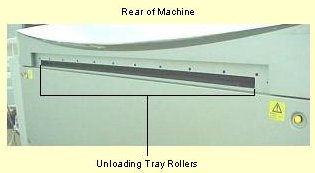
- From the rear of the machine, Look for:
- Oil, grease, dirt, and/or debris. If found, remove any
debris, and clean the rollers with a lint-free cloth.
- Damage or wear. If found:,
answer all generic
troubleshooting questions and then, contact your
service representative.
- Install new
unload tray rollers.
- Clean the
unload tray rollers using a lint-free cloth.
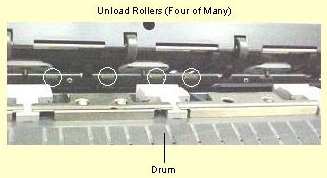
- Look for:
- Oil, grease, dirt, and/or debris. If found, remove any
debris, and clean the rollers with a lint-free cloth.
- Damage, worn or missing rollers, protruding springs,
and/or restricted roller movement (turn each roller with
your finger). If found,
answer all generic
troubleshooting questions and then, contact your
service representative.:
- Install new
unload rollers.
- Clean the
unload rollers with a lint-free cloth.
- Inspect all the rollers in
the upper gripper actuator assembly. Look for:
- Oil, grease, dirt, and/or debris. If found, remove
any debris, and clean the rollers with a lint-free
cloth.
- Damage, worn or missing rollers, protruding springs
and/or restricted roller movement (turn each roller
with your finger). If found:
- Install
new rollers and then,
- Clean the
rollers using a lint-free cloth.
- . Look for:
- Oil, grease, dirt, and/or debris. If found, remove
any debris, and clean the rollers with a lint-free
cloth.
- Damage, worn or missing rollers, protruding springs,
and/or restricted roller movement (turn each roller
with your finger). If found:
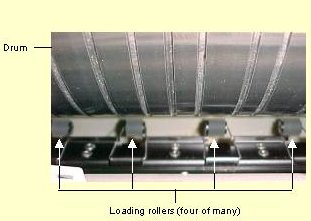
- Install new loading rollers.
- Clean the loading rollers using a lint-free
cloth.
- Inspect the damaged plate(s), and the plate batch being
used. Look for:
- Defects or dirt: May indicate manufacturer’s
defect or damage that was caused to the plate during
handling. If found:
- Load new, clean, undamaged plates. If the
problem persists, proceed to the next step.
- . Verify that:
- The rollers are completely clean and free of debris
(turn them with your hand). If they are not:
- Remove any debris, as required.
- Clean the rollers using a lint-free cloth.
- Open the front door and Verify that:
- The paper clips are not stuck and that they open
fully. If the paper clips are stuck and/or do not
open fully due to a build-up of dirt, clean the
paper clips with a lint-free cloth.
- The paper clips are not stuck due to being bent, and
there is no damage to the rubber tips. If any part
of one or more of the paper clips is bent, or if
there is any damage to the rubber tips, answer
all generic
troubleshooting questions and then, contact your
service representative.replace
the paper clips. Do not attempt to bend or otherwise
adapt the paper clips.
- Visually inspect the disposal system rollers (both rows).
Verify that the rollers are completely clean and free of
debris (turn them with your hand). If they are not, remove
any debris, and clean the rollers with a lint-free cloth.
- From the front of the machine, shine a flashlight on the
plate support rollers (on the punch beam) and, along the
line of the hot spots, visually inspect the rollers. Verify
that:
- The rollers are completely clean and free of debris
(turn them with your hand). If they are not, remove any
debris, and clean the rollers with a lint-free cloth.
- The rollers are not damaged in any way. If they are, answer
all generic
troubleshooting questions and then, contact your
service representative.replace
the plate support rollers.
- Visually inspect the plate leading rollers. Verify that they
are completely clean and free of debris (turn them with your
hand). If they are not, remove any debris, and clean the
rollers with a lint-free cloth.
- Close all doors, as
required. Then, perform plate loading to verify whether the
problem is resolved.
Note: Be sure to use undamaged plates
(inspect the plates before loading them into the cassette).
- Insert the open cassette
into the machine, leave the front door open and, using a
cheater, perform plate loading. Watch the plate as it
progresses through the machine.
Note: If the customer is using a dual
cassette, be sure to redefine the cassette as dual
loading before leaving the site.
- Perform the steps described in 'Before
You Finish'.
|


 To
inspect the drum: