Procedure |
|
Removing
the existing water pump motor
- Remove the pump from the motor by opening the clip at the rear of
the pump. To open the clip, loosen (but do not remove) the Phillips®
screw:
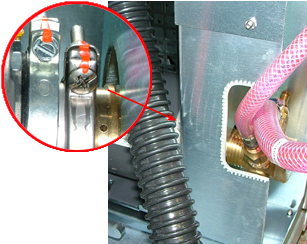
Extract the pump and place it to one side.
- Use a hex key to remove the five screws securing the middle and lower
plates surrounding the pump:

- Use a hex key to remove the four screws securing the motor base to
the rubber bumpers:

- Before extracting the motor, disconnect the wire connector from the
wire bracket located on the base:

- Use a 13-mm open wrench to remove the four screws securing the motor
to the motor base:

- Remove the two Phillips screws securing the outer wiring bracket,
and then remove the outer wiring bracket:

- Use a flat head screwdriver to remove the two screws securing the
wiring cover to the pump and then remove the cover:

- Use a long pair of pliers to disconnect the two wiring adaptors:

- Use a flat head screwdriver to remove the green grounding screw:

- Use a flat head screwdriver and a hammer to remove the inner wiring
bracket and nut from the side of the water pump:

The dismantled motor pump can be put to one side. Later on, return the
pump to ??? for servicing.
Installing the water pump motor
The motor pump is delivered without a base and any wiring installed.
Note: Assemble the water
pump motor on a working table before installing it into the platesetter.
- Remove the wiring protection cover from the motor:

- Use a flat head screwdriver to remove the two screws securing the
wiring cover to the pump and then remove the cover:

- Remove the green grounding screw:

- Use a flathead screwdriver and a hammer to install the wire bracket
onto the side of the water pump motor. Make sure the bracket is placed
at a 45° angle:

- Use a flat head screwdriver and two screws to secure the wiring cover
to the pump. (Click to view image)
- Connect the wire locking bracket—secure it with two Phillips
screws.

- Connect the motor to the motor base. Make sure the right side of the
motor is touching the base walls:

- Secure the motor to the base.
- Four screws secure the motor to the base.
- Add a flat washer, a spring washer and a nut to each screw.
- Close the screws with a 13-mm open wrench.
(Click to view image)
- Place the motor on the mainframe bumpers.
- Connect the wire connector to the wire bracket located on the base.
(Click to view image)
- Use a hex key and four screws to secure the motor base to the rubber
bumpers. (Click to view image)
- Use a hex key and five screws to secure the middle and lower plates
surrounding the pump. (Click to view image)
- Connect the pump to the motor by closing the clip at the rear of the
pump. Tighten the Phillips® screw to close the clip.
(Click to view image)
|




