Home | Contact Us | Submit Troubleshooting Info | Search | Help


    Output | Software Solutions | Proofing | Color, Screening and Calibration | Scanning | Digital Photography | Consumables | POS


Installing the Light Tight kit on a Magnus 800 single-cassette autoloader


Product


Kodak® Magnus 800™ single-cassette autoloader


Background


When the Light Tight kit (part number 518-02635A) is installed on a Magnus 800 single-cassette autoloader, it prevents external light from entering the device. The reduction in external light enables operators to expose highly sensitive Kodak Thermal Direct non-process plates on a Magnus 800 platesetter.


Requirements


Light Tight kit (518-02635A)


Procedure


The Light Tight kit is only effective if the site is adequately prepared. Before installing the kit, implement the following conditions:

  • The Magnus 800 platesetter, single-cassette autoloader, and plate stack must be located in a room with a yellow light source.
  • The Magnus 800 computer and workstation may be in either the same room as the device, or an adjoining room.)

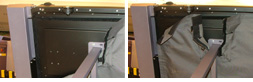
Applying the Velcro fasteners

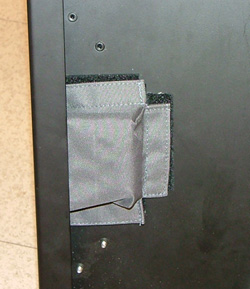
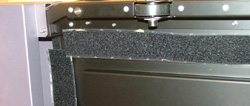
Velcro® fasteners are comprised of two layers: a hook layer, which is a piece of fabric covered with tiny plastic hooks, and a loop layer, which is covered with even smaller and hairier plastic loops.


  1. For each of the Light Tight kit covers, separate the Velcro loop layer from the hook layer.
    Note: The hook layer is sewn into the Light Tight kit covers.
  2. Use a cloth, dampened in isopropyl alcohol, to clean all the surface areas of the single-cassette autoloader where the loop layer is to be installed.
  3. Install the Velcro fasteners as described in Table 1.
    Note: When installing the Velcro fasteners on the single-cassette autoloader, press hard on the back of the fasteners to ensure that they stick securely to the autoloader.
Table 1

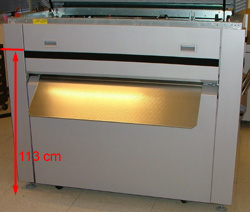
Paper disposal door

  • Separate the Velcro fastener from the Light Tight cover (252-15655A).
  • Install 1 Velcro loop fastener onto the paper disposal door.
  • Make sure that the top of the fastener is installed at a height of 113 cm from the floor.

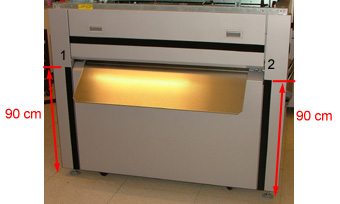
Paper disposal side

  • Separate the Velcro fastener from the Light Tight cover (252-15655A).
  • Install 2 Velcro fasteners onto the side of the paper disposal panel.
  • Make sure that the tops of the vertical fasteners are installed at a height of 90 cm from the floor.

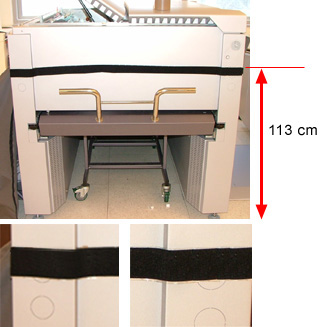
Cassette side

  • Separate the Velcro fastener from the Light Tight cover (252-15656A).
  • Install 1 Velcro fastener on the cassette side of the single-cassette autoloader.
  • Make sure that the top of the fastener is installed at a height of 113 cm from the floor.
  • Make sure to fold the Velcro fastener around the indentations on the single-cassette autoloader.

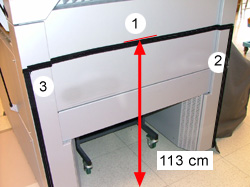
Side panel

  • Separate the Velcro fastener from the Light Tight cover (252-15657A).
  • Install 3 Velcro fasteners on the non-cassette side panel of the single-cassette autoloader.
  • Make sure that the top of the long horizontal fastener is installed at a height of 113 cm from the floor.
  • Make sure to fold the Velcro fasteners around the indentations on the single-cassette autoloader.

Single-cassette autoloader top cover

  • Separate only the long horizontal Velcro fastener from the Light Tight cover (252-15658A). You will install the remaining fasteners of this Light Tight cover later in this procedure.
  • Install 1 Velcro fastener on the single-cassette autoloader top cover.

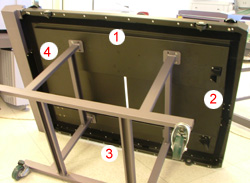
Underside of loading conveyor

  • Separate the Velcro fasteners from the Light Tight cover (252-15659A).
  • Install 3 fasteners on the underside of the loading conveyor.

S300 Cassette trolley
Note: See below for the S100 cassette trolley.
  • Make sure that there are no plates inside the cassette trolley.
  • Separate the Velcro fasteners from the Light Tight cover (252-16191A).
  • Install 3 fasteners around the perimeter of the hole located on the cassette tray.
  • Install a 1 small Light Tight cover (252-16191A) over the hole.


  • Separate the Velcro fasteners from the Light Tight cover (252-15660A).
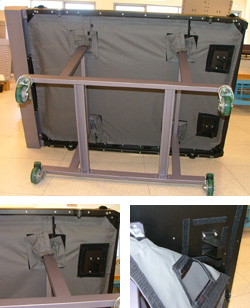
  • Install 4 fasteners along the perimeter of the underside of the cassette trolley. Make sure that the Velcro fasteners are flush against the edge of the trolley.


  • Install 4 more small Velcro fasteners along the perimeter of each of the two latches, located on the underside of the cassette trolley.


  • Install 1 Light Tight cover (252-15660A) on the underside of the cassette trolley.


  • Before placing the plates into the cassette, insert a sheet of cardboard underneath the plate stack. This may reduce the cassette’s plate capacity by 10%, but renders the Light Tight kit more effective.
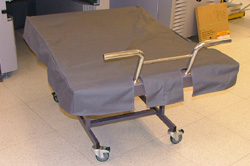
  • Install 1 Light Tight cover (252-15661A) over the upper side of the cassette trolley.
    Note: Only apply this cover when the cassette trolley resides outside of the single-cassette trolley. Do not attempt to insert the trolley into the single-cassette autoloader when the cover is installed.

S100 Cassette trolley


Part number: 252-16192A-50


Installing adhesive labels over single-cassette autoloader holes

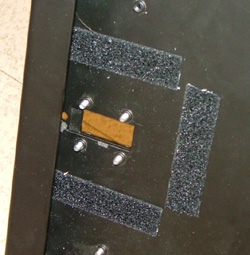
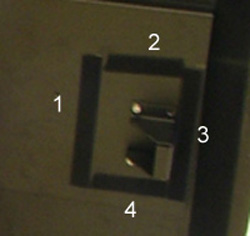
To prevent plates from being exposed to external light, install black adhesive labels over specific holes on the single-cassette autoloader, as described in Table 2.

Table 2
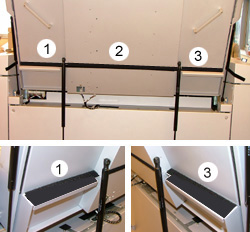
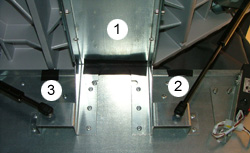
Interior of single-cassette autoloader
Install 3 black adhesive labels over the holes located on the interior left side of the single-cassette autoloader. Install 3 more black adhesive labels over the holes located on the interior right side of the single-cassette autoloader.
Note: Black adhesive label 1 is larger than labels 2 and 3.

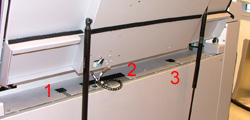
Underside of loading conveyor
Install 3 black adhesive labels over the holes located on the underside of the loading conveyor.


Installing the Light Tight covers

Install the Light Tight covers on the single-cassette autoloader, as described in Table 3.
Important: Make sure that the bottom of the covers extend over the floor to completely block out any light. It is imperative that no light can enter through any gaps between the covers and the floor.

Table 3
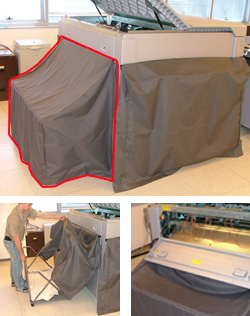
Paper disposal panel
Install 1 Light Tight cover (252-15655A) over the paper disposal panel and the paper bin. Raise the cover to remove the paper bin. The paper disposal panel can be accessed without having to raise the Light Tight cover.


Cassette side
Install 1 Light Tight cover (252-15656A) over the cassette side of the single-cassette autoloader. Raise the cover to remove the cassette trolley.

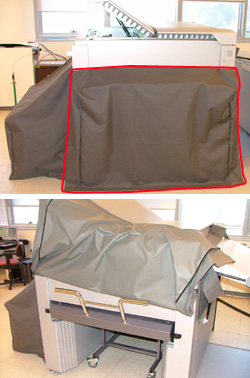
Side panel
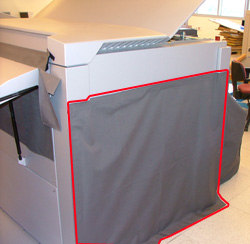
Install 1 Light Tight cover ( 252-15657A) on the non-cassette side panel of the single-cassette autoloader.

Single-cassette autoloader top cover
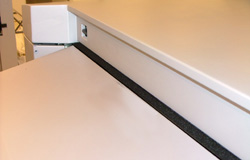
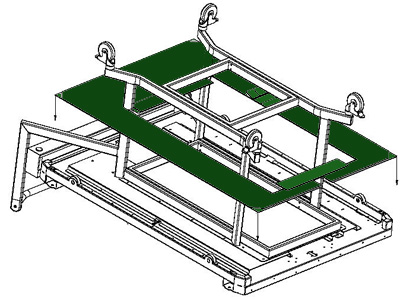
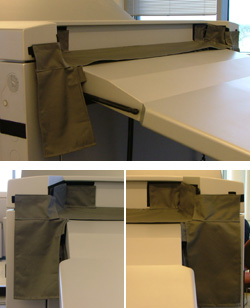
Install 1 Light Tight cover (252-15658A) to the single-cassette autoloader top cover. Align the Light Tight cover with the horizontal Velcro fastener already installed onto the single-cassette autoloader top cover. Remove the remaining fasteners attached to the Light Tight cover, and install the cover as depicted in the image below.

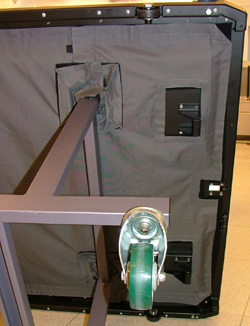
Underside of loading conveyor
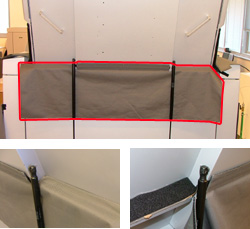
Install 1 Light Tight cover (252-15659A) onto the underside of the loading conveyor.


Technical contact
 

Content owner: Yaron Shifman
See the Escalation page for escalation contacts.

Date submitted
 

10 Oct 2007


    Copyright © 2005 Creo Inc. All rights reserved. Confidential. Back to top.