Procedure |
|
Replacing the particulate filter:
Important: If people replacing
the filter are sensitive to airborne emissions in concentrations below
the applicable regulatory limits, and/or an MSDS is not available, wear
the following:
- Protective clothing
- Protective gloves
- Respiratory protection
- Ensure that the output device is not processing a plate or film, and
the UDRC power indicator light is off.
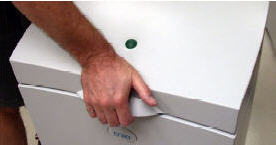
- Open the cabinet lid by pressing down with the heel of your hand while
releasing the latch with your fingers.
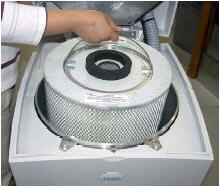
- Remove the particulate filter by lifting the filter straight up using
the handle:
Caution: The hole at
the top of the filter may have a very sharp perimeter. If you lift
the filter by grasping the perimeter of the hole, you may cut your
fingers:
- Place the used filter in the disposal bag (provided with the replacement
filter.)
-
If the UDRC does not have a chemical filter, remove the particulate
filter spacer from the bottom of the filter compartment and put it
aside for reinstallation.
- Clean the interior of the UDRC filter compartment:
- Vacuum the dust deposits from around the tube in the center of
the inner lid. Take care to prevent debris from falling into the
filter compartment.
- Wipe the inside of the inner lid and the deck with a clean cloth
dampened with water and mild detergent.
- Wipe the interior surface of the filter compartment.
- Remove all residue by wiping thoroughly with a clean, damp cloth.
Warning: Do not let
water run into the UDRC. This can result in an electric shock, as
well as damage to the equipment.
-
Reinstall the particulate filter spacer in the bottom of the filter
compartment.
-
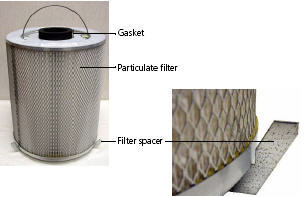
Install the particulate filter (new or partially used, as applicable)
in the filter compartment with the gasket facing up. Ensure that the
filter is fully seated on the particulate filter spacer. The spacer
centers the filters inside the filter compartment:
Note: When replacing
the filter be careful not to bang the filter against the upper edge
of the compartment. If you damage the edge, you could cause an air
leak from the outside into the compartment, reducing the flow from
the debris collection nozzle. Depending on the extent of the air leak,
filter life is reduced and a low flow error message may appear on
your workstation.
-
Close the cabinet lid by pressing down on it until you hear the latch
click.
- Wash your hands.
|

