Home | Contact Us | Submit Troubleshooting Info | Search | Help


    Output | Software Solutions | Proofing | Color, Screening and Calibration | Scanning | Digital Photography | Consumables | POS


Field Change Order D173 to Prevent Cup Marking

Applies to:    Trendsetter Autoloader Priority = Next failure
Reason = Reliability
Release date = 12 November 1999

Machines affected

Machines with Version 2 Pickers only

Component

Picker
Problem This upgrade ECO D173 is designed to prevent the suction cups from marking the emulsion on the plates. It is specific to Version 2 Pickers only. A separate kit and procedure exists for Version 3 Pickers (see FCO D174).
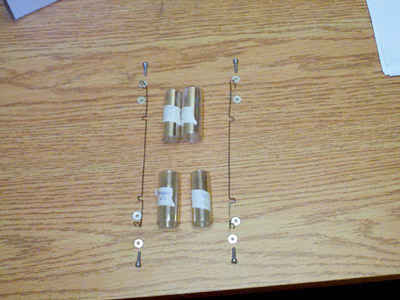
Solution(s) Install upgrade kit 05-0136 which contains a thin polycarbonate film that is held in front of the suction cups.
Parts needed Upgrade kit #05-0136:
upgrade_kit.JPG (49496 bytes)
Procedure Determine which version of picker you have. You can check the 100 label numbers: a version 2 picker has 5, 8, and 12 implemented. Or if you check visually, a version 2 picker has:
  • valveless cups (no buttons in the center of the cup)
  • top of the picker up/down rails attached to the load table with a small bracket. (See photo)
  • bottom of the rail should be attached with one cap head screw through a plain hole (not counter sunk) in the very bottom of the rail (see photo)
  • bracket that attaches to the top of the picker head cylinder has a square, not angled, top and the cylinder has a 2 inch stroke. (see photo)
  1. Enter >>PICKER UP and then >>PICKER IN.
  2. Open the bay door by defeating the latch with a credit card or a ruler.
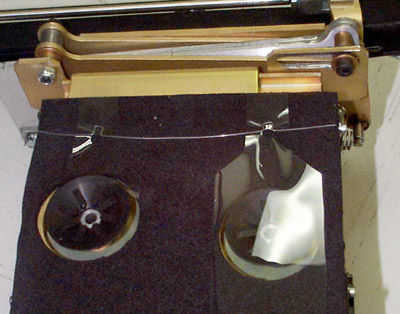
  3. Attach the wire hangers to the last fasteners on the top and bottom of the picker head. Install both hangers so that the two hooks in the middle point toward the outside of the machine. Sandwich the wire hanger between the two washers.
    wire_on_picker.JPG (30221 bytes)
  4. Tighten down one side only so that the wire just touches the foam face on the top and bottom. Leave the other side loose so that the strip can be snapped overtop of the hooks.
    mylar_on_wire.JPG (53263 bytes)
  5. Remove the protective film on both sides of the Mylar (it should be clear, not foggy). Remove the wax paper to expose the double sided tape near the middle of each film.
  6. The top and bottom strips are different, the bottom has a large hole in the mid span of the Mylar. Install both on the hooks on the wire hangers. If you put your finger over the hole that you are putting the hook through, you can feel if the hook has entered the hole.
    finger_over_hole.JPG (40012 bytes)
    hook_through_mylar_hole.JPG (53591 bytes)
  7. Once both Mylar strips are in place tighten the side of hanger that was left loose. As you do, push it sideways so that you tension the Mylar strip on the top and then again on the bottom. At the same time make sure that the wire is touching the foam face of the picker. Rub the double sided tape area of the mylar to ensure good adhesion to the picker foam face.
  8. If you installed this kit on a 3244, mark off box #19 on the 100 label. If it was installed on a 3230, mark off box #2 on the 100 label. (See note below.)
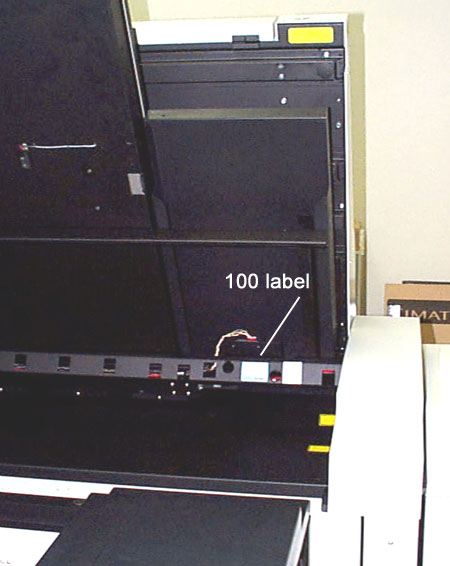
Action Required Find the 100 label number on the left side of the machine on the unload table frame. You may need to remove the side cover  (the table must be down to remove cover). Move the >>TABLE UP and find the sticker. See photo showing location of 100 label.
Mark as change #19 on the ECO/100 label if you are upgrading a TS 3244 base.
Mark as change #2 on ECO/100 label if you are upgrading a TS 3230 base.
Submitted by: smontague@creo.com
Date modified

    Copyright © 2005 Creo Inc. All rights reserved. Confidential. Back to top.