Home | Contact Us | Submit Troubleshooting Info | Search | Help


    Output | Software Solutions | Proofing | Color, Screening and Calibration | Scanning | Digital Photography | Consumables | POS


Base Trendsetter VLF

Objectives:

  1. Determine the system centerline.
    Using the floor layout drawing and a measuring tape, mark the floor at each end of the autoloader system.
  2. Position the centerline laser plane (#90-1120) outside the work area.
    Note: The laser will maintain the centerline throughout the installation. Do not move the laser at any time during installation.
    1. Set the tripod at 1.5m elevation above the floor.
    2. Assemble the laser plane for vertical plane operation.
    3. Mount the laser plane to the tripod.
    4. Level the laser plane using the bubble level.
    5. Turn the laser on.

    WARNING!  Do not look directly into the laser beam.

    1. Adjust the position of the tripod and the rotation of the laser plane until the reference marks on the floor are met ±1mm. The laser plane will now be displaying the plane that marks the autoloader system centerline.
    2. Point the laser to the floor under the tripod and mark the position for reference.
  3. Position the Trendsetter VLF in its approximate location according to the floor layout (±12mm).
    1. Using a measuring tape, check the distance to the processor (if it's there) or to a nearby wall or post.
    2. Roll the machine into the correct position.
    3. Verify the distance on the floor layout diagram.
  4. Remove all seven side panels from the machine.
    This will give access to the engine, fan box and power box. Place the panels in a safe location.
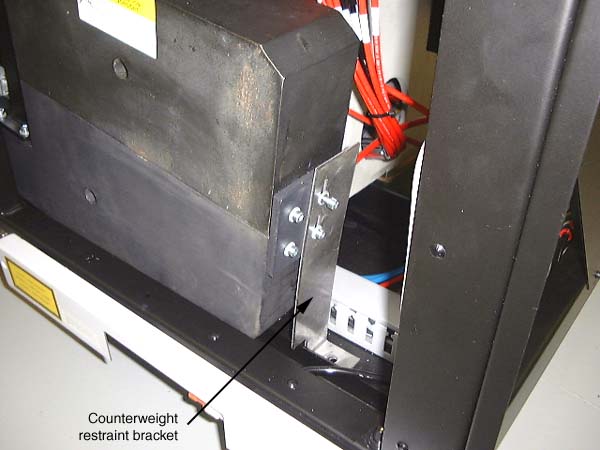
  5. Remove all internal packing material - do a thorough search of the machine for any bits of protective foam that will prevent correct operation of moving parts; particularly under the LEC flap. Remove the counterweight restraining bracket shown below - it is the aluminum angle bracket that holds the counterweight in place during shipping:

    _images/VAL_counterweight_bracket.jpg (44974 bytes) Counterweight restraining bracket
  6. Open the electronics card cage and check that all circuit boards are properly seated.
  7. Install the table bumpers that were removed for shipping.
    The table bumpers on some Trendsetter VLFs rest on the front panels. For those machines, you must replace the panels after installing the bumpers. For other machines, the bumpers rest on the top frame.
For SCU installation, proceed to step 8; For MCU installation, proceed to step 9.


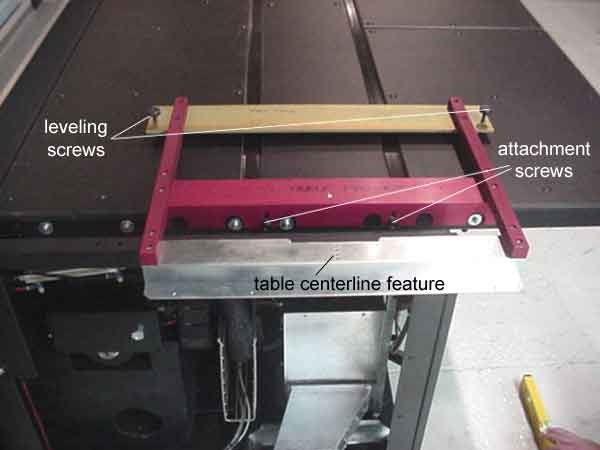
  1. Attach the table fixture (#92-0369) to the table edge on the cassette side, then level the fixture.

    See the drawing: Superjig table fixture

  2. Table fixture (attached to pick side of table)

    1. Check that the table is down.
    2. Place the table fixture on top of the table.
    3. Set the height of the fixture's pivot:

      For a Table Left Side pick, rotate the pivot fully clockwise.
      For a Table Right Side pick, rotate the pivot fully counter-clockwise.

    4. Place the retainer below the table (the retainer is required if the table does not have permanent nuts installed).
    5. Loosely fasten the screws through the table edge. You may want to open the p-door and raise the table to make this task easier.
    6. To adjust the table fixture level:
      • lower the table
      • calibrate the digital level
        • turn it on and let the display settle
        • Press the Calibration button.  'cal1' will appear on the display.
        • Wait a few seconds till the display has settled again.
        • Turn the level around 180° and press the Calibration button again.  'cal2' will appear on the display.
        • Wait a few seconds till the display has settled again.
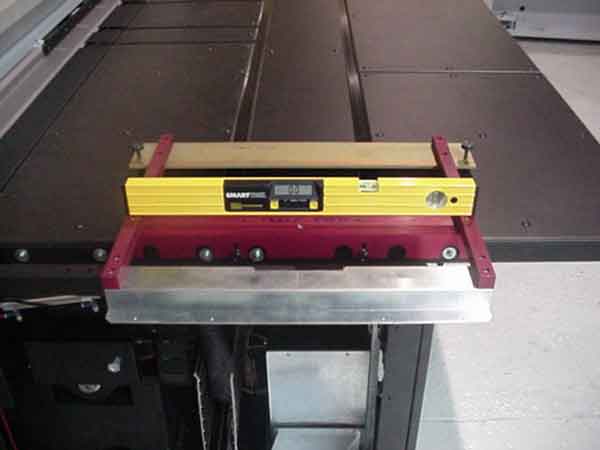
      • place the calibrated digital level on the side bar of the fixture, then across the front and rear bars simultaneously
      • rotate the leveling screws to adjust the level in both axes to 0° ±0.1°.

    Leveling the table fixture

    1. Tighten the retaining screws.
    1. Align the Trendsetter VLF to the system centerline laser.
      1. Turn on the laser plane. Recheck that the laser is still in position, and is level.
      2. Check the centerline reference marks on the table fixture.
      3. Roll the machine until the laser touches both edges of the centerline marks (one on the table edge and one on the table fixture).
      4. Turn off the laser plane.


    2. Set the coarse Trendsetter VLF height using the 3 adjustable feet.
      Lay on the floor, reach under the machine and rotate each adjustable foot down from the fully 'up' position - three full turns for an SCU and two full turns for a MCU. Use the adjustable foot wrench as required.
      Note: The position of the Trendsetter VLF will probably shift slightly when the castors are removed. It will need to be realigned.
    3. Position the floor plate (SCU installations only).

      Note: If the floor plate has been shipped in pieces, re-assemble it by following the instructions in Assembling the Floor Plate.

      1. Slide the floor plate under the Trendsetter VLF.
      2. Attach the floor plate alignment fixture (#92-0371) to the table fixture.
        See the drawing: Superjig floor fixture
      3. Suspend the plumb-bobs (#90-1125) from the floor plate fixture so they hang just above the floor plate.
      4. Align the holes in the floor plate under each of the plumb-bob tips. Use a mallet, if needed, to bump the floor plate into position. Placement doesn't have to be exact as further adjustments will be made after the castors are removed.

    Positioning the floor plate

    1. Position the 4 lifting jacks (#92-0084).
      1. Place the lifting bars (#56-3266) through the square holes in the engine casting.
      2. Check that the hose tray is up out of the way of the lifting bars.
      3. Slide the lifting jacks into the tube ends. Make sure the jacks go in all the way.
      4. Place 2 white plastic slide plates (#57-8573) under each jack.
    2. Raise the Trendsetter VLF and remove the castors.
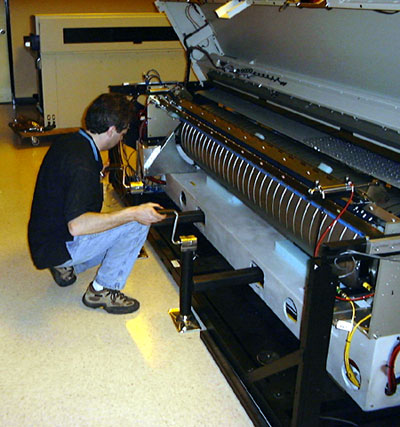
      1. Carefully raise the jacks until the bars are bearing against the top of the engine casting holes at all 4 points.
      2. Place a wood block (#59-3808) under each corner of the VLF Trendsetter for safety.
      3. Raise the jacks, alternating between the 4 jacks so that the machine is kept level.

      4. WARNING! Do not let any of the lifting points get significantly higher or lower than the others, as this could twist the frame or cause instability.
      5. Stop lifting when the castors are off the ground and there is room to remove the castor screws.
      6. Check that the wood blocks are still positioned correctly under the corners of the machine.
      7. Remove the 4 screws holding each castor to the Trendsetter VLF frame.  Save the castors and screws at the site in case the machine has to be moved again in the future.

        Using jacks to raise and lower the Trendsetter VLF

    1. Lower the Trendsetter VLF.
      1. Check the position of the floor plate (SCU installations only).
      2. Make sure that the power box and fan box pucks (pod feet) are fully up. If they are resting on the ground, raise the VLF Trendsetter using the jacks and rotate the adjustable feet down (1 full rotation = 7 mm height).
      3. Lower the jacks evenly until the lifting bars are no longer touching the engine casting.
      4. Note: Do not remove the jacks and lifting bars yet.

    2. Check that the engine is level.
      1. Place the calibrated digital level (#90-1150) along the casting under the drum and take a reading. It should be 0° ± 0.1°.
      2. Rotate it 90° and place it on a motor plate beside the drum. You may need to open the hood to place the level. Be careful of the p-door. Take a reading. It should be 0° ± 0.1°.
      3. To adjust the engine level:
        • Using the adjustable foot wrench, rotate the appropriate adjustable foot in the direction of least deflection
        • Recheck the engine level
    3. Recheck the centerline position. For SCU installations only, also recheck the floor plate position.
      To adjust the alignment of the Trendsetter VLF:
      • Lift the Trendsetter VLF evenly, using the jacks, until the adjustable feet are all 3 mm off the floor.
      • Push, pull or bump the Trendsetter VLF and/or the jacks until the position is correct.
        Sit on the floor an kick on the corner of the base frame. Don't push or pull on the table or the fixtures. The machine will slide on the white plastic plates.
      • Lower the jacks evenly until they are loose.
      • Recheck the centerline position. For SCU installations only, recheck the floor plate position.
      • Recheck the distance from the edge of the table to the conveyor and to the processor.
      • Repeat the adjustment if needed.
    4. Check that the table is level at both ends. It should be 0° ± 0.5°.
      Press gently on the table while reading the calibrated digital level.
      Table levelness is most important at the cassette end, where the pick happens.
      Adjust the table to 0° on the pick side. If the conveyor side of the table is more than ±0.5°, then adjust the whole table until the conveyor side is ±0.5°.

      WARNING! Tilt the p-door out of the way before lifting the table. Failure to do this will bend and damage the table and/or p-door.

    5. To adjust the table level:

      • Adjust the four bumpers underneath the table.
      • If the table still isn't level, use the adjustable foot wrench to rotate the front center foot and tilt the front of the VLF Trendsetter up or down slightly, to 0.4° maximum, front to rear.

      WARNING! Do not tilt the Trendsetter VLF from side to side.

    6. Remove the plumb-bobs and the floor plate fixture (SCU installations only).
    7. Attach the table fixture now if you are installing an MCU - see step 8.
    8. Recheck that the table fixture is level (0° ±0.1°).
    9. Adjust the power box and fan box pucks (pod feet).
      Rotate the pucks down by hand until they are just touching the ground, then rotate them down a half turn more.

      WARNING! Do not lower the pucks further or the frame will twist.

    10. Remove the jacks, sliding plates, and lifting bars.
      If you are installing a SCU, remove and store the lifting bars onsite for future use - usually in the back of the machine. If you are installing a MCU, leave the lifting bars in place until you need them for the MCU installation.
    11. Lower the hose tray to its lowest position.
    12. Check the shop air system pressure, using the air supply gauge (#92-0373A).
      See the Air Supply Qualification Procedure in Section 6.1 of the Trendsetter VLF AL site preparation .
    13. Install an air fitting onto the Trendsetter VLF.
      1. Check that the Autoloader shut-off valve, in the supply line after the regulator, is OFF.
      2. Connect the shop airline.
      3. Set the Trendsetter VLF internal pressure regulator in the fan box to 80 psi. You may need to remove an access panel.
      4. Replace the access panel if it was removed.

    Copyright © 2005 Creo Inc. All rights reserved. Confidential. Back to top.