Mac - TCP/IP, NFS
Protocol Configuration
NOTE: The TCP/IP address and host name configured in the
Hosts file are the default configuration.
- If the IP address of the Ripro Server is not the default address or
the Mac you are configuring is not on the first ethernet board (see screen below), you
have to add the Ripro's othe IP addresses. Double click the Hosts file in the Macintosh
System Folder.
- The last line in the folder is the Host Name and IP Address, type in
the correct IP address and Host Name and then close the file.
- If you have more than one server on the network, you must also enter
its Host Name and IP address in the Hosts file.
- Where there is more than one server you must also duplicate all the
documents (applications) and change the Host Name in each document.
Version 7.5.3 should be installed
TCP/IP Configuration:
- Choose "Ethernet" option
- Choose "More" -> obtain IP address manually
- Network mask should be identical to Ripro mask
- Gateway address - give Ripro adapter's address
TCP/IP Test:
- Restart the PCI Mac
- Ping from another station.
To configure the IP address for each one of the Mac's on the
Network.
- Verify that the MacTCP control panel from the Ripro Server has been
copied into the Control Panel of the Mac.
- The initial IP addresses 192.9.100.1 for en0 and 192.9.100.2 for et0
are allocated to Ethernet Board0, and IP addresses 192.9.110.1 (en1) and 192.9.110.2 (et1)
are allocated to Ethernet Board1.
Refer to Scitex IP Addresses
for Scitex IP recommended addressing structure.
- To verify the zone of your Mac, open the Network in the Control
Panels, the zone will appear in the Current Zone box.
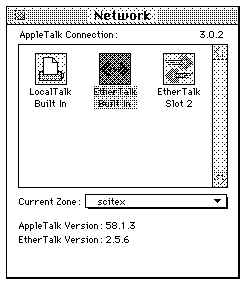
- For older AppleTalk Versions where the "Current Zone" box
does not appear, you can determine the current zone of your Mac by opening the Chooser,
the highlighted zone is your current zone.
- Double click the MacTCP control panel and click the More button to
display the following configuration window:
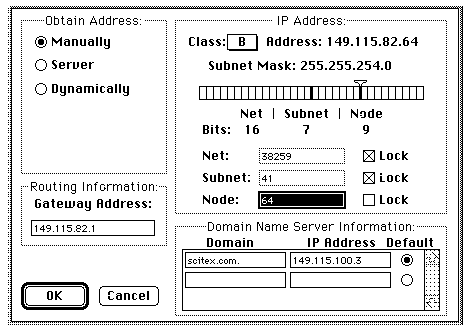
- Select Manually in the upper left corner of the window (Obtain
Address) and click OK. This returns you to the MacTCP Control Panel.
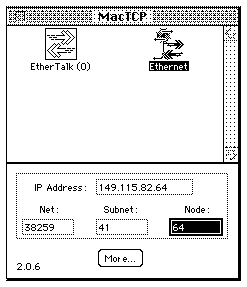
- Select the Ethernet icon in the upper part of the control panel, then
enter the desired IP address (as allocated by the system administrator) in the MacTCP
Control Panel and click More.
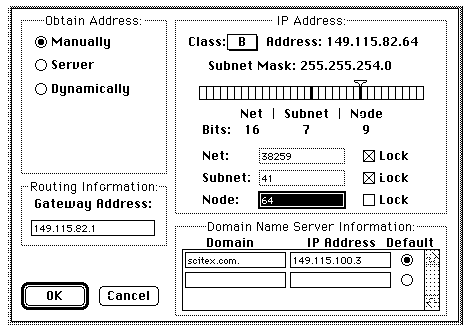
The MacTCP Configuration window reappears with the IP address updated and including the
appropriate default Subnet Mask (255.255.255.0) .
- Select Dynamically in the upper left corner of the screen and click
OK.
Selecting Dynamically means that the node portion of the IP address is assigned
dynamically when you start up the computer.
- Restart the Mac to load and activate the MacTCP driver.
NOTE: Each station on the network must have a unique IP address.
(Between Macintosh Workstations and the Ripro Server)
Where there is an external router between the Macintosh workstations
and the Ripro server, the IP numbers and the Subnet Mask will be supplied by the network
administrator at the site according to the network and the routers and/or routers
configuration. The MacTCP configuration should be done according to this information
together with the network administrator. If you are connected to the Ripro via a router
you need to fill the Gateway Address of the router in the Gateway Address of the MacTCP
configuration window.
The default Host Name is RIPRO1, if you have changed the name of
your Ripro Server host proceed as follows:
- Double click the application for which you wish to change hosts (for
example Set_Hot_folder).
The applications are in the Ripro Applications folder which is found on the Mac after it
has been installed.
The Remote menu strip appears.

- Select Remote and from the drop down menu select Edit Command.
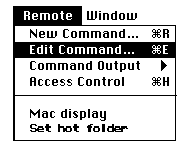
- The Remote Commands dialog box appears with the two Application
documents in the left hand panel, select the first one and then select Edit.
- Select Host from the Edit Remote Command window.
The MacTCP Connection Tool window now opens.
- If the host you require is in the Host List window, then select it.
If not type in the required Host Name or IP address in the text box labeled Host Name or
Address.
- When you have finished click OK.
- The Edit Remote Commands window opens.
- Click Set at this window.
- At the Remote Commands dialog window select the next application
document and proceed exactly as needed.
- When the host name has been changed for each application document;
select each application document in turn from the Remote Commands dialog window and click
Execute to confirm the process.
- If you have more than one server, make a new folder with all the
applications and proceed to enter the Host Name as explained above. Make sure that the new
(additional) Host Name and IP address are also listed in the Hosts file.
- Select the Apple icon and Select Control Panels.
- Double click on Sharing Setup, and the Sharing Setup screen appears.
- Ensure that the Program Linking module is On.
|

