Home | Contact Us | Submit Troubleshooting Info | Search | Help
Output | Software Solutions | Proofing | Color, Screening and Calibration | Scanning | Digital Photography | Consumables | POS
Home | Contact Us | Submit Troubleshooting Info | Search | Help
Output | Software Solutions | Proofing | Color, Screening and Calibration | Scanning | Digital Photography | Consumables | POS
Problem: |
How do I align to punch? |
Explanation: |
Align to punch is performed from the Brisque. |
Solution: |
Configure the output device in the Preps application. Refer to the table below, as to which imagesetter you are exposing to, and punch system installed. |
The Align to Punch procedure needs to be performed only once. Once the alignment offsets for a given output device have been determined for a specific punch system, JTTs that include an expose operation need to be changed to reflect this information.
You may edit the default expose operation, once this has been done, all new JTTs will include the alignment offset information.
See the appropriate appendix for information on how to set alignment for you specific punch setup:
| Punch System | Appendix |
| Dolev 800 | |
| 4Press Bar (Head) Punch | |
| 4Press Side Punch |
Output one film with the default parameters to check the current punch location. If it is not correct you will need to enter the alignment parameters in the Punch Parameters dialog for the device that you are configuring on the Brisque.
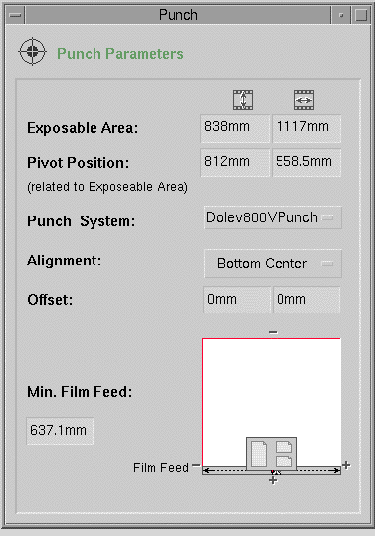
Make sure that that when you expose the film on the Brisque the Punch System should be the one you are defining (usually only one installed on the Dolev 800). The Alignment should be "Bottom Center".
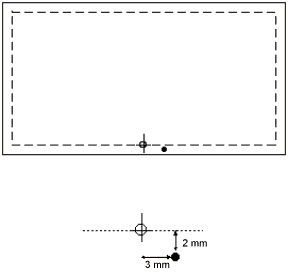
In the following example the punch hole is 2 mm down and 3 mm right from where the punch should be.
From the Expose Operation Dialog choose Punch Parameters:
To move the image 3 mm to the right along the Horizontal axis, enter 3mm in the Horizontal field.
To move the image 2 mm down along the Vertical axis, enter 2 mm in the Vertical field (a positive number was entered because the Brisque aligns from the Top Left).
You will see the image move graphically on the display.
Output one film with the default parameters to check the current punch location. If it is not correct you will need to enter the alignment parameters in the Punch Parameters dialog for the device that you are configuring on the Brisque.
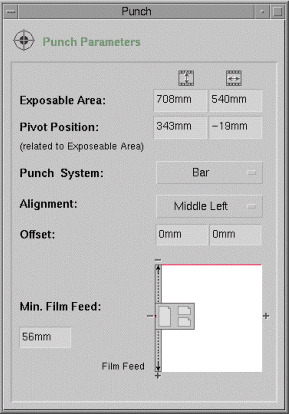
Make sure that that when you expose the film on the Brisque the Punch System should be the one you are defining (usually called Bar Punch or Head Punch). The Alignment should be "Middle Left".
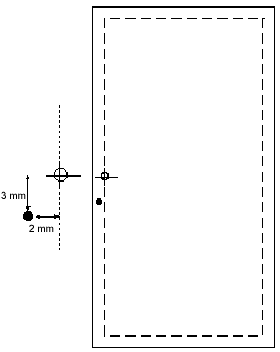
In the following example the punch hole is 3 mm down and 2 mm left from where the punch should be.
From the Expose Operation Dialog choose Punch Parameters:
To move the image 2 mm to the left along the Horizontal axis, enter -2 mm in the Horizontal field.
To move the image 3 mm down along the Vertical axis, enter 3 mm in the Horizontal field (a positive number was entered because the Brisque aligns from the Top Left).
You will see the image move graphically on the display.
Notes:
- Make sure that your Preps template is wide (landscape) and that the page size that you choose in the printer definition is tall (portrait).
- This differs from the PostScript workflow, where the page size would be wide (landscape).
Output one film with the default parameters to check the current punch location. If it is not correct you will need to enter the alignment parameters in the Punch Parameters dialog for the device that you are configuring on the Brisque.
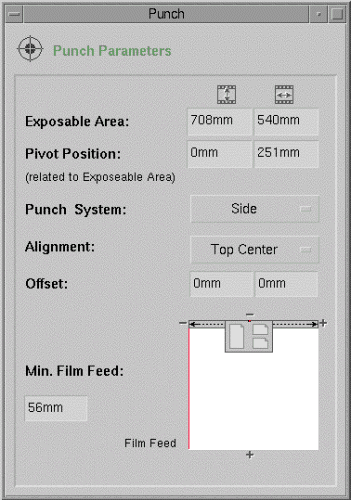
Make sure that that when you expose the film on the Brisque the Punch System should be the one you are defining (usually called Side Punch). The Alignment should be "Top Center".
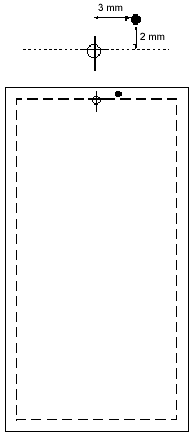
In the following example the punch hole is 2 mm up and 3 mm right from where the punch should be.
From the Expose Operation Dialog choose Punch Parameters:
To move the image 3 mm to the right along the Horizontal axis, enter 3mm in the Horizontal field.
To move the image 2 mm up along the Vertical axis, enter -2 mm in the Vertical field (a positive number was entered because the Brisque aligns from the Top Left).
You will see the image move graphically on the display.
Note:
Make sure that your template is tall (portrait) as well as the page size that you choose in the printer definition.