Home | Contact Us | Submit Troubleshooting Info | Search | Help
Output | Software Solutions | Proofing | Color, Screening and Calibration | Scanning | Digital Photography | Consumables | POS
Home | Contact Us | Submit Troubleshooting Info | Search | Help
Output | Software Solutions | Proofing | Color, Screening and Calibration | Scanning | Digital Photography | Consumables | POS
I choose the centering option in Preps, but when I Preview, Improof or Expose my IMPO job, the pages appear off-center. How can I prevent this from happening?
In some instances, a document may not be centered within the PostScript page that contains the document. This may be caused either by inherent problems from within the layout application that was used to create the PostScript file, or the in the way the actual PostScript file was created.
There are 2 alternative methods for creating centered pages:
The following instructions will explain how to create centered PostScript pages in FreeHand, PageMaker and QuarkXpress.
The following table describes which ScitexBrisque28... PPD’s are required for FreeHand, PageMaker, and Quark Xpress. The following versions of these applications are supported by the PPD’s: FreeHand 5.0 5.5 7.0, PageMaker 5.0 5.5 6.0 6.5, and Quark Xpress 4.0 4.01.
| Product | Platform | PPD’s Name | Which Driver to use? |
| Brisque ver 2.8 |
Macintosh |
|
|
| Brisque ver 2.8 |
Macintosh Japanese version |
|
|
| Brisque ver 2.8 |
Windows |
|
Refer to the "Windows Notes" at the bottom of this table. |
| Brisque ver 2.8 |
Windows Japanese |
|
Refer to the "Windows Notes" at the bottom of this table. |
Both of these versions of FreeHand and PageMaker will center the documents within the PostScript pages.
Two problems may arise when defining either Metric or Custom Page Size parameters in the FreeHand and Quark Express applications. We describe these prolems, and how to correct them.
Pages created in millimeters may pose a problem if the paper size chosen (when printing the document) is not in full points.
Custom pages, created in millimeters, can be printed in two different ways:
Option 1:
Option 2:
The second option requires that you change your preferences to points, but will give you a final page size that is more exact.
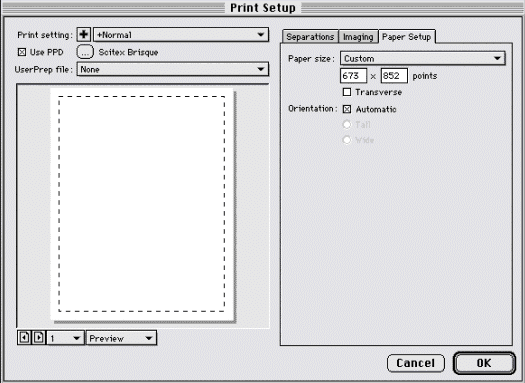
Two issues must be considered when dealing with pages created via Quark Xpress 4.0 and 4.0x: pages that contain bleeds, and metric pages.
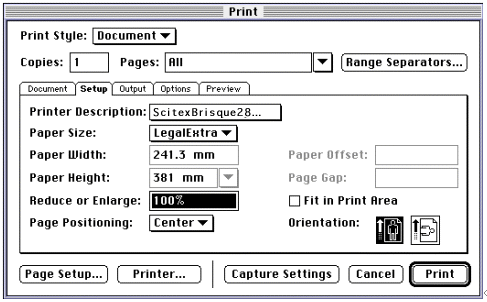
Quark Xpress has bug that causes metric pages (A3, A4, A5, etc.) to not center properly within the actual Postscript page size. If you need to center the page exactly within the crop marks, then you should use the following workaround:
Converting the working dimensions from millimeter to points
Pages that are created in millimeters (such as A3, A4, A5 and custom size) need to be converted into whole points in order for Quark to perfectly center the page within the crop marks. The following table displays width and height dimensions for the standard metric pages sizes, converted from millimeters to whole points:
MM
POINTS
Name W
H
W
H
B1 707
1000
2004
2835
B2 500
707
1417
2004
B3 353
500
1001
1417
B4 250
353
709
1001
B5 176
250
499
709
A0 841
1189
2384
3370
A1 594
841
1684
2384
A2 420
594
1191
1684
A3 297
420
842
1191
A4 210
297
595
842
A5 148
210
420
595
If your document size does not appear in the table, you need to manually convert the dimensions of the page size to points with the following formula:
x [mm] * 2.8346 = y [points]
After you use the formula to covert to points, round off the result to the nearest whole point.
For example, 150mm = 150 * 2.846 = 425.19pt. Then after rounding off, the final point value is 425pt.
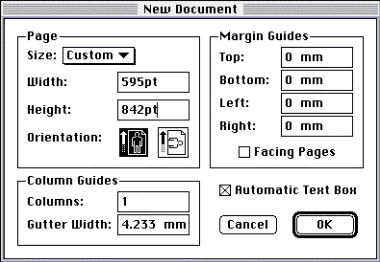
After you have converted your document from millimeters to points, and the page size is a standard size, may use the document as you would for a US Standard page size (such as US Letter, Legal and Tabloid). However, if the page size you defined is not a standard size, continue to the next step.
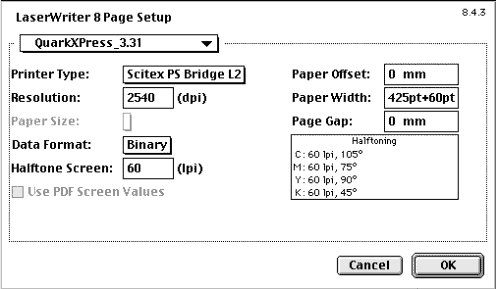
Printing a custom sized page (non-standard size):
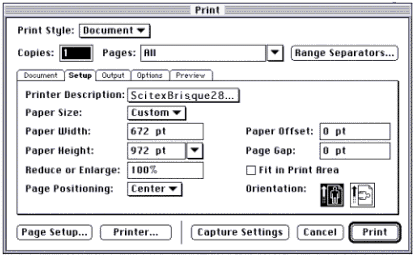
| Note: | If the Document Measurement preferences are defined as millimeters, you do not need to change the Preferences to points. Enter the sizes in points followed by pt (as shown in the figure). |
Two issues must be considered when dealing with pages created via Quark Xpress 3.31 and 3.32: pages that contain bleeds, and metric pages.
US standard pages sizes that contain bleeds must be printed using Centered Registration Marks. In order for these pages to be properly centered, the right amount of extra space must be provided in the selected page size when the Quark document is printed. The size of the page must be the original document size plus 30 additional points for each direction.
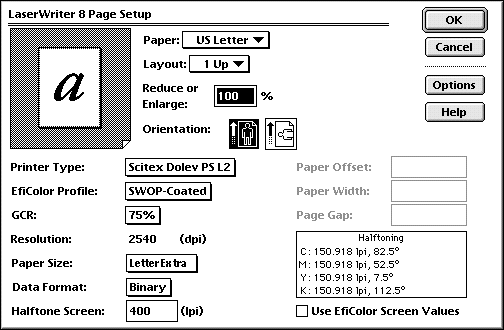
Because of a rounding-off bug (from millimeters to points) in Quark Xpress 3.31 and 3.32, metric pages (A3, A4, A5, etc.) to not center properly within the crop marks. To center the pages exactly within the crop marks, you need to either create the document in whole points, or convert them from millimeters to points.
You do not need to work in points in order to change the dimensions of the document. In the Document Information window, enter the size values in points, followed by pt. Quark Xpress will then convert the point values into the Document Measurement units defined in the Preferences window.
The following table displays the millimeter:points conversions for standard metric page sizes.
MM
POINTS
Name W
H
W
H
B1 707
1000
2004
2835
B2 500
707
1417
2004
B3 353
500
1001
1417
B4 250
353
709
1001
B5 176
250
499
709
A0 841
1189
2384
3370
A1 594
841
1684
2384
A2 420
594
1191
1684
A3 297
420
842
1191
A4 210
297
595
842
A5 148
210
420
595
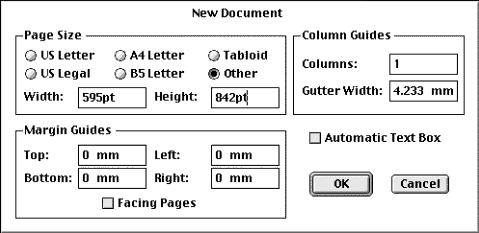
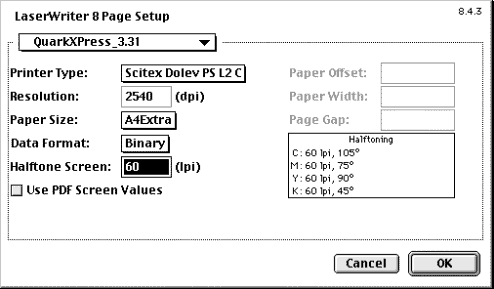
For example, 150mm = 150 * 2.846 = 425.19pt. Then after rounding off, the final point value is 425pt.
You can now print the document.
| Note: | You do not need to be working in points to add the width in points. Enter in the width followed by pt (as shown in the figure above); the points value will be converted to the Document Measurements defined in the Parameters window. |
The Super Crop plug-in for Adobe Exchange 3.0 or later enables you to crop the current page or all pages to a specified region, to the bounding box of the page or revert to the last saved version of a PDF. Cropping is the process of selecting part a page in a PDF document and discarding the rest of the page.
The Super Crop plug-in is available free of charge from the Adobe website: http://www-pac.adobe.com/prodindex/acrobat/30plugins.html#crop. Instructions for the installation of the plug-in are available on the same website. The use of this plug-in is at your own risk, and CreoScitex takes no responsibility for any unwanted or irreversible effects that may be caused after its installation.
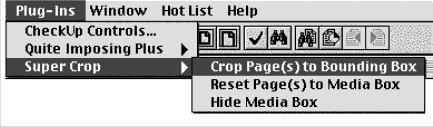
For the Super Crop plug-in to work, the input PDF file must include crop marks. First, open the PDF file in the Acrobat Exchange application. Then, to ensure that all PDF pages are centered for imposition, from the Acrobat Exchange menubar, invoke the Plug-Ins > SuperCrop > Crop Page(s) to Bounding Box command as displayed in Figure 1:
Figure 1:
The Bounding Box of a page is the smallest rectangular region that includes all the text and graphics on a particular page (the PS crop marks form the DTP Application are included). Cropping to the bounding box of a page eliminates extraneous white space at the margins of the page. The media box of a page is the original size of that page.
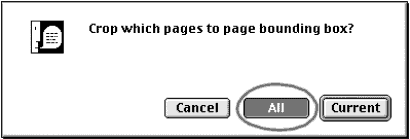
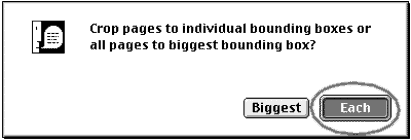
After selecting the Crop Page (s) to Bounding Box (as described in figure 1) a message appears (see Figure 2). Select ALL to crop all pages, and then Each in the following dialog box (see Figure 3) to crop each page to its own bounding box. (The Biggest option is for cropping all pages to the largest bounding box of all pages).
Figure 2:
Figure 3:
One this process has been completed, all the pages are centered by their bounding box, and are ready to be imposed.