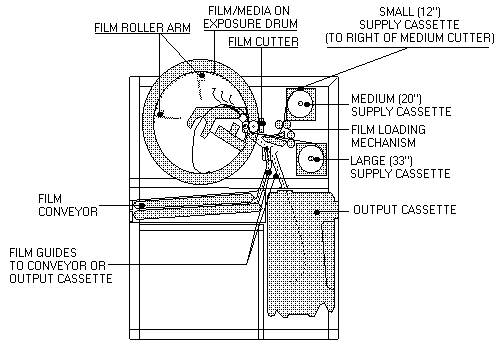
The Dolev 800 imagesetter accepts film, paper or polyester
plates. The media is loaded onto a loading cassette and inserted into the imagesetter. You
can select one of three loading cassettes: a small (12 in), medium (20 in) or large (33
in) cassette.
The Dolev 800 has an automatic film loading mechanism. Once
the film loading cassette is inserted, press the SET UP key on the control panel and film
loading begins.
The film is pulled between a set of rollers and onto the
exposure drum. The film is cut, and a vacuum system ensures that the film is held down on
the inner drum surface. During set up, the imagesetter cuts and ejects the first piece of
film. The reason for this is that a small piece of film was exposed to light when the
cassette was carried from the darkroom.
The next step is to expose the film. You choose your file,
file size resolution, and layout. The film is exposed and ejected. The ejected film is
sent to the output cassette, or to an optional inline processor.
Open the loading cassette compartment door. To remove the
small (12 in) or medium (20 in) size cassette, push back the locking bar.
Remove your cassette. Carry the loading cassette to the
darkroom.
The Large Cassette has a separate compartment outer door. It
is located on the front on the imagesetter. Open the door. Inside you see another
compartment door. The compartment houses the large (33 in) cassette. Open the door.
Remove the cassette. Carry the loading cassette to the
darkroom.
Check that the film* you plan to load on the cassette is in
the darkroom before you lock the door and turn off the lights.
(* Throughout the guide, the term "film" refers to all exposure media. Caution: All Dolev imagesetters require a bright cyan light source for film
development. Do not use red or yellow illumination!)
Close and lock the door to the developing room.
Light the bright cyan light.
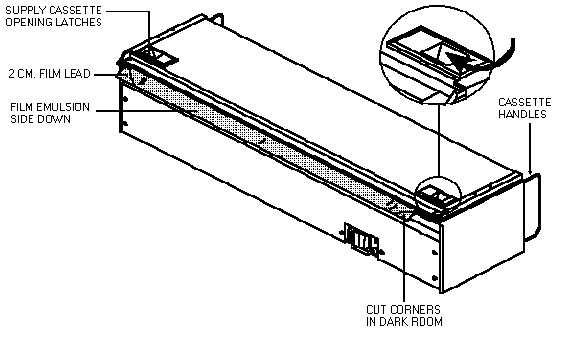
Open the loading cassette. Two latches secure the cassette
lid. To open the loading cassette, push the latches horizontally toward the center of the
cassette. Pull up on the lid until it is in a resting position.
Film supply cassette
Grasp the outer surface of both mounting rims and lift the
film spool out of the cassette.
Look at the mounting rim. It consists of two sections: an
inner ring that secures the rim to the spool, and an outer ring. Twist the inner ring.
Remove the rim from the spool.
If the cassette contains a film roll, remove it from the
spool. Place any unexposed film in a film case or container. Mark the container.
Place the new roll of film on the table. Note the film
position: rolled away from the cassette, emulsion down.
Grasp the spool by the fixed rim. Insert the spool through the
film roll.
Put the mounting rim in place on the spool. The inside surface
of the rim should be flush with the roll.
Tighten the removable rim by twisting the inner ring with the
tightening tool.
You are ready to put the film in the cassette. Lower the spool
into the cassette. The ends of the spool fit between the prongs of the cradle.
Place a short piece of film over the edge of the cassette and
shut the cassette lid. Allow 30 mm (approx. 1 in) of film to stick out of the cassette.
Check that the film is straight (parallel to the cassette lid).
Take a pair of scissors and cut the two corners of the film at
a 45o angle. This prevents film from jamming during loading.
You are ready to leave the darkroom and load the imagesetter.
Before you leave the darkroom, double-check that you have protected any unexposed film.
Open the loading cassette compartment door. If you are loading
the small or medium size cassette, push back the locking bar. Make sure the medium size
loading cassette is loaded on the left side and the small cassette is loaded on the right
side. The film must be extending from the bottom of the cassette on the side closest to
the imagesetter body.
Fold down the cassette handles.
Pull the locking bar forward. Close the film compartment door.
The large cassette has a separate outer compartment door. Open
the outer door. Open the interior compartment door. To mount the large cassette (33 in) on
the imagesetter, place it on the interior door and slide the cassette into place. Fold
down the cassette handles and close the cassette chamber door.
Close the film compartment door.
Use the "set loading" command to load and unload the
first film.
Caution: Do not open the output cassette until you
are in the dark area and the door is LOCKED!
Carry the unloading cassette to the darkroom. The room is
equipped with a bright cyan light.
Close the developing room door and lock it. Turn on the cyan
light.
Open the unloading cassette. Flick the two fasteners on the
front of the cassette to open.
Remove the films one at a time. Feed each piece of film into
the processor. You may find one narrow (less than 4 in/10 cm wide) strip of film in the
cassette. This is the piece of film that was exposed to light when a new loading cassette
was loaded onto the imagesetter. Dispose of this waste film.
Depending on your processor, you receive a signal from the
processor when you are allowed to feed each subsequent film. When you have fed the last
film into the processor and received the signal that the feed is complete, you may unlock
the door.
Note: Be sure to check the bottom and sides of the
cassette carefully for any film that may have slid into the base of the cassette.
Replace the output cassette on the imagesetter. Close the
imagesetter door.