Background
|
|
The objective of the testing resolution is to calibrate the optical head
so that the distance between two adjacent laser dots corresponds with
the file resolution.
Note: Test results do not depend on the plate type, size, or thickness,
so this test can be performed on any plate type that the customer uses.
|
Procedure
|
|
- Load a plate.
- Open the Lotem Calibration dialog box:
- For Lotem 400 Xpose—on the Xpose Utilities panel, double-click
LotemCalib.
- For Lotem 400—proceed as follows:
- In Brisque, from the Launch Pad, open the setup panel, and then
double-click Devices.
- In the Output Device Handling dialog box, in the Device section,
select Plate Setter > Lotem > Lotem400.
- In the Operations section, select Lotem Calibration.
- In the Lotem Calibration dialog box (example shown for Lotem Xpose),
from the Calibration Type list, select Resolution.
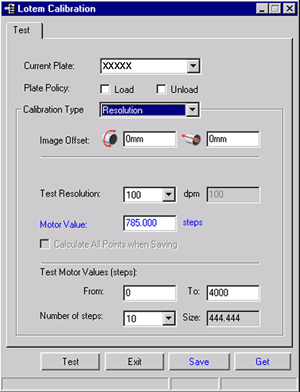
- Select the plate type:
- For Lotem Xpose—in the Current Plate dropdown list
- For Lotem 400—in Media
- Define the Plate Policy:
- Load plate—Automatically loads a new plate before the
test begins. If you clear this option, you can reuse a plate for additional
calibration tests.
- Unload plate—Automatically unloads the plate after the
test. If you clear this option, you can reuse the plate for additional
calibration tests.
- Define the Image Offset values:
Note: The (0,0) offset coordinate is located at the upper-left
corner of the plate. Use different offset values for each test when
you are using the same plate for several tests.
- Horizontal offset—The value around the drum in mm
- Vertical offset—The value along the drum in mm
- From the Test Resolution list, select the required resolution.
Note: Repeat the test for any other resolutions that the customer
uses.
- In the Test Motor Values (steps) area, define the motor values
range in the From and To boxes.
Note: The recommended range is ±100 motor steps of the default
motor value.
- From the Number of steps list, select a value of 10 or 11.
- Click Test to initiate the resolution test according to the
settings. The application performs several exposures.
- Develop the plate and examine the results.
- Based on the results, determine the optimal stepper motor value at
which the optical head is calibrated.
- Type the optimal stepper motor value in the Motor Value box.
- Click Save. The new motor value is automatically transferred
to Lotem Controller.
- If required, repeat the test for other resolutions that the customer
uses.
Note: Click Get to verify that you have the correct resolution
motor value.
|

