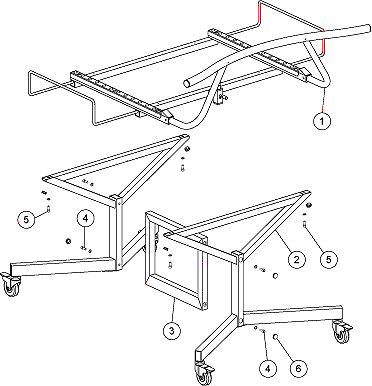
The Loading Cassette trolley includes four
assemblies. See Figure 2-2 (refer to numbers in brackets to
identify the various parts):
Top horizontal frame [1]
Two identical side assemblies, each assembly has two wheels
[2]
Inner vertical frame [3]
Screws and cups [4, 5, 6]
One technician is required to assemble the trolley, using a
flat Allen key.
Note: Do not tighten the bolts until
all bolts are inserted.
Attaching side assemblies to inner vertical frame:
Align the right side assembly with the right side of the
inner vertical frame, matching the holes. Insert two bolts [4] and 2 spring washers to
attach the vertical frame and the side assembly.
Repeat the above step to attach the left side assembly to
the left side of the inner vertical frame.
Attaching top horizontal frame: carefully lift the top frame
and place it on the side assemblies, with the handle facing upwards.
Align the top frame by matching the four threads of the top
frame to the four holes of the side assemblies. Insert the four bolts [5] and spring
washers (insert from the bottom side). Do not tighten the bolts.
The trolley height is pre-adjusted to 713 mm and there is no
need to adjust this height. However, you need to check that the trolley stands securely on
the floor, on all four wheels. Move the trolley to verify that all the wheels rotate
properly. For example, if the floor is not straight, you may need to adjust the trolley
leveling, by adding or removing washers to the bolts that connect the wheels.
When the trolley is properly leveled, first tighten the two
bolts of each side assembly, and then tighten the four bolts of the top assembly (it is
important to tighten the bolts in this order).
Insert four plugs [6] into each side assembly: two in
vertical frame and two in top assembly.
Figure 2-2: Loading cassette trolley assembly
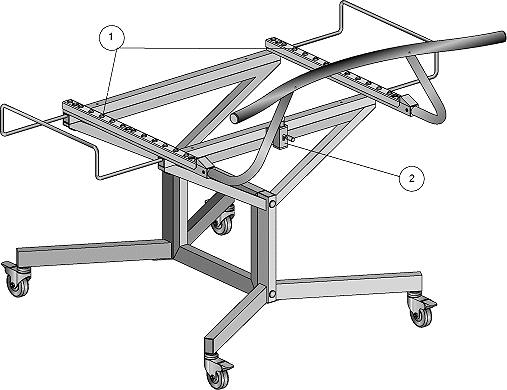
Figure 2-3 on next page shows the
trolley after assembly.
1 - two rows of bearings
2 - cassette lock Figure 2-3: Loading cassette trolley after assembly
Placing Cassette
The Cassette is supplied together with the Loading
cassette trolley, but packaged in a separate carton (bottom carton). It is recommended
that you unpack the cassette after the trolley is assembled, so that you can place
it directly on the trolley.
Open the top flaps of the Cassette carton.
Lift out the Cassette and place it on the Loading
cassette trolley. Verify that the cassette is placed on the two rows of bearings (item
1 in Figure 2-3, above). When the cassette is properly positioned
it is automatically locked in place by the cassette lock (item 2 in Figure
2-3, above).
Copyright
(c)1998 Scitex Corporation Ltd. All rights reserved. Certain names, logos,
designs, titles, words or phrases on this page may constitute trademarks, servicemarks,
or tradenames of CreoScitex Corporation Ltd. or other entities which may be
registered in certain jurisdictions.