
Home | Contact Us | Submit Troubleshooting Info | Search | Help


    Output | Software Solutions | Proofing | Color, Screening and Calibration | Scanning | Digital Photography | Consumables | POS


Lotem 800 Installation Guide
Lotem 800 Calibration

Previous Page  ToC  Next Page

Intensity Test

The objective of the Intensity test is to find the required laser intensity for optimal exposure at a resolution of 100 dpm. In addition, the drum speed value used to obtain optimal intensity is identified. The Intensity test results depend on the type of plate, so this test should be performed for each plate type; test results do not depend on plate size or thickness.

The optimal intensity for resolution 100 is identified. If other resolutions are requested, the PC controller automatically calculates the optimal intensity and drum speed values for the additional resolutions.

Note: It is recommended to perform the Res-Intensity test if additional resolutions are requested.

Test procedure:
  1. Load the plate you intend to use for this test.
  2. From the Brisque Launch pad, or from the Setup panel, double click the Calibration icon; the Lotem calibration window opens.
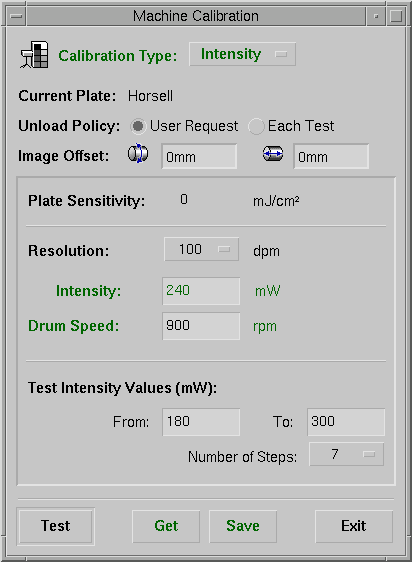
  3. Choose Intensity from the Calibration Type menu.
  4. intens.gif (11297 bytes)
    Figure 5-3: Lotem Calibration window - Intensity test

  5. Current Plate is automatically read from the PC Controller.
  6. Unload policy - see in Focus Test, previously:
  7. Image Offset - see in Focus Test, previously,
  8. Plate sensitivity is automatically loaded from the PC controller, according to the plate currently loaded.
  9. Resolution: choose 100 dpm.
  10. Intensity: after the test is completed, enter the intensity test result in this field.
  11. Drum speed: enter the drum speed value of the test. If optimal intensity results are not obtained, you should change the drum speed value and repeat the test.
  12. Test intensity values (mW): enter the desired intensity range for this test. Recommended: enter a range from 180 mW to 300 mW.
  13. Number of steps: enter the requested number of exposures in the above range of Test intensity values.
  14. Press Test to initiate the intensity test according to the above setting.

Note: Press Get to load a previous intensity test result from the PC controller.

  1. The application performs several exposures, according to the settings in the above window
  2. When the exposure is completed, develop the plate and examine the results.
  3. Based on the exposed plate results, if satisfactory results are not obtained, change the drum speed value and repeat the test.
  4. When satisfactory results are obtained, choose the optimal laser intensity that gives the best exposure. Enter this value in the Intensity field in the Intensity calibration window.

Note: The optimal drum speed value is the drum speed value in which the optimal intensity was obtained.

  1. Press Save to save the new intensity value and the drum speed value in the PC controller.
  2. Press Exit to exit from this window, or continue to another calibration test.

Copyright (c)1998 Scitex Corporation Ltd. All rights reserved. Certain names, logos, designs, titles, words or phrases on this page may constitute trademarks, servicemarks, or tradenames of CreoScitex Corporation Ltd. or other entities which may be registered in certain jurisdictions.


Top of Page  Previous Page  ToC  Next Page


    Copyright © 2005 Creo Inc. All rights reserved. Confidential. Back to top.