Home | Contact Us | Submit Troubleshooting Info | Search | Help


    Output | Software Solutions | Proofing | Color, Screening and Calibration | Scanning | Digital Photography | Consumables | POS


“DDB Card Switch to Application Failed” Error Message appears on ThermoFlex Mid and Narrow


Product

 
  • Kodak ThermoFlex Mid II
  • ThermoFlex Mid
  • ThermoFlex Narrow

Error


DDB Card Switch to application failed. The task DDB Card Download WCS Task failed. The task DDB CardStartUp Task failed.


Cause

 
  • DDB cable connections
  • DDB cable
  • L-box power supply
  • DDB Xilinx software loading
  • ThermoFlex Controller software loading process
  • DDB board

Solution

 
  1. Verify that the DDB cable is firmly connected.
  2. Replace the DDB cable.
  3. Check the L-box power supply.
  4. Manually load the Xilinx software:
    1. Verify that the L-box main power switch is on.
    2. Start ThermoFlex Controller and verify that the platesetter is in ready mode.
    3. In the Hardware tree, locate Boards > DDB card, and open the DDB dialog box.
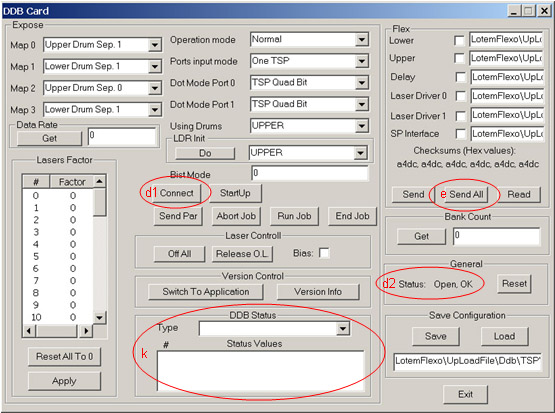
      Note: The next two steps are illustrated in the image following the procedure.
    4. In the DDB dialog box, press the Connect button (See [d1] in the image) and verify that the Status is Open, OK. (See [d2] in the image.)
      Note: If the status is not Open, OK, the problem is not caused by the Xilinx installation. Proceed to step 5.
    5. In the DDB dialog box, press the Send All button and wait about two minutes. (See [e] in the image.)
    6. At the end of operation, the following error message appears: DDB card returned illegal buffer length (opcode 83 returned 0 expected 2 to 2).
      The platesetter will be in ATTENTION mode.
      Note: This error message does not appear in all versions.
    7. Close the DDB dialog box.
    8. In ThermoFlex Controller, open the rear door of the platesetter. Wait a moment, and then close the platesetter door.
    9. In ThermoFlex Controller, open the DDB dialog box.
    10. In the DDB dialog box, click Connect.
    11. In the DDB Status area, in the Type box, select FPGA status register – 0.
      If the software loading and start-up is successful, in the Status Values box, 000 FF FF F7 F7 appears. (See [k] in the image.)
      If a different status value appears, repeat the procedure.
  5. Reload the ThermoFlex Controller software.
  6. Replace the DDB board and perform the Delay Calibration Test.

Note: It is highly recommended that you perform laser calibration to make sure that all diodes are calibrated. Then expose a customer job and check the laser quality.


Technical contact(s)
 

Viki Arviv

Submitted by
 

Viki Arviv

Date submitted
 

08 Mar 2006


    Copyright © 2005 Creo Inc. All rights reserved. Confidential. Back to top.