There are two methods of setting up the
TCP/IP connection between the Brisque and the Lotem:
Recommended
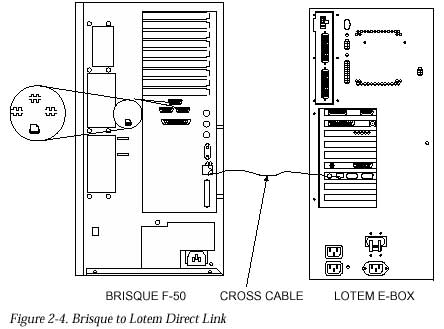
Connect the Brisque directly to the Lotem controller using the special network cross cable
(Cat# 199A02132) supplied with the Lotem.
Alternative
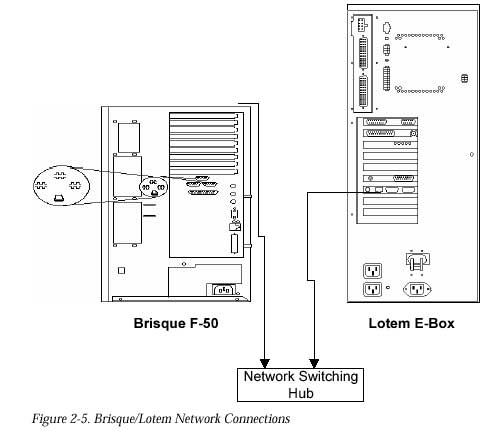
Connect both the Brisque and the Lotem to the site network infrastructure.
Setting Up TCP/IP
Connectivity Using a Cross Cable (Recommended)
The direct link solution involves
connecting the Brisque directly to the Lotem PC Controller using the special network cross
cable (Cat#199A02132) supplied with the Lotem, this cable cannot be used for network
connection.
This section describes how to set up the
TCP/IP connectivity via a direct link and includes the following procedures:
Connect the twisted pair network cable from the Brisque
(refer toError! Reference source not found) to the
network interface in the E-Box, located on the right side of the Lotem.
The PC
controller and the Brisque must have individual IP addresses.
Defining the IP Address on the
Lotem PC Controller
The Lotem PC Controller should already be
booted up with the Windows 95 startup screen displayed.
Power on the Lotem.
In Windows NT, select Start -> Settings-> Control
Panel. The Control Panel window opens.
Double-click the Network icon to open the Network
(viewing mode) window.
Select the Configuration taband then
double-click TCP/IP Protocol to open the TCP/IP Properties window.
Type in the IP Address (e.g. 192.9.100.2) and the Subnet
(e.g. 255.255.255.0)for the Lotem PC Controller and then click OK
twice.
Launch the application by double-clicking the Lotem
application icon.
Verify that the system executes the startup sequence.
Defining the IP Address on
the Brisque
At the Brisque command prompt, type smit tcpip.
From the SMIT TCP/IP menu, select Further Configuration
-> Network Interfaces -> Network Interface Selection -> Change/Show
Characteristics of Network Interface to open the Available Network Interfaces window.
In the Internal Address field type in the IP
address of the interface board (e.g. 192.9.100.1).;
In the Network Mask field type in the address of the Subnet
Mask (e.g. 255.255.255.0).
Toggle the Current Status field to Up and then press Enter;
an OK status now appears
Press [F10] to exit SMIT.
Setting Up
TCP/IP Connectivity via the Network (Alternative)
TCP/IP connectivity via the network involves
connecting both the Brisque and the Lotem to the site network infrastructure, and consists
of the following procedures:
Verify that the Brisque is connected to the network via the Fast Ethernet
board in slot#2 [2] (refer to
Figure 1-5, F-50 RearView.)
Connect the Lotem PC Controller E-Box network port to the
communication network switching hub (refer to figure below.)
Defining the IP Address on
the Lotem PC Controller
The Lotem PC Controller should already be
booted up with the Windows 95 startup screen displayed. The system administrator should
provide the IP address and the subnet mask.
Power on the Lotem.
In Windows NT, select Start -> Settings -> Control
Panel. The Control Panel window opens.
Double-click the Network icon to open the Network
(viewing mode) window.
Select the Configuration taband then
double-click TCP/IP Protocol to open the TCP/IP Properties window.
Type in the IP Address and the Subnet Mask for
the Lotem PC Controller and then click OK twice.
Launch the application by double-clicking the Lotem
application icon.
Verify that the system executes the startup sequence.